3D Part Inspection Is a Snapshot Away
A non-contact inspection system uses digital photography for accurate three-dimensional measurement of plastic parts.
A non-contact inspection system uses digital photography for accurate three-dimensional measurement of plastic parts. Developed by Eos Systems, this method is being employed in application development by plastics companies like Bayer MaterialScience. A major advantage of the PhotoModeler system is affordability—it costs only $895 per license—considerably less than coordinate-measuring machines and non-contact laser digitizers.
Detecting deformation
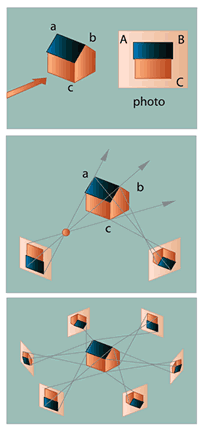
PhotoModeler software from Eos is based on the science of photogrammetry, an established measuring technique using photographs, which is mostly used for aerial mapping and analysis. Eos adapted the technology for close-range applications and has found uses in accident reconstruction, architecture, and industrial applications. In plastics manufacturing, PhotoModeler reportedly can be an effective tool for detecting deformation in thin-wall, complex parts. The system is particularly useful for curved or contoured surfaces where 3D measurements are difficult to achieve with traditional inspection tools.
Once the digital camera is calibrated by the PhotoModeler software, the user takes multiple photos of the part. Using automated target acquisition, the software can output a 3D CAD model of the part. In this task, the software can use various reference points such as corners or edges or targets (high-contrast circles) that are specified by the user.
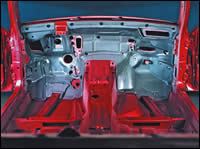
At Bayer, the measurement system is used both in the U.S. and in Germany to help develop new resins for applications such as injection molded automotive body panels. The company must quantify the extent of distortion in the panel that results from a range of weathering conditions.
Benefits vs. contact methods
Finding a suitable method to measure dimensional flaws in a 1-meter-long door panel was difficult, according to Ignacio Osio, principal engineer and manager of Bayer’s application engineering lab. A typical coordinate measuring machine (CMM) utilizes touch sensors that meticulously tap and record each point along a surface. According to Osio, it would be hard to find a CMM large enough to handle a 1-meter part, and painstakingly time-consuming to calibrate the CMM to measure all the curved surfaces. Moreover, there is the potential for physical contact with the part to skew the inspection results. Large CMMs are expensive too, costing up to $250,000.
Linear methods, too, have limitations in measuring curvatures and the same applies to electronic rulers, which would require many square measurements to accurately capture slight distortions of the curves.
To evaluate shrinkage and warpage, Bayer researchers subjected parts to a range of humidity and temperature conditions. The sample parts were photographed from multiple vantage points after exposure. After uploading the digital images into PhotoModeler, certain reference points from each view are matched and the data are converted into a 3D framework. “This part has some amount of sagging that is difficult to detect with a measuring device that is not three-dimensional,” said Osio. “We were even able to pick up some other distortion that is not easy to measure through other means.”
On the 1-meter body panel, Bayer was able to measure changes within 0.1 mm, which is the company’s requirement for inspection. According to Eos, PhotoModeler is capable of even greater detail by increasing the number of photographs and the number of matching control points. Bayer also uses Eos’ add-on automation module called Coded Targets ($395). This system recognizes the target and further automates the process.
Related Content
Try This Alternate Method for Heating Your Torque Rheometer
Rheometers are generally not on all the time. And most users have found that the first test run in the instrument after heating up is not very reliable and is usually discarded. Try this method instead.
Read MoreTracing the History of Polymeric Materials -- Part 30: Polyurethane
In the world of polymers, polyurethane chemistry is probably the most versatile. This a resulted in a wide range of products made from these materials and given the industry the flexibility to respond to the progressive march of regulatory concerns.
Read MoreHow to Improve Quality with Offline Inspection and Analysis
Automated sample testing with a light table detects the smallest contamination in flakes, micro granulates and sample test sheets.
Read MoreUpgraded CT Scanning and Multi-Sensor Coordinate Measuring Machines
Werth’s TomoScope S Plus 240 systems boast more than double the measuring volume as their predecessor with almost the same size.
Read MoreRead Next
Precision Processing Requires Precision Equipment
Moretto offers plastics processors and micromolders for a broad suite of auxiliary solutions targeted specifically for precision processing.
Read MoreBeyond Prototypes: 8 Ways the Plastics Industry Is Using 3D Printing
Plastics processors are finding applications for 3D printing around the plant and across the supply chain. Here are 8 examples to look for at NPE2024.
Read MoreLead the Conversation, Change the Conversation
Coverage of single-use plastics can be both misleading and demoralizing. Here are 10 tips for changing the perception of the plastics industry at your company and in your community.
Read More

