Boosting Extrusion Productivity-Part II of III: Optimize Product Changeover & Purging
Extrusion processors typically run a number of different products and resins.
Extrusion processors typically run a number of different products and resins. It’s not unusual for one extruder to run three or more different products in a 24-hr period. The change may be only in color, using the same base resin, or it may be from one resin to a completely different resin. It is not unusual for the changeover time to be 30 to 60 min. Two resin changes per day will thus cost 1 to 2 hr of downtime and scrap. Clearly, this will directly affect the profitability of any processing operation.
In these situations it is critical to have a short and efficient changeover with minimum scrap and downtime. Generally it takes less time to change over a small extruder than a large one. Changeovers are also typically shorter with high-speed extruders because the volume occupied by the plastic is small while the throughput is very high.
When resin changes need to be made it is important that the new resin can easily displace or purge the old resin. Some simple rules should be followed to allow the new resin to displace the old, “resident” resin effectively. If the new resin cannot displace the resident resin it can make sense to use a purging agent to flush out the old resin. Then the new resin is used to flush out the purging agent.
MELT DISPLACEMENT BEHAVIOR
The effectiveness of a new resin at purging the old is a function of the new resin’s melt-displacement behavior. That behavior can be determined from the melt velocity profile. In a melt channel filled with resident resin, the new resin will appear at the upstream end of the channel after time t0. It will appear at the location of the highest melt velocity. In pressure flow inside a circular or rectangular channel, the highest melt velocity will occur in the center of the channel, assuming the melt temperatures are uniform or symmetric around the center of the channel. Beyond time t0 the thickness of the new resin will grow from the center to the walls, with a corresponding reduction in the thickness of the resident resin.
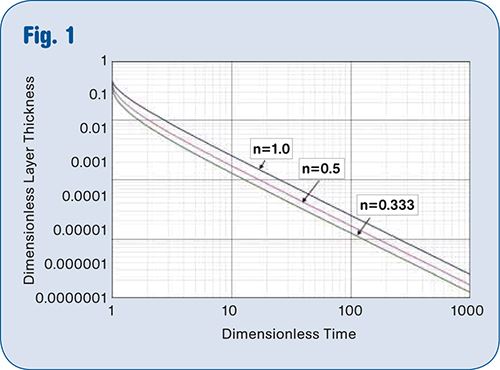
The layer thickness of the resident polymer can be expressed as a function of time. Figure 1 shows the layer thickness as a function of the dimensionless time using a log-log scale. The dimensionless time is the ratio of time to minimum residence time.
Figure 1 shows the reduction in resident resin layer thickness for three values of the power law index, n. Lower values of the power law index result in smaller thickness values. This is to be expected because lower values of the power law index correspond to higher degrees of shear thinning and result in velocity profiles that approach plug flow. Most commodity polymers have a power law index between 0.3 and 0.5. An n-value of 0.5 results in a reduction of layer thickness of more than 30% relative to n = 1.0. An n-value of 0.333 results in a reduction of layer thickness by more than 20% relative to n = 0.5. We are assuming here that both the resident and new polymers have the same power law index.
The curves in Fig. 1 beyond a dimensionless time of 10 are close to straight lines, indicating a power law relationship between layer thickness and time. For commodity polymers, a 10X reduction in layer thickness takes a dimensionless time of about 3 to 4. A 100X reduction takes a dimensionless time of about 25 to 35; a 1000X reduction takes a dimensionless time of about 250 to 350.
The minimum residence time in extrusion tends to be about 30 to 60 sec, while a typical channel height is around 10 to 20 mm, though these numbers can vary over a much wider range. If we set the minimum residence time to 60 sec and the channel height to 20 mm, it will take about 3 to 4 min to reach a resident resin layer thickness of 1.0 mm. It will take about 25 to 35 min to reach a layer thickness of 0.1 mm and 250 to 350 min to reach a layer thickness of 0.01 mm or 10 micron.
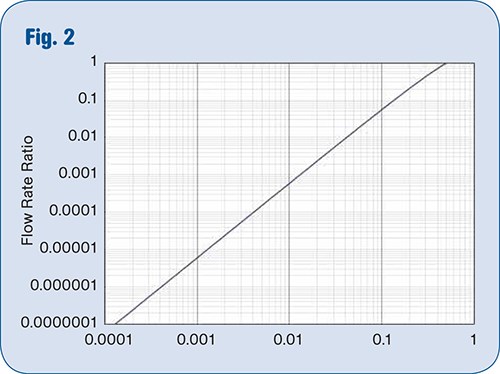
Another way of analyzing the purging behavior is to look at the amount of resident polymer at the discharge. The flow rate of the resident resin can be determined by integrating the resident resin velocity over the resident resin thickness. The amount of resident resin in the discharge is simply the resident resin flow rate divided by the total flow rate. The ratio of the flow rate of the resident resin to the total flow rate can be expressed as a function of dimensionless layer thickness. The dimensionless layer thickness is the actual layer thickness divided by the height of the channel.
The flow-rate ratio increases with the layer thickness; the relationship is clearly nonlinear. Since we are primarily interested in very small values of the flow-rate ratio and layer thickness, a log-log plot provides more information, as is shown in Fig. 2.
EFFECT OF VISCOSITY DIFFERENCES
An important issue in purging is the effect of viscosity differences. It is well known that a high-viscosity resin can effectively displace a lower-viscosity resin. On the other hand, a low-viscosity resin is ineffective in displacing a higher-viscosity resin. This description, however, is only qualitative. By analyzing the displacement behavior for fluids with dissimilar viscosity we can quantify the effect of viscosity differences in the resin. The analysis of the displacement behavior is similar to the analysis of coextrusion flow. The difference is that in purging, the interface between the two resins changes over time.
A critical factor is the viscosity ratio (rv), or the viscosity of the resident polymer divided by the viscosity of the “new” displacing polymer. When the displacing polymer is less viscous than resident polymer (rv > 1), the dimensionless pressure gradient reduces as the interface moves from the center of the channel towards the wall. When the displacing polymer is more viscous than the resident polymer (rv < 1), the pressure gradient increases as the interface moves from the center to the wall. The final dimensionless pressure gradient (when the interface reaches the wall) is the reciprocal of the viscosity ratio.
The shear stress is determined directly from the pressure gradient. When the displacing polymer is more viscous than the resident polymer, the shear stress at the interface will increase, resulting in more effective “scrubbing” or purging action. When different resins are to be extruded, it is beneficial to start with the lowest viscosity resin and then move to the next higher viscosity resin. After running the highest viscosity resin it may be necessary to physically clean the extruder or use a purging agent.
EFFECT OF COLOR
Color can affect the purging process in a number of ways. Colored resin particles are very noticeable in non-colored clear plastics, particularly in film. As a result, colored plastics should be run after non-colored plastics. Dark colors tend to displace light colors efficiently; however, it can take a very long time for light colors to displace dark colors. In production, therefore, light colors should be run before darker colors.
Purging behavior also varies according to the nature of the colorant itself. Gross and Wortberg described a study of the purging behavior in blown film extrusion of LDPE with several pigments (see Learn More box). Two blue pigments were studied (copper-phthalocyanine and ultramarine), two carbon black pigments, and one red pigment (iron oxide). The color was measured using a colorimeter. One problem in the color measurement was that a color veil could be observed with the naked eye but not with the colorimeter.
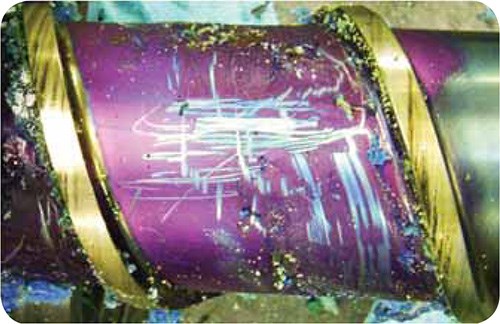
The red pigment purged best, followed by the ultramarine blue. The copper-phthalocyanine blue was next. The two carbon blacks showed the worst purging behavior. This poor purging behavior is related to the small particle size of the pigment. One problem with the copper-phthalocyanine blue was a persistent color veil that made the length of the purge 550 meters of extruded film, compared with 150 meters for the hardest-to-purge carbon black. The persistent color veil was linked to a significant buildup of colorant on the surface of the extruder screw, as shown in Fig. 3. The photo shows a layer of colorant on the screw surface. This layer will not be removed by a gentle wiping action; it takes a firm scrubbing action. In fact, complete removal of this type of buildup on the screw may require pulling the screw and manual cleaning. The strong tendency of this particular copper-phthalocyanine to build up on the screw makes it an unattractive colorant for extrusion operations that have frequent color changes, because it will cause long and costly changeovers.
DYNAMIC VS. STATIC PURGING
The standard purging method involves running a purge material for a certain period of time at constant screw speed. In some cases, the screw speed is changed during the purging process; this is referred to as dynamic purging methods. DuPont developed a purge procedure for extrusion coaters called Disco Purge: First the extruder hopper is emptied and the new material is put in. Then the screw speed is varied as follows:
- 1st minute at 30% of maximum screw speed
- 2nd minute at 90% of max. screw speed
- 3rd minute at 50% of max. speed
- 4th minute at 15% of max. speed
- 5th minute at 70% of max. speed
- Minutes 6-10 at 15% to 20% of max. speed
- Minutes 11-15 repeat the cycling steps of the first 5 minutes.
The specific screw speeds and times are not important. It is important to disrupt the flow patterns and to establish new velocities and shear rates. One minute at each screw speed is generally sufficient. At low screw speed the polymer at the wall has a chance to bond with material in the main stream. At higher screw speed the shear stress at the walls is higher and more polymer can be flushed out. Periods of high flow rate are essential to achieve effective purging.
This method was tested on a 4.5-in., 28:1 extruder, using DuPont Polyethylene 6611 purging compound (see Learn More), which contains a foaming agent. Disco purge worked quite well in removing DuPont’s Surlyn ionomer, requiring about 75 lb of resin to purge, while a static purge at 45 rpm required almost 250 lb. On the other hand, a Disco Purge of DuPont’s Nucrel EMAA or EAA copolymer was not as effective as a static purge at 45 rpm.
This illustrates that a purge procedure that works well with one resin does not necessarily work well with another. Various purging methods are described in patents and other publications.
PURGING AGENTS, COATINGS
There are many different purging compounds that work either by physical or chemical action. The best way to test the effectiveness of a purging compound is to test it on the actual extruder, because there are many factors that influence the purging process. It is safe to say that a number of these factors are not yet fully understood. As a result, developing a good purging procedure requires a certain amount of trial and error.
It is unavoidable that at some point a transition needs to be made from a high-viscosity resin to a low-viscosity resin or from a dark to a light color. In these situations a purging compound may be required. If this does not work well, it may be necessary to pull the screw and physically clean the extruder.
Some plastics, such as polycarbonate, for example, have a strong tendency to adhere to metal surfaces. There are a number of coatings and surface treatments that improve the lubricity of metal surfaces. Some examples are PTFE-impregnated nickel or chrome, titanium nitride, boron nitride, tungsten disulfide (Dicronite from Lubrication Sciences International, dicronite.com), and metallic glass (Lunac from WMV Europe bv, wmv.nl). These coatings can be quite effective in reducing buildup on the screw and die surfaces.
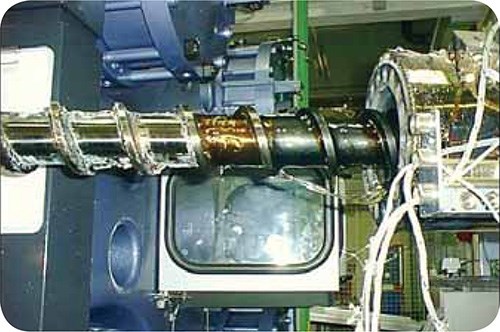
Figure 4 shows a screw used in processing polycarbonate where the left part of the screw is coated with Lunac and the right part is not coated. The uncoated part of the screw has discolored resin stuck to the surface while the resin on the coated part of the screw does not show discoloration.
These coatings not only improve the effectiveness of purging, they also allow the extruder to run for longer periods of time without a shutdown for cleaning. This will result in increased uptime, which is critical in achieving efficient and cost-effective extrusion.
In order to achieve efficient purging it is important to achieve streamlined flow in the extruder without dead spots and stagnation. A practical way to check for dead spots is to change color about 1 hr before a planned shutdown. After shutdown, the entire system should be checked for the presence of the old color. Any spot where the old material can be seen will be a dead spot or at least a region with stagnation. These dead spots should be systematically eliminated to improve the effectiveness of purging. This will also reduce the incidence of black specks, discoloration, burned spots, gels, etc.
Related Content
The Importance of Barrel Heat and Melt Temperature
Barrel temperature may impact melting in the case of very small extruders running very slowly. Otherwise, melting is mainly the result of shear heating of the polymer.
Read MoreTroubleshooting Screw and Barrel Wear in Extrusion
Extruder screws and barrels will wear over time. If you are seeing a reduction in specific rate and higher discharge temperatures, wear is the likely culprit.
Read MoreHow Screw Design Can Boost Output of Single-Screw Extruders
Optimizing screw design for a lower discharge temperature has been shown to significantly increase output rate.
Read MoreWhat to Know About Your Materials When Choosing a Feeder
Feeder performance is crucial to operating extrusion and compounding lines. And consistent, reliable feeding depends in large part on selecting a feeder compatible with the materials and additives you intend to process. Follow these tips to analyze your feeder requirements.
Read MoreRead Next
How to Get Peak Performance & Efficiency Out of Your Extrusion Line, Part I
A lot of things must be in place to achieve what I like to call efficient extrusion.
Read MorePeople 4.0 – How to Get Buy-In from Your Staff for Industry 4.0 Systems
Implementing a production monitoring system as the foundation of a ‘smart factory’ is about integrating people with new technology as much as it is about integrating machines and computers. Here are tips from a company that has gone through the process.
Read MoreBeyond Prototypes: 8 Ways the Plastics Industry Is Using 3D Printing
Plastics processors are finding applications for 3D printing around the plant and across the supply chain. Here are 8 examples to look for at NPE2024.
Read More
