Tips and Techniques: How to Get Best Results With Insert Fasteners
The weakest sections of many plastic part designs are the joints and assembly points.
The weakest sections of many plastic part designs are the joints and assembly points. During screw assembly of mating components, the screw has to be tightened with sufficient torque to produce the recommended axial tension load between the host component and the threads of the screw in order to prevent loosening. A common problem with bolted joints is that plastics are susceptible to creep or stress relaxation. Under loads well below the elastic limit, plastics will lose their ability to maintain a load. When this occurs, the threaded connection becomes loose.
Metal threaded inserts significantly improve joint strength in plastic parts and are not themselves susceptible to creep. The larger body diameter and body design of the insert allow the appropriate installation torque to be applied to the screw. And these joints do not become loose over time, since the brass provides permanent creep resistance for the entire load path of the thread. Additionally, the inserts enable unlimited assembly/disassembly of the components without compromising the integrity of the threads. Ultimately, it is often the metal insert that allows designers to replace cast or machined metal components with less expensive plastic without sacrificing performance.
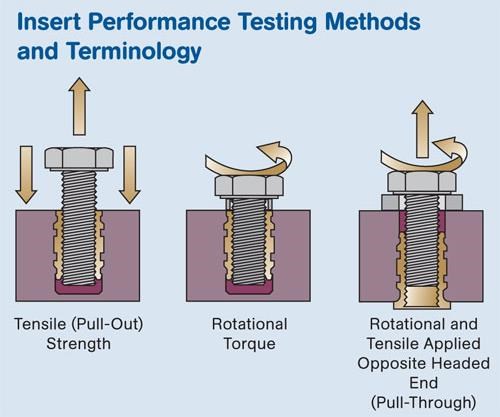
Typical performance requirements for assemblies using inserts involve tensile strength, rotational torque, and pull-through strength. Tensile strength, or pull-out, is the axial force required to pull the insert out of the plastic material. Torque is the rotational force required to rotate the insert in the plastic material. Finally, pull-through is a combination of rotational torque and tensile force applied opposite the head of the insert.
The following factors affect insert performance:
- Insert type, design, and quality of insert features.
- Plastic specifications.
- Design and quality of the plastic components, including hole tolerance consistency.
- The installation process.
Start with the performance requirements of the assembly, and then select the appropriate insert. The objective is to choose an insert with sufficient torque resistance to accommodate the tightening torque necessary to achieve sufficient axial tension load on the threaded joint to keep it together and prevent loosening, while also achieving pull-out values necessary for the load conditions that the insert will be exposed to while in service. In general, resistance to torque is a function of insert diameter, and resistance to pull-out is a function of insert length.
HOW THEY’RE INSTALLED
There are many different styles of inserts designed to accommodate various performance requirements and installation methods. The installation method must be considered, as this will affect the type of insert that can be used as well as the overall cost of the assembly. The two primary types of inserts are those that are molded in and those installed after the molding process (post-mold).
Molded-in inserts usually yield the highest performance, yet this form of installation is by far the most expensive. In addition, you run the risk of damaging the mold if the insert is not properly positioned during the molding process. That can result in tens of thousands of dollars in lost profit.
Inserts installed with heat or ultrasonics after molding yield good performance at a fraction of the assembled cost of the molded-in inserts. Post-mold installation is very efficient and eliminates the requirement of properly loading inserts into a mold during the mold cycle. Typically, inserts installed with heat yield the best combination of overall performance and lowest installed cost.
Self-tapping inserts provide the best pull-out resistance for a post-mold insert, yet the assembler has to be very careful about installing the insert so that it is perfectly square to the hole or it will not mate well with the screw.
Expansion inserts are designed for non-critical applications where ease of installation is the primary design criterion, not torque and pull-out resistance. Another low-cost option is press-in inserts that are designed to reduce installation cost at a sacrifice of torque and pull-out performance.
HOLE DESIGN GUIDELINES
Correct hole size is critical. Larger holes decrease performance, while smaller holes induce undesirable stresses and potential cracks in the plastic. Undersized holes may also result in flash at the hole edge. The insert manufacturer’s recommended hole size for the insert must be adjusted if fillers are used in the plastic. If the filler content is 15% or more, it is suggested to widen the hole by 0.003 in., and if filler content is 35% or more, the suggested hole diameter increase is 0.006 in.
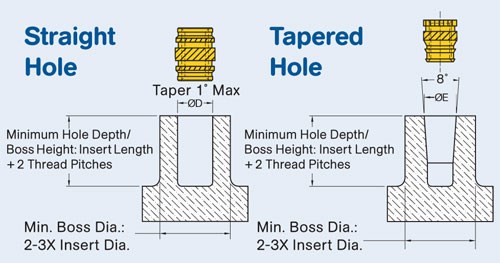
Holes for post-mold inserts should always be deeper than the length of the insert. For self-tapping inserts, use a minimum depth of 1.2 times the insert length. For other inserts, the recommended depth is the insert length plus two thread pitches. The assembly screw should never bottom out on the hole, as jack-out would result.
Molded holes are preferable to drilled holes because of the strong, denser surface of the molded hole. Core pins used to mold the holes should be large enough to allow for shrinkage. For straight holes, the taper should not exceed a 1° included angle. Tapered holes should have an 8° included angle.
Tapered holes reduce installation time and ensure proper alignment of the insert to the hole. Easier release from the core pin is an additional benefit. Only tapered inserts should be used in tapered holes. The disadvantage is that tapered inserts are not symmetrical, and therefore must be oriented prior to installation.
Insert performance is affected by the plastic boss diameter and/or wall thickness. Generally, the optimum wall thickness or boss diameter is two to three times the insert diameter, with the relative multiple decreasing as the insert diameter increases. The plastic wall thickness has to be large enough to avoid bulging during installation and strong enough for the recommended assembly screw installation torque. Poor knit lines in the vicinity of the insert will cause failures and reduced insert performance.
Post-mold inserts that are cold-pressed into the hole require larger boss diameters and/or wall thickness to withstand the greater stresses induced during installation. Installing the inserts while the plastic is still warm after molding generally avoids problems.
MATING COMPONENTS
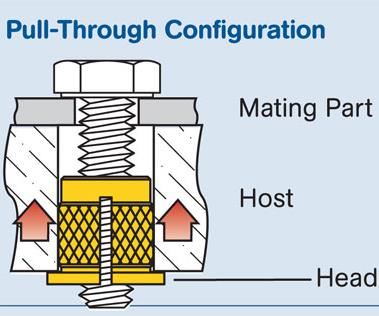
The diameter of the clearance hole in the mating component is very important. The insert and not the plastic must carry the load. The hole in the mating component must be larger than the outside diameter of the assembly screw but smaller than the pilot or face diameter of the insert in order to prevent jack-out. If a larger hole in the mating component is required for alignment purposes, a headed insert should be considered. Inserts should be installed flush (or no more than 0.005 in. above the hole).
If the mating component is also plastic, the use of a compression limiter should be considered to maintain the preload of the threaded joint. In order for the compression limiter to work properly, it should abut the insert so that the insert, and not the plastic, carries the load.
Insert heads provide a larger bearing surface and a conductive surface if needed. High-load applications can benefit from locating the head opposite the load in a pull-through configuration. Tapered inserts should not be used in pull-through applications or in thin-walled bosses as this will cause cracking of the plastic.
About the Author
Christie Jones is market development manager for Spirol International Corp., Danielson, Conn., which specializes in fastening solutions. She has a broad applications background in fasteners. Contact: cljones@spirol.com or (860) 774-8571, ext. 4436
Related Content
Optimizing Pack & Hold Times for Hot-Runner & Valve-Gated Molds
Using scientific procedures will help you put an end to all that time-consuming trial and error. Part 1 of 2.
Read MoreIs There a More Accurate Means to Calculate Tonnage?
Molders have long used the projected area of the parts and runner to guesstimate how much tonnage is required to mold a part without flash, but there’s a more precise methodology.
Read MoreHow to Design Three-Plate Molds, Part 1
There are many things to consider, and paying attention to the details can help avoid machine downtime and higher maintenance costs, and keep the customer happy.
Read MoreProcess Monitoring or Production Monitoring—Why Not Both?
Molders looking to both monitor an injection molding process effectively and manage production can definitely do both with tools available today, but the question is how best to tackle these twin challenges.
Read MoreRead Next
Making the Circular Economy a Reality
Driven by brand owner demands and new worldwide legislation, the entire supply chain is working toward the shift to circularity, with some evidence the circular economy has already begun.
Read MorePeople 4.0 – How to Get Buy-In from Your Staff for Industry 4.0 Systems
Implementing a production monitoring system as the foundation of a ‘smart factory’ is about integrating people with new technology as much as it is about integrating machines and computers. Here are tips from a company that has gone through the process.
Read More
