Finding Out Why Products Fail
At its worst, plastic product failure can cause death or injury to a customer or a customer’s customer.
At its worst, plastic product failure can cause death or injury to a customer or a customer’s customer. At its most benign, the failure is correctly identified on the production floor and ends up as scrap and lost production time. Regardless of how severe the problem is or when it’s detected, product failure is a quality issue, and the cure is rooted in quality procedures. Although this article is written particularly for extruders, it applies equally well to all types of processors.
Product failure can involve liability, insurance, and legal issues. Your product may not really have malfunctioned. It could have been drawn incidentally into a larger product-liability issue by association. For example, following a large fire in a public place like a hotel or airport, virtually every maker of materials found in the structure—from wire and cable to wallpaper—will be sued. Your response is still based on quality issues and process records. (Note: If you don’t keep accurate process condition records, implement a system right away!)
First steps to take
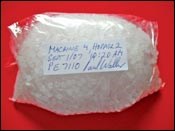
What should you do first, second, and third when a part fails? If the failure is detected during manufacture, first immediately collect raw-material samples from feed hoppers and from original shipping containers. This is critical because the raw material or an additive may be at fault, not your production process. The samples will then be your evidence in a compensation claim. Use clean, preferably transparent, containers. Record the time and location that a sample was taken on the container and sign it.
Second, collect product samples with the defect, as well as product samples without defects for comparison. The minimum number or amount of product samples depends on potential tests. Strength tests such as impact, tear, or tensile strength usually require 10 or more samples for each type of test. Sample sizes for dimensional tolerance tests depend on the type of test or statistical analysis of the variation. A common length for testing of continuous profiles such as siding, pipe, or film is 10 to 30 ft. Tests for melt-flow characteristics, surface properties, and optical properties usually require smaller samples. It is important that the person taking the samples is trained to select, label, and store samples properly.
Third, assemble relevant processing and production data. You should already be recording all the details of processing conditions that you can identify. If your plant is ISO 9000 certified, you will have these records describing your process in detail. (ISO 9000 techniques focus on documenting production procedures, training staff to follow documented procedures, and making sure they do so. ISO 9000 also directs action toward reducing variation in key inputs and the finished product.)
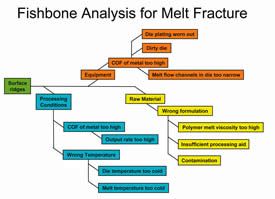
Some processors formalize quality procedures with flow charts, fishbone charts, and check lists. If you are one of them, assemble statistical process control (SPC) records for the period during and after the time the bad product was produced to determine if the process was “under control,” statistically speaking, when the part was made. The key assumption of SPC is that process variations follow a normal, predictable distribution pattern. Although SPC can be used to identify a problem, it won’t tell you how to fix it.
Fourth, after you’ve gotten the raw data together, get everyone involved in the process to describe the problem as they see it. Use standardized forms so that everyone collects the data the same way and uses the same terminology for defects. Write down the nature of the problem and when it started. (Note: Standard terminology for quality problems should already be part of your proactive quality system.)
Troubleshooting after the fact
Some defects aren’t detected until weeks or months later. In that situation, accurate production records and identification codes for the failed products must be available to figure out what went wrong. Failure to keep production records and material samples and to have some I.D. information on the product exposes you to liability. Often processors use inkjet printers to put a lot number or production date stamp on a product.
Analyzing product failure, either immediately or well after it occurred, is psychologically sensitive because it means that all the quality-control strategies you had in place failed. Your first instinct may be to interrogate everyone involved until you find someone to blame, but this isn’t the best approach. Collaboration to identify and fix the problem is much more effective.
Simple, open-ended questions work best, not questions that require a yes-or-no answer. The purpose of asking questions is to yield clues that will help identify the most likely cause of the problem. For example, ask, “Did you notice anything unusual when the problem occurred?” If you have successfully produced the same product in the past, ask, “What has changed?”
Pay attention to details. Most companies use some form of flow chart, fishbone chart, or check list at this point to help identify possible causes. Check out first the candidates that would be quickest to fix. For example, if you see a color change or gels, check for contamination in the feeding system.
Apply the fix
Fifth, fix the problem. Troubleshooting is the process of eliminating possible causes until only one remains. Then it’s easy to fix. Use a clear set of rules so operators know the range of adjustments they can make on their own initiative, beyond which they must seek approval from a supervisor. These may include adjustments to production rate, temperature, pressure, and formulation. The exact time when any adjustment is made, by whom, and the results should be recorded on the standardized form mentioned earlier.
Operators should make only one adjustment at a time and wait a reasonable time to assess results. For example, output changes on an extrusion line typically can be assessed in one to five minutes. Temperature changes can be assessed in 5 to 20 min, depending on size of equipment.
Record what changed as a result of the adjustment. Keep in mind that adjustments may have consequences farther along in the manufacturing process, so be prepared to make those consequential adjustments as well. For example, raising process temperatures makes hotter material, which requires more cooling.
If the first adjustment didn’t solve the problem, go back to your fishbone chart or check list and work down. Don’t forget to take samples before and after making any changes and keep accurate records.
Use a clear standard for the amount of time that can be spent trying to fix a problem before stopping the production run. Depending on the process, it may be less costly to switch production to another product while waiting for senior personnel to review the problem product and decide on a strategy. Remember, you want to minimize scrap and maximize production output, even if it means revising the production schedule.
Significant formulation adjustments may affect product properties that are not measured during manufacturing, like strength or gas/moisture barrier. Senior production personnel should review the information and samples collected before any changes are made to a formulation or equipment, which are outside of the purview of machine operators.—Edited by Jan H. Schut
Paul Waller consults on extrusion and packaging and heads Plastics Touchpoint Group Inc. in Toronto (www.plasticstouchpoint.com), which offers engineering, plant design, machine installation and operator training. He can be reached by e-mail at paul@plasticstouchpoint.com. Previous articles in this series are found at www.ptonline.com/extrusion.
Related Content
Part 2 Medical Tubing: Use Simulation to Troubleshoot, Optimize Processing & Dies
Simulation can determine whether a die has regions of low shear rate and shear stress on the metal surface where the polymer would ultimately degrade, and can help processors design dies better suited for their projects.
Read MoreTroubleshooting Screw and Barrel Wear in Extrusion
Extruder screws and barrels will wear over time. If you are seeing a reduction in specific rate and higher discharge temperatures, wear is the likely culprit.
Read MoreWhy Are There No 'Universal' Screws for All Polymers?
There’s a simple answer: Because all plastics are not the same.
Read MoreHow to Select the Right Cooling Stack for Sheet
First, remember there is no universal cooling-roll stack. And be sure to take into account the specific heat of the polymer you are processing.
Read MoreRead Next
Lead the Conversation, Change the Conversation
Coverage of single-use plastics can be both misleading and demoralizing. Here are 10 tips for changing the perception of the plastics industry at your company and in your community.
Read MoreFor PLASTICS' CEO Seaholm, NPE to Shine Light on Sustainability Successes
With advocacy, communication and sustainability as three main pillars, Seaholm leads a trade association to NPE that ‘is more active today than we have ever been.’
Read More


