Control Flash in Extrusion Blow Molding
Ability to control the adverse effects of flash is critical to success in extrusion blow molding.
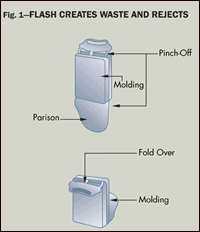
Ability to control the adverse effects of flash is critical to success in extrusion blow molding. In any variant of this process, a parison is extruded, pinched off at the top and bottom, then blown into a part that takes the shape of the mold cavity. Pinch-off generates excess material in the form of top and bottom flash.
Flash generation imposes limits on blow molding efficiency. Flash removal calls for a post-molding trim step, which requires special equipment and poses a risk of damaging good parts. Further, flash has potential for significantly extending the molding cycle, primarily by increasing the time needed to cool the thick flash areas.
Flash slows cooling
Flash is created at the pinch points, which means that flash thickness is typically double the part’s maximum wall thickness. Thus flash at least doubles the time required to fully cool the molding.
In practice, most blow molders minimize this cooling-time penalty by ejecting the part before the flash is fully cooled. That approach, however, means that the flash is still soft and pliable when ejected, which can create other problems. One is a tendency for flash to fold over on itself and adhere to adjoining surfaces of the part after ejection of the molding (see Fig. 1). Flash is also considerably more difficult to handle and trim while hot. In either case, the resultant penalty may be a significant increase in the part reject rate.
In theory, the solution to this dilemma is to reduce to the greatest possible extent the difference between the cooling times for the flash and the part. To achieve that calls for an understanding of the forces at work in cooling an extrusion blow mold and transfer of that know-how into design or modification of tools.
The cooling time is influenced by the rate at which heat is removed from the mold, which in turn can be optimized through skillful design of air, water, or oil cooling channels machined into the mold. The most widely used cooling medium is water.
The flow patterns in a mold water channel (and the cooling rates associated with them) can be defined by the Reynolds number (Re). The underlying equation determining Reynolds number is Re = pVd/N, where p is the fluid density, V is the average flow velocity, d is the channel diameter, and N is the viscosity of the fluid.
Typically, a Reynolds number of around 2100 or lower results in laminar flow in the water lines, which is relatively inefficient for removing BTUs. In contrast, Reynolds numbers greater than 2100 tend to create several types of turbulent flow patterns, which are more efficient in heat removal. Clearly, a key consideration in designing the cooling channels for blow molds is to induce or modify turbulent flow patterns. In some cases, as in some injection molds, a mechanical device (e.g., spiral rod) can help to induce turbulent flow in the cooling channel.
A different option would be to run the mold at a lower temperature in order to accelerate the cooling rate and reduce cooling time. In practice, that approach fails for two reasons: One is that it tends to promote a build-up of internal stresses in the parts. The other flaw is that running the mold at a temperature lower than that of the surrounding ambient air leads to “mold sweating,” or condensation of water droplets on the mold, which creates surface defects on parts, called “orange peel.” This serious source of part defects must be avoided. General industry practice is to run tools with some margin of safety in the 45 F to 55 F range.
Remedies for flash
The preceding analysis yields several possible ways to reduce the cooling-time penalty caused by flash. In most bottle molds, the zone where flash occurs is already designed as a separate insert. That is because the pinch-off area traditionally has required a special metal insert (e.g., QC-7 aluminum) able to resist wear and increase heat-transfer efficiency.
This makes it relatively easy for a builder of bottle molds to design the insert (or redesign an existing one) as a separate cooling zone with improved cooling efficiency. Retrofit of inserts to include cooling is often feasible.
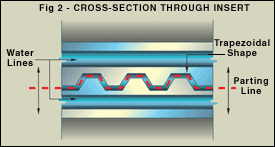
The cross-section of the insert’s parting line in a conventional blow mold traditionally takes the form of a horizontal line, the main reason being that it is easier and less costly for a tool-builder to machine in straight lines. However, a trapezoidal cross-section would considerably expand the surface area of the mold in contact with the flash, thereby removing heat more efficiently (Fig. 2). A trapezoidal insert cross-section can also increase the flash’s stiffness, making the “hot tails” more resistant to folding over when sticky and hot.
In one case involving a 1-gal, 63-g bottle, the twin remedies just described were combined with great effect. Design of the insert as a separate cooling zone, in unison with trapezoidal machining of the insert’s cross-section, reduced the cooling time by 4 sec, so that cycle time was reduced from 13 to 9 sec, or 31%. That more than justified any additional costs incurred.
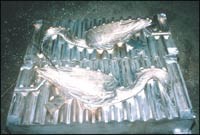
A trapezoidal cross-section in the parting-line insert also helped resolve a trimming problem encountered in blow molding of flower pots. The molder had adopted a five-station indexing wheel machine capable of delivering parts to the conveyor every 2.5 sec (helped by cooling fans). However, the “hot tails” were arriving at the trim station too sticky to be cut effectively. The addition of indentations (trapezoidal cross-sectioning) to the mold pinch-off insert resulting in improved cooling efficiency. In irregularly shaped parts like the birds shown in Fig. 3, a trapezoidal cross-section can be designed into the entire parting line (the cross-sections of the two halves are offset to ensure the parting lines meet). This enhances flash stiffness and cuts the rate of rejects.
Related Content
Back to Basics on Mold Venting (Part 1)
Here’s what you need to know to improve the quality of your parts and to protect your molds.
Read MoreHow to Select the Right Tool Steel for Mold Cavities
With cavity steel or alloy selection there are many variables that can dictate the best option.
Read MoreInjection Molding: Focus on these Seven Areas to Set a Preventive Maintenance Schedule
Performing fundamental maintenance inspections frequently assures press longevity and process stability. Here’s a checklist to help you stay on top of seven key systems.
Read MoreUnderstanding Melting in Single-Screw Extruders
You can better visualize the melting process by “flipping” the observation point so the barrel appears to be turning clockwise around a stationary screw.
Read MoreRead Next
Beyond Prototypes: 8 Ways the Plastics Industry Is Using 3D Printing
Plastics processors are finding applications for 3D printing around the plant and across the supply chain. Here are 8 examples to look for at NPE2024.
Read MoreFor PLASTICS' CEO Seaholm, NPE to Shine Light on Sustainability Successes
With advocacy, communication and sustainability as three main pillars, Seaholm leads a trade association to NPE that ‘is more active today than we have ever been.’
Read MorePeople 4.0 – How to Get Buy-In from Your Staff for Industry 4.0 Systems
Implementing a production monitoring system as the foundation of a ‘smart factory’ is about integrating people with new technology as much as it is about integrating machines and computers. Here are tips from a company that has gone through the process.
Read More
