Determining Maximum Mold Cycle Counts
The first production meeting with my new employer went something like this: “We want you to establish a preventive maintenance program that is based on cycle counts for all our molds.” Before I could launch into an explanation of how best to determine maximum cycle counts, I was hit with this: “So, how many cycles do you think our molds can safely run before we need to clean them?”Leaving my crystal ball at home and unable to get my x-ray vision working, there was no way to answer that question with any accuracy.
The first production meeting with my new employer went something like this: “We want you to establish a preventive maintenance program that is based on cycle counts for all our molds.” Before I could launch into an explanation of how best to determine maximum cycle counts, I was hit with this: “So, how many cycles do you think our molds can safely run before we need to clean them?”
Leaving my crystal ball at home and unable to get my x-ray vision working, there was no way to answer that question with any accuracy. Unfortunately, this is not what they wanted to hear. The group of PhDs surrounding the table looked on with minor disgust, assuming this should be an easy question for a “mold guy” to answer. They were disappointed because they would not be able to leave the meeting with an immediate production scheduling plan that would help molds run better and eliminate some tool damage issues they had suffered from molds suspected of being over-run.
Not wanting disappoint on the first day, I threw out a standard rule of thumb, used when pressed for max cycle counts: 250,000 cycles is typically a good starting point for the average injection mold, but it can vary greatly—up or down—depending upon the mold design and these production characteristics:
- Resin type, additives, required temperature, corrosiveness, abrasiveness, and flash rate.
- Residue (off-gassing) type—powder, flakes, gummy (tar like) or oily consistency.
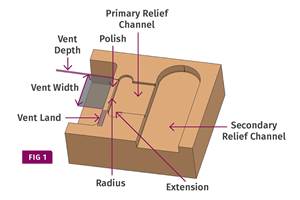
- Vent locations, depth, and finish.
- Vent dump size, location, and configuration (ring, channel, blind pockets, etc.).
- Static vs. dynamic (moving tooling) vents.
- Tooling plating type and condition.
- Tooling tolerances and running fit.
- Inaccessible internal bushings and other actuating components.
- Internal condensation level and mold-plate steel type.
- O-rings and other internal water-seal leakage history.
- Specific hot- or cold-runner issues.
Another critical element when determining maximum cycle counts is knowing part defect frequencies and positions that can be affected by many of the above criteria. Part defects “localized” by unbalanced filling or steel variations need to be recognized and considered when setting max cycle counts. But generally speaking, anytime we over-run a mold, we increase the risk of molding bad parts though burns, shorts, weld lines, flash, or dirty parts. Mold off-gassing or residue will end up someplace if it can’t escape through clean vents.
IN REAL LIFE
Let me say first that stopping and pulling molds for scheduled PMs is a good maintenance practice—period. But unfortunately it’s not always possible if you want to keep your customers happy.
What? A mold-maintenance evangelist saying that regularly scheduled PM’s won’t make us more money by optimizing mold performance?
Let me clarify. Obviously, if a mold was pulled for a good cleaning every time its maximum cycle number was up, the mold—or those responsible for mold maintenance—would obviously be grateful. With scheduled maintenance, it is much easier to accurately gauge the labor hours required to disassemble, clean, and return it to production, knowing that the tooling has not been worn prematurely with gummed-up close fits. No surprises in mold repair is always a good thing for schedulers and the tooling and labor budget. But in the real world this seldom happens because… production rules.
Molders are customer driven—as they need to be—when it comes to running a mold to complete an order. If a couple of more hours, shifts, days, and—in extreme cases—weeks are required to get an order completed, the mold will run—or lock up trying.
So why bother setting max cycle counts if they are not adhered to? Although we may not always be able to clean every mold every time it needs it, it is critical to do so with some molds because of the damage that can occur when max counts are ignored. When steel is gone, it’s gone. So the challenge in the shop is to know max counts for molds along with a “safe range” where molds should be pulled if possible, but may be run longer without severe damage if in danger of missing production schedules.
Molds that are subjected to many short production runs are also in danger of premature tooling wear if the tool room doesn’t track total mold cycles for a series of short orders. Without a formal tracking system, it is easy to damage tooling simply because cycle counts get lost in the day-to-day rush of pulling and setting lots of molds.
AN EXPENSIVE LESSON
Over-run molds create situations that require more abrasive cleaning methods, which in itself can be hard on tooling and drastically reduce their usable life, as noted in the following case history.
A 16-cavity medical mold had a sleeve/core setup with a typical radial-vent ring groove (0.060 in. wide x 0.001 in. deep) at the bottom of the part, around the core. It fed into three flats (0.250 in. wide x 0.060 in. deep) that ran down the core lengthwise into a radial vent dump that was 0.125 in. deep x 0.125 in. wide. The part vented fine for up to about 150,000 cycles (480 hr, or 20 days), which historically, under normal processing parameters, was how long it took to fill up the vent dumps.
Once the vent dumps were full, the residue, having no where to go, was forced past the flats between the core and sleeve, where the sliding action of the core and sleeve during ejection turned the typical red powdery residue in to a black gummy substance that quickly wore out the tooling. This resulted in flash on the bottom of the part. The mold builder would not permit our toolroom increase the size of the vent dump, insisting it would compromise sleeve/core alignment during part fill and ejection.
Our particularly aggressive production manager made the controversial decision to run the mold an extra week (50,400 more cycles) to get additional uptime. When finally pulled, nine of the 16 cavities had flash above or close to spec (0.003 in. max) requiring us to send the cores back to the builder to be reworked (welded, ground, and plated) and in some cases replaced. The sleeves were so gummy that the ejector plate could not be moved by hand with a pry bar and required considerable force from a 5-lb mallet to drive the cores out from the sleeves.
Through ongoing diligent inspections during repairs, we found that even a few hours over the maximum cycle count caused excess and measurable wear. We also found that if the mold over-ran its cycle limit, the cores required hard “Scotchbriting” to remove the excess ground-in residue. If this was performed incorrectly—a repair tech could easily “round-over” the sharp leading edge of the sealing diameter of the parting line, which in turn would cause flash, setting up yet another toolroom-vs.-processing debate over the actual root cause of the flash. But when cleaned during the “safe range” of cycle counts, the residue was quickly and easily removed via ultrasonics, creating no additional wear whatsoever. So from that day on, this mold had a mandatory max count of 150,000 cycles—no exceptions.
An expensive lesson indeed, but a common problem that portrays the importance of setting accurate numbers for maximum cycle counts on specific molds that from time to time get over-run.
On the other end, there are many molds that can easily run more than 250,000 cycles but need to have this number validated. One such mold was a 48-cavity jump-thread cap mold that we started out at 250,000 cycles and found—after steady count increases of 100,000 per run—that we could actually run the mold to 2.5 million cycles before it needed cleaning! The fill configuration and resultant residue in this mold was contained in non-critical static vent dumps that posed no threat to moving tooling or shutoffs. For non-tooling- trained administrators, it is sometimes difficult to understand why molds that run similar resins have such different reactions to extended cycle counts. This is why the effects of process variations need to be monitored and understood, so we can maximize runtime without additional component wear. Over-maintaining molds wastes money, too—and increases the chance for mold damage during repairs.
BASIC PRODUCTION DATA REQUIRED
What you really need to know to set maximum mold cycles can only be determined through close visual inspection of mold plates and tooling after a production run and the ability to accurately answer a few production-related questions that will dictate maintenance requirements:
- On what date and time was the mold started?
- What press did it run in?
- Who started it?
- What tooling configuration is the mold running?
- On what date and time was the mold stopped?
- Who stopped it?
- Why was it stopped (scheduled or unscheduled stop reason)?
- How many cycles or hours did the mold run?
And also very helpful when evaluating mold residue and tooling wear levels:
- Was the production run interrupted by stops for changeovers, unscheduled breakdowns, or weekend downtime?
- Were repeated ejector counts required to release the parts from the mold?
- Was the mold properly and regularly serviced in the press during the run?
- Were the cycle time and processing parameters consistent with past runs?
- Are any part defects related to flash in a vented area?
Consistent with operating any mechanical apparatus, setting max mold cycle counts requires accurate documentation of visual observations along with tracking defects, defect positions, and required corrective actions.
Molds and tooling are not getting cheaper, and thus can significantly reduce a company’s profit margin on specific jobs through off-the-cuff decisions to run molds longer just to fill a truck or an empty corner of a warehouse.
“Efficiently producing quality parts on time” is the mantra of every molder. You cannot meet this mantra by allowing production requirements to dictate maximum cycle counts in every situation. Adherence to data-collection practices and visual inspection of tooling and parts is the only method that will allow you to balance maximizing tooling life, production capability, and mold reliability.
About the Author
Steven Johnson is the operations manager for ToolingDocs LLC, part of the PCIC Group of Companies. Steve also has is own business, MoldTrax in Ashland, Ohio. He can be reached at steve.johnson@toolingdocs.com or (419) 289-0281.
Related Content
Where and How to Vent Injection Molds: Part 3
Questioning several “rules of thumb” about venting injection molds.
Read MoreHow to Select the Right Cooling Stack for Sheet
First, remember there is no universal cooling-roll stack. And be sure to take into account the specific heat of the polymer you are processing.
Read MoreBack to Basics on Mold Venting (Part 2: Shape, Dimensions, Details)
Here’s how to get the most out of your stationary mold vents.
Read MoreThe Effects of Time on Polymers
Last month we briefly discussed the influence of temperature on the mechanical properties of polymers and reviewed some of the structural considerations that govern these effects.
Read MoreRead Next
Lead the Conversation, Change the Conversation
Coverage of single-use plastics can be both misleading and demoralizing. Here are 10 tips for changing the perception of the plastics industry at your company and in your community.
Read MoreBeyond Prototypes: 8 Ways the Plastics Industry Is Using 3D Printing
Plastics processors are finding applications for 3D printing around the plant and across the supply chain. Here are 8 examples to look for at NPE2024.
Read MoreSee Recyclers Close the Loop on Trade Show Production Scrap at NPE2024
A collaboration between show organizer PLASTICS, recycler CPR and size reduction experts WEIMA and Conair recovered and recycled all production scrap at NPE2024.
Read More

