Extrusion: Understanding Weld Failures
Hard-surfacing failures without evidence of burrs indicate possible weld bond issues.
Most extrusion screws have hard-surfacing materials welded on the flights to provide longer wear life. When extreme wear occurs in the absence of abrasive fillers, a burr on the flights provides a clue as to what is happening.
A burr on the trailing side indicates a very high side force is causing the flights to gall or even weld to the barrel material, literally pulling the two surfaces apart. This is usually due to “wedging,” which is caused by the screw momentarily plugging with solid polymer at a radial location. If pressure from the plugged channel is not balanced by a similar force on the other side, the screw is pushed with tremendous force against the barrel.
Before screws are rebuilt it’s a good practice to grind the old weld off and check for cracking.
It’s hard to measure this force because it may only last for a fraction of a second. But by calculating the pressure necessary to bend the screw so it can contact the barrel over relatively short lengths, it’s been found that the pressure can be momentarily as high as 25,000 psi. Remember, the screw in the compression section is a double-spiral wedge driven by the full torque of the extruder drive, giving it enormous compressive force. Wedging is basically a screw design issue where the melting rate of the screw is inadequate to match the compression rate.
A burr on both sides of the flights usually indicates a barrel alignment issue whereby the barrel is causing the screw to bend with each revolution to conform to the barrel. Again, because of the power of the extruder drive, this crushes the flights and develops galling, resulting in a burr on both sides.
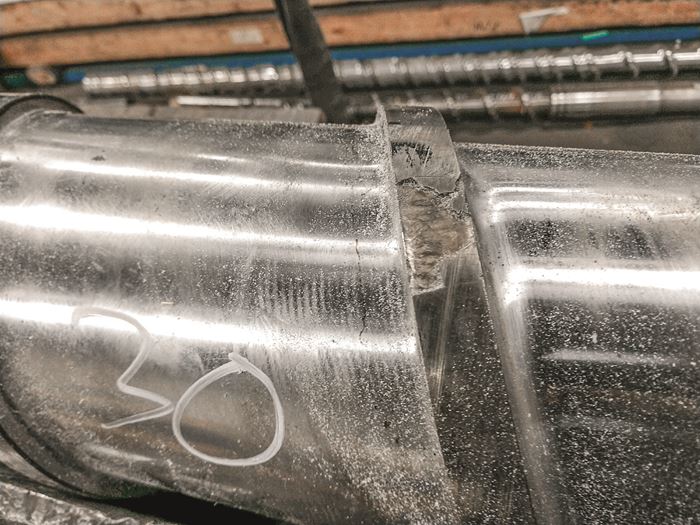
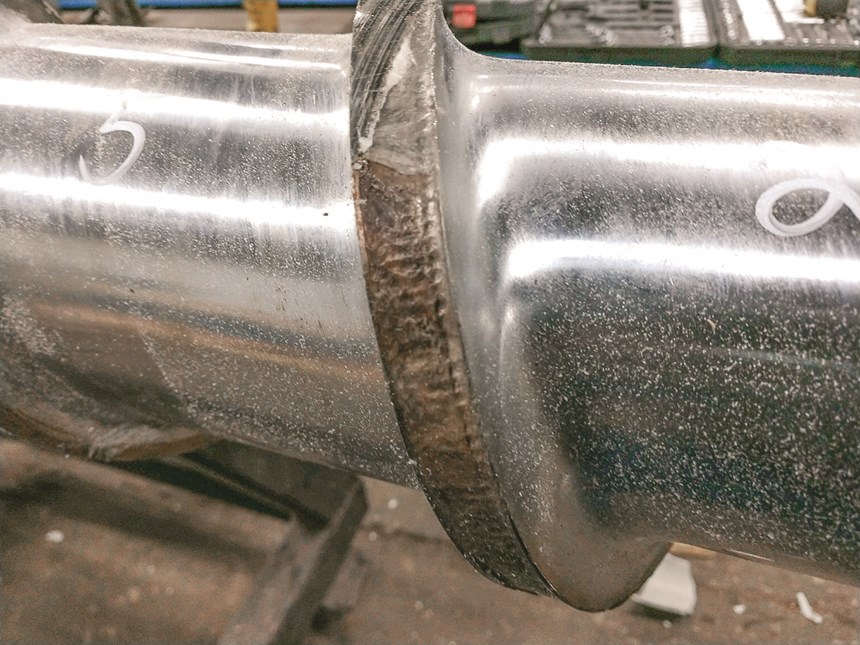
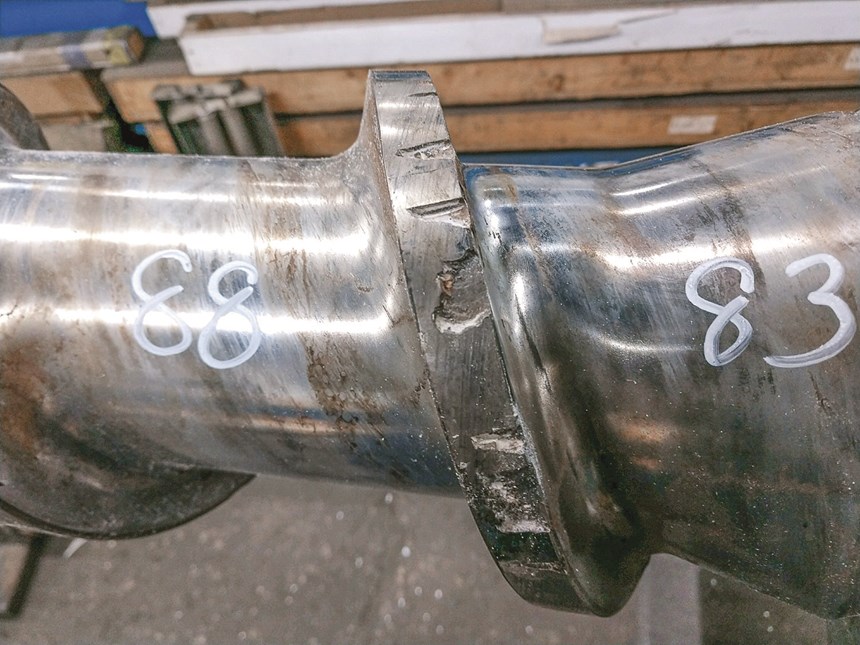
None of the three images that accompany this article show any evidence of a burr, so it’s unlikely the weld failure is the result of wedging or barrel alignment. More likely, the weld failure was due to improper weld application, resulting in a poor bond between the hard-surfacing material and the base metal. The photo on the left shows a complete failure of a large area of the flight. The pattern on the flight surface where the weld is missing shows the moderate distortion of the weld groove by the welding heat.
But it is very smooth, indicating the weld was simply laid on the flight with little or no bond. The images in the center and right show a lesser— but still catastrophic—degree of weld failure. The areas where sections of the weld have fallen out with no sign of galling on either side is again a sure sign of poor weld bond.
Today almost all screw manufacturers use a technique called plasma transferred arc (PTA) welding to apply hard-surfacing material to the screw flights. PTA is used because it has the least effect on the underlying screw material while creating a strong metallurgical bond because of its extremely high temperature. Other welding processes apply heat for a longer period, with a wider heat-affected area at the weld point. This dilutes the hard-surfacing material with base metal and reduces its anti-galling properties by contaminating the hard-surface material with iron.
Most of the nickel/chrome (Ni/Cr) and cobalt-based hard-surfacing materials fuse at about 2000 F, and the plasma “flame” can generate temperatures in excess of 10,000 F. Being much hotter and much more concentrated than most other welding processes reduces the dilution of the hard-surfacing material.
PTA welding is a surprisingly sensitive process and takes constant operator attention; it requires numerous adjustments related to the position of the torch itself and the position of the weld bead on a round surface. Moreover, there are adjustments for the welding arc, shield gas and amperage. Even a little draft on the arc will disturb the shielding gas and plasma gas and cause a reduction in bonding as well as rapid oxidation of the interface area.
For example, having the PTA torch a mere 1/16-in. too far over center on a small screw will greatly reduce the bond strength. The condition of the base metal before and after welding is also critical. Carbon steel undergoes a phase transformation if held at temperatures below 650 F, which creates a form of steel that is brittle and has a lower density.
This results in cracking of the base metal and transfer of the cracks into the hard surface material, setting up areas for weld failure. To prevent this phase change, the screw must be preheated and held at an elevated temperature through the welding process, and then very slowly cooled to prevent the phase change. Even minor deviations in how the preheating and post-cooling process is handled will cause excessive cracking. Some radial cracking of the hard-surfacing overlay is normal—the overlay usually has a greater coefficient of expansion than the base metal, and upon cooling shrinks more than the base metal, which is relieved by the radial cracking. In fact, if no radial cracking is present with the Ni/Cr alloys it is likely to be in fact some other material. New screws have the weld applied in a shallow trough before the flights are machined, which helps to reduce the sensitivity of torch position and improves welding rate. The trough dimensions are also critical. However, rebuilt screws are welded on a narrow and round surface. As a result, it’s often difficult to obtain the same hardness of the overlay on rebuilt screws, particularly small ones.
Want to Learn More About Extrusion? Visit the Extrusion Zone.
Once a screw has been welded with improper preheating and post-cooling, it is difficult to obtain a good rebuild because of the prior cracking and brittleness that extend into the base metal due to the prior phase change. Before screws are rebuilt, it’s a good practice to grind the old weld off and check for cracking, using various metallurgical test methods.
The practice of putting a layer of softer stainless steel on the screw flights under the hard surfacing is sometimes used to “block off” underlying cracking. However, that results in two welds and, if not done properly, doubles the chances of weld failure.
The important thing to remember is that polymers do not wear screws unless filled with hard, abrasive fillers. Only contact between the barrel and screw flights results in wear. By simply observing the “burr,” the cause of wear can generally be determined. Any hard-surfacing failures without evidence of the burr will indicate possible weld-bond issues.
ABOUT THE AUTHOR: Jim Frankland is a mechanical engineer who has been involved in all types of extrusion processing for more than 40 years. He is now president of Frankland Plastics Consulting, LLC. Contact jim.frankland@comcast.net or (724)651-9196.
Related Content
Troubleshooting Screw and Barrel Wear in Extrusion
Extruder screws and barrels will wear over time. If you are seeing a reduction in specific rate and higher discharge temperatures, wear is the likely culprit.
Read MoreUnderstanding Melting in Single-Screw Extruders
You can better visualize the melting process by “flipping” the observation point so the barrel appears to be turning clockwise around a stationary screw.
Read MoreHow Polymer Melts in Single-Screw Extruders
Understanding how polymer melts in a single-screw extruder could help you optimize your screw design to eliminate defect-causing solid polymer fragments.
Read MorePart 2 Medical Tubing: Use Simulation to Troubleshoot, Optimize Processing & Dies
Simulation can determine whether a die has regions of low shear rate and shear stress on the metal surface where the polymer would ultimately degrade, and can help processors design dies better suited for their projects.
Read MoreRead Next
Extrusion: The Challenges of Extruding Highly Filled Polymers
These materials require screw changes and modifications in upstream and downstream equipment and operating procedures.
Read MoreFor PLASTICS' CEO Seaholm, NPE to Shine Light on Sustainability Successes
With advocacy, communication and sustainability as three main pillars, Seaholm leads a trade association to NPE that ‘is more active today than we have ever been.’
Read MorePeople 4.0 – How to Get Buy-In from Your Staff for Industry 4.0 Systems
Implementing a production monitoring system as the foundation of a ‘smart factory’ is about integrating people with new technology as much as it is about integrating machines and computers. Here are tips from a company that has gone through the process.
Read More
.jpg;width=70;height=70;mode=crop)
