Extrusion: What’s the Best Way to Vent?
There are advantages and disadvantages to each, and they must be evaluated before making a decision.
Most single-screw extruders turn in a counter-clockwise (right-handed) direction and are vented on the left, facing downstream. The few extruders that turn clockwise (left handed) are usually vented on the right, also facing downstream. Both right- and left-handed rotating screws can be vented on top as well.
Which option is best? Choosing vent locations has consequences, so you need to understand the advantages and disadvantages of each before making up your mind.
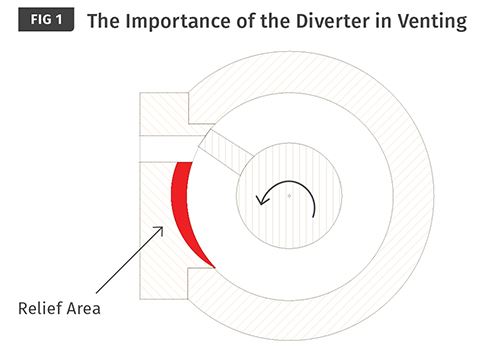
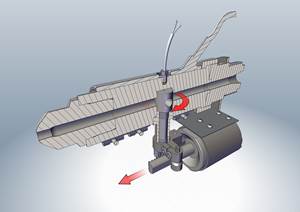
You first have to understand the purpose and function of the vent diverter to comprehend why left-, right- or top-style venting makes any difference. Simply put, the design of the diverter is crucial to trouble-free venting. The diverter is a precision-fit plug that is shaped to precisely match the barrel wall with a contoured “relief” area on the bore surface (see Fig. 1). Remember, the melt that’s being pushed by the screw flight also sticks to the barrel, and when it passes the vent opening—the path of least resistance—it tends to be forced out. To counter this effect, the diverter has a relief area designed to accommodate the amount of melt that would be forced out the opening.
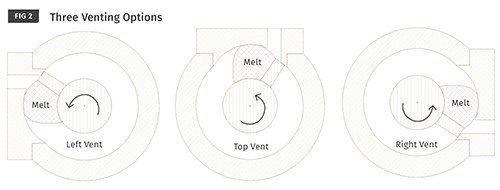
The basic choices of vent location depend on gravity and the volume of volatiles that are anticipated coming out of the vent. With a right-hand screw the three design options are shown in Fig. 2. (This whole scenario is reversed for a left-hand screw.)
The left vent has gravity working for it. As the melt bank passes the opening and enters the relief area of the diverter, it tends to sag back into the barrel due to the pull of gravity. This tends to empty the relief area in preparation for the passing of the next flight.
The same is true of the top vent, where gravity is pulling the entire melt in the relief straight down and back into the barrel. This makes the top vent the most effective at keeping the opening clear.
The right vent is the least effective vent position because the melt in the relief tends to sag into the opening and then get pushed further into the opening by the next flight.
The right-hand option requires a much more precisely designed relief area, and is still much more likely to plug the opening with melt. This is particularly the case every time the screw is stopped, as this gives the melt in the relief more time to sag into the opening.
Why are right-hand vents used in this less-than-optimum location? In coextrusion applications where spacing is tight, this arrangement may provide better access to the vent. In other cases the processor might feel that having the two vents facing each other cleans up the floor plan and the operating personnel can access both vents from the same position. In other cases it’s just a lack of operating knowledge.
Top venting provides the best option for maintaining a clear vent opening but is mostly used for special situations. The problem with the top vent is that when it plugs (due perhaps to a cold adapter downstream of the extruder) the melt can run all over the barrel and heaters in that area. Also it’s difficult to observe the condition in the vent without climbing onto the hot extruder.
However, for situations where a large amount of volatiles is anticipated from the vent, even the left vent can be difficult to keep the opening from plugging due to “foaming” of the melt. A top-vent design and the force of gravity can be a big help here, allowing the melt in the relief, as well as any polymer that may have gotten into the opening, to sag back into the screw channel.
Such situations occur in applications like recycling foamed polymers, compounding applications using water stripping, and processing of excessively wet polymer. In these cases, the disadvantages of a top vent are more than offset by the advantages provided by gravity.
Related Content
The Importance of Barrel Heat and Melt Temperature
Barrel temperature may impact melting in the case of very small extruders running very slowly. Otherwise, melting is mainly the result of shear heating of the polymer.
Read MorePlastics Technology Year in Review: Your Favorite Reads of 2024
A year-end review of the top stories showcasing industry trends, advancements and expert insights. Revisit the articles that captured the attention of the plastics community.
Read MoreUltrasonic Welding: Tips, Techniques, and Troubleshooting
In this collection of content, we provide expert advice on welding from some of the leading authorities in the field, with tips on such matters as controls, as well as insights on how to solve common problems in welding.
Read MoreKnow Your Options in Injection Machine Nozzles
Improvements in nozzle design in recent years overcome some of the limitations of previous filter, mixing, and shut-off nozzles.
Read MoreRead Next
For PLASTICS' CEO Seaholm, NPE to Shine Light on Sustainability Successes
With advocacy, communication and sustainability as three main pillars, Seaholm leads a trade association to NPE that ‘is more active today than we have ever been.’
Read MoreSee Recyclers Close the Loop on Trade Show Production Scrap at NPE2024
A collaboration between show organizer PLASTICS, recycler CPR and size reduction experts WEIMA and Conair recovered and recycled all production scrap at NPE2024.
Read MoreMaking the Circular Economy a Reality
Driven by brand owner demands and new worldwide legislation, the entire supply chain is working toward the shift to circularity, with some evidence the circular economy has already begun.
Read More
.jpg;width=70;height=70;mode=crop)
