This article is an adaptation of a technical presentation given by Jeremy Cooley at Plastics Technology’s Extrusion 2017 Conference, held Oct. 18-20 in Charlotte, N.C. Cooley is a technical sales representative at Asaclean-Sun Plastech Inc. and has spent the past 15 years focusing on helping processors develop robust purging programs. These eight tips are aimed at helping processors increase output, lower production costs, reduce machine downtime, and decrease scrap rate.
PROPER GRADE SELECTION
All purging compounds are not created equal. Some grades may work extremely well for certain applications and resins but are completely ineffective in other situations. Understand what you are working with before you put something in your machine. When selecting a commercial purging compound (CPC), a good strategy to start with is determining compatibility with the resins you are running.
Before beginning, ask yourself the following questions:
- What are my expectations of this CPC?
- What challenges do I face?
- Do I struggle with contamination (black specks, color, etc.)?
If you can set quantifiable goals, you can check the results against them at the end of the trial. Depending on the machine, the application, and the answers to the questions above, a chemical purging compound might provide a distinct advantage over a mechanical purging compound, or vice-versa. Mechanical CPCs use the machine’s power to create pressure and agitation in the barrel. These types of purge rely on higher viscosity, additives, and inorganic minerals to clean the barrel. Chemical CPCs are used in lower-pressure applications, such as extrusion, blow molding, etc. This type of purging compound uses an endothermic chemical reaction that expands to create the pressure and agitation necessary to clean the barrel.
Depending on the grade and severity of the problem, this reaction generally requires 5 to 30 min of soak time in the barrel. If you don’t make sure you’re using the right grade, there’s a good chance that your contamination and changeover issues won’t improve.
CHANGEOVERS
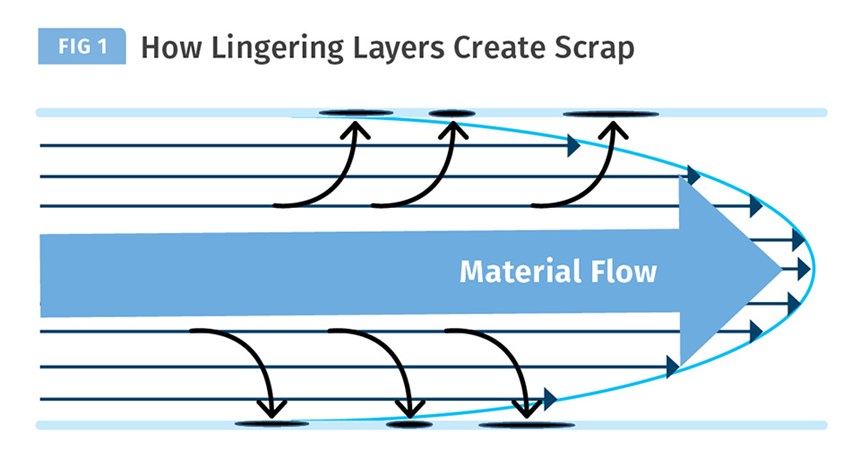
Changeovers are unavoidable for almost all processors. In cases of changing resins or colors, the previous resin/color can sometimes linger in the barrel, creating scrap. The material will travel through the barrel following the path of least resistance, which causes layers of resin to accumulate over time. Resin alone cannot remove these layers as effectively as a CPC can. Changeovers introduce a way for the layers to “shake loose” because the machine is not at steady state. Figure 1 shows how contamination and layering can occur. By not purging during the last changeover, an operator might see some of those layers come out in the next product. In other words, there’s a ripple effect of not purging during every changeover.
It is critical to understand your total machine downtime cost in order to truly understand how well the purging compound is working. This requires gathering a bit of data, but it is necessary to quantify a purging trial. So rather than subjectively determining “it was OK” or “good,” you can make decisions based on concrete data.
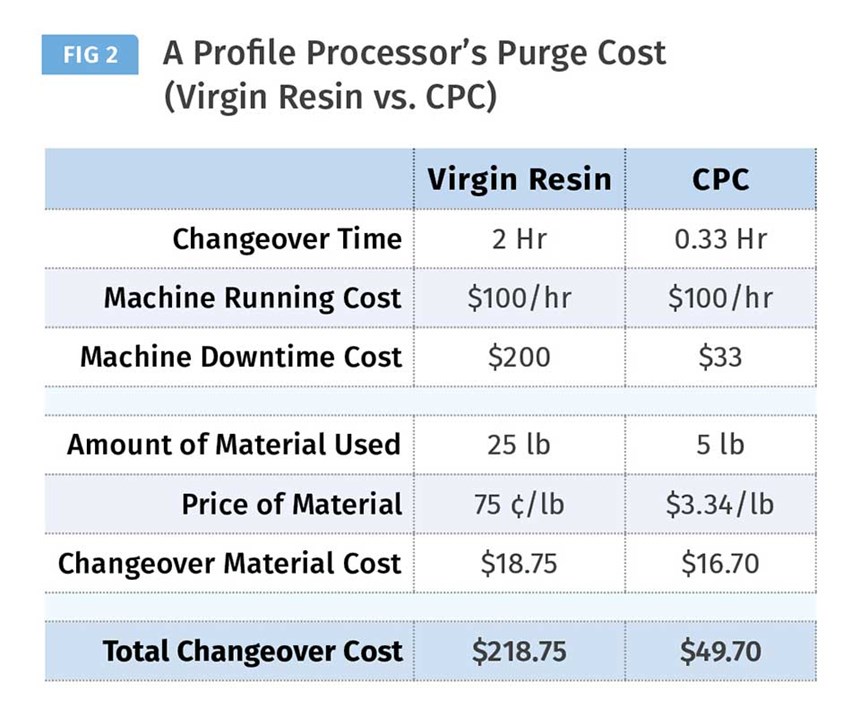
Figure 2 details a profile extruder’s real-world cost-savings analysis for its changeovers. This particular processor was using virgin HDPE to purge. The changeover took it 2 hr, and it calculated that since the machine runs at $100/hr, the downtime cost was $200 per changeover. They used 25 lb of purge material, priced at 75¢/lb, to give a changeover material cost of $18.75. Adding in the machine downtime cost equates to a total purge cost of $218.75. Assuming this profile processor performs five changeovers a week for 48 weeks in a year, this computes to $52,500 annually. If you bring additional staff onto the line to help speed up the changeover, how much more is that purge costing you in terms of labor?
SHUTDOWN & SEALING
One of the most often overlooked functions of a CPC is to use it to shut down and seal. Unless your operation runs 24/7/365, you will have periods of extended downtime for holidays and weekends. Even if you do run 24/7/365, you’ll eventually have shutdowns for preventive maintenance and repairs. In any of these circumstances, sealing the barrel with a CPC will help prevent degradation-causing oxygen from entering the barrel, thus reducing carbon from settling into the system. Another benefit to shutting down and sealing with a purging compound is that starting up is much easier, because the production resin can be run directly after the purging compound is purged. The barrel will be clean and free of contaminants, so a start-up step is eliminated by using this method. (More information on shutdown/sealing with a CPC.)
SCREW PULLS
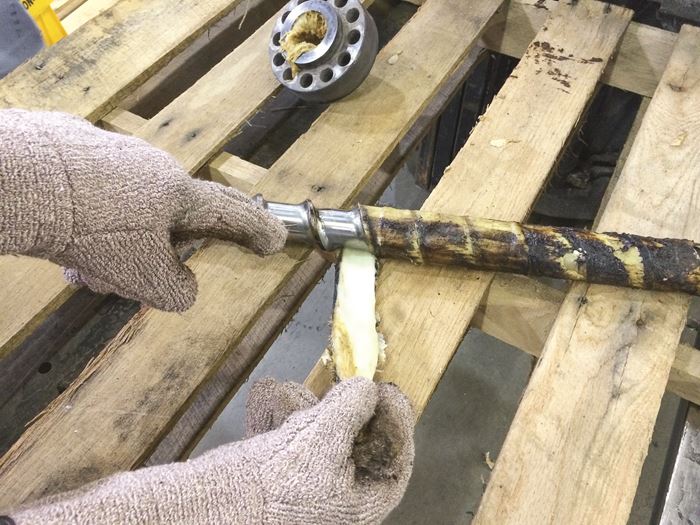
For difficult changeovers (black to natural or white, for example), a screw pull can be an effective option. Pulling a screw is time consuming and labor intensive, but using a CPC can significantly lighten that burden. By running the barrel full of certain CPCs, then pulling the screw, the technician could have to exert significantly less force to pull the screw and also have much less manual cleaning to do, because the purging compound does a good portion of the cleaning. This decreases the overall changeover time. There is even a grade on the market available that will not adhere to the barrel/screw and peels off the screw similar to peeling a banana (watch a short video of “banana peel”).
PREVENTIVE PURGING
If you’re worried about increasing production numbers and decreasing scrap rates, preventative purging can be a life saver. The first step in establishing a preventive purging program is to start tracking production rates, changeover time, and even the amount of purging material used during changeovers. When production rates start to fall, it might be time for a preventive purge, even if it is not time to change over. This method effectively removes deposits in their beginning state and prevents them from settling in and becoming more difficult to remove.
Questions About Purging? Visit the Purging Zone.
FOLLOW DIRECTIONS
A common mistake with CPCs is not following supplier instructions. While experimentation is encouraged, it should be conducted only after establishing a baseline by following the step-by-step purging instructions. Try purging with or without the die, or purge with the screen packs in or out. Maybe consider other grades of purge compound, and increase temperatures by about 50⁰ F where extra cleaning is necessary (like areas of heavy contamination). Optimization is always the end goal of every process, and your purging program is no exception. Consult with a purging expert before you decide to experiment on your own.
ANALYZE COST FACTORS
Smart companies will thoroughly and continuously examine processes to evaluate where cost can be reduced. If you’re not already keeping track of changeover time, scrap rate, production reject rate, and lost production due to downtime, start now; you can’t know if the changes you make are working unless you know where you started. Being consistent is also critical to accurately understand whether your efficiencies are improving.
One of the most common objections processors have about purging compounds is that they are priced more expensively than regrind or virgin resin. But you should also consider the costs associated above, and see that scrap rate, production reject rate, and changeover time will all increase by not using a CPC.
If you think about these costs in terms of cost per purge, rather than the cost per pound of CPC, you’ll see that the purge compound will actually save you a substantial amount of time and money. Refer again to Fig. 2. In a trial using 5 lb of Asaclean’s U-grade purging compound, the changeover took 20 min., reducing the machine downtime cost from $200 to $33 and lowering the changeover material cost from $18.75 to $16.70. This results in a $49.70 total changeover cost using CPC as opposed to the $218.75. Assuming the same five changeovers a week for 48 weeks a year, this totals a cost of $11,928 annually.
The customer would save $40,572, or 77% annual savings in changeover cost simply by using CPC instead of virgin resin. What about home-made purges? Some think in-house purges are better because they are less expensive.
However, ask yourself these questions if you are using an in-house purge: Is my in-house purge resistant to oxidation? If I shut down and seal with my in-house purge, will I have defect-free product when I start up again? Am I positive my in-house purge is not adding another layer to the contamination? If the answer to any of these questions is no, and you are looking for a better way, maybe changing to a CPC is the way to go.
DISCO PURGING
This tip is specific for extrusion and is even effective for twin-screw setups. As mentioned earlier, not purging during every changeover can cause long-term contamination issues. However, using a purging compound and a technique known as a “disco purge” lets the machine do the work and remove those set-in layers.
In a disco purge, the operator runs the machine at the maximum safe speed, then stops the screw abruptly, repeating that process several times. This allows the purge material to settle into those layers when the machine is not running, but when it starts up again, it creates more turbulence and starts to remove the layers with the CPC. Repeating this process removes more and more of the layers, and eventually the remaining contamination should shake loose and come out before running the next product.
ABOUT THE AUTHOR: Jarred Packard is the project engineer for Sun Plastech Inc., Parsippany, N.J., the manufacturer and distributor of Asaclean Purging Compounds. He is a purging compound expert specializing in new product development for Asaclean. Packard joined Sun Plastech in 2017 after working in the packaging industry. Contact: 973-257-1999 x248; jpackard@asaclean.com; asaclean.com.
Related Content
The Effects of Stress on Polymers
Previously we have discussed the effects of temperature and time on the long-term behavior of polymers. Now let's take a look at stress.
Read MoreA Guide to Ultrasonic Welding Controls
Ultrasonic welding today is a sophisticated process that offers numerous features for precise control. Choosing from among all these options can be daunting; but this guide will help you make sense of your control features so you can approach your next welding project with the confidence of getting good results.
Read MoreUltrasonic Welding: Tips, Techniques, and Troubleshooting
In this collection of content, we provide expert advice on welding from some of the leading authorities in the field, with tips on such matters as controls, as well as insights on how to solve common problems in welding.
Read MoreFive Quick Steps Toward Better Blending
Rising costs of resins and additives, along with higher demands for quality and use of regrind, place a premium on proficient blending. Here are some steps to get you there.
Read MoreRead Next
Beyond Prototypes: 8 Ways the Plastics Industry Is Using 3D Printing
Plastics processors are finding applications for 3D printing around the plant and across the supply chain. Here are 8 examples to look for at NPE2024.
Read MoreSee Recyclers Close the Loop on Trade Show Production Scrap at NPE2024
A collaboration between show organizer PLASTICS, recycler CPR and size reduction experts WEIMA and Conair recovered and recycled all production scrap at NPE2024.
Read More

