Minimize Screw Recovery & Cycle Times
Injection Molding Know How
There are hundreds of details you must identify and control to run a successful molding plant. One that is almost always at the top of the list is optimizing cycle time. Shorter cycles that make acceptable parts improve profits.
Keeping ahead of the competition is key to survival for molders. How do you stay in the lead? Start by following Dr. Deming’s teachings and pay attention to details. There are hundreds of details you must identify and control to run a successful molding plant. One that is almost always at the top of the list is optimizing cycle time. Shorter cycles that make acceptable parts improve profits.
The “details” that can affect cycle time include part design, resin selection, tool design, and processing parameters such as injection rate, melt temperature, cooling, back pressure, etc. You have to pinpoint the “detail” that is limiting your cycle time and find a way to fix or improve it.
Let’s focus here on screw recovery time. You don’t want screw-recovery or plasticating time to exceed the cooling time required for the part. If the screw cannot melt the amount of plastic required for the shot by the time the part is cool enough to be ejected, the clamp stays shut until the screw reaches its shot size plus decompression (if any). You will often find this inefficient situation in shops that mold storage tubs or trash containers, or run high-cavitation molds for caps, closures, etc.
With the goal defined—minimize screw recovery time—what are the options available to a molder?
Like most of the other details in processing, there is not one simple answer. And remember that the primary goal is uniform melt temperature and viscosity. Reducing cycle time at the expense of a uniform melt will not improve your profit margin in the long term.
Here’s our list of options:
•Feed-throat temperature: Many molders run the feed throat too cool in an effort to prevent bridging. If bridging is caused by granules sticking, you do need to lower your feed-throat temperature. However, in most cases I’ve encountered, bridging is not caused by granules sticking but instead by a solid ball of melted plastic. This is not a feed-throat temperature problem; it’s most likely a check-valve issue. So run the feed throat warm. Start at 140 F (60 C). Experiment with even higher feed zone temperatures.
•Rear zone temperature: This influences how the granules begin to stick to the barrel wall. The better the friction, the faster the screw will recover. This is influenced by resin type, granule size and shape, etc. The only way to find out if this is an option is to check recovery time over the span of recommended melt temperatures. Too high or too low a temperature will provide longer recovery times.
•Backpressure: Appropriate backpressure is critical for obtaining melt uniformity and color blending. High backpressures cause longer recovery times but sometimes are required for melt uniformity. Make sure the backpressure is not too high or too low.
•Zone temperature settings: With the myriad of available temperature profile options (flat, reverse, standard etc.), we will tackle this detail in a separate article.
•Screw design: Again, there are a myriad of options that will have to be tabled for separate article, but I will state emphatically that if you are using a standard “general-purpose” screw you will not get a uniform melt. End of discussion.
•Screw speed or screw-flight circumferential velocity: Higher rpm does not always mean faster screw recovery. Test a range of screw speeds and allow time for the process to stabilize. This can take a long time.
•Carrier for the color: Some color concentrate carriers have a lubricating effect that reduces the friction between the plastic granules and the barrel wall. This extends recovery time. As a simple check, run natural resin with no color and note whether recovery time decreases.
Let’s assume you have optimized all the processing variables available, but you are still stuck waiting for the screw to reach shot size. Options now are limited to only two:
1. Get a bigger barrel to gain melting capacity. If this is your choice, keep in mind that you will be using a small percentage of the barrel capacity. Bigger barrels increase residence time. Also, you’ll wind up with a shorter stroke distance during injection, which translates into less control over hitting transfer position accurately. There is a chance of more screw overtravel or larger effects from nonreturn valve leakage. Add in the significant capital expense of a new barrel and screw. Capital expenditures, degraded resin, black specks, less control on injection, etc. are all costly to the molder’s bottom line.
2. Adapt the barrel with a nozzle shutoff valve. It mechanically closes after melt decompress at the end of hold or second stage. Shutoff nozzles block the flow of plastic from going through the nozzle of the injection machine. This allows the screw to continue to rotate during mold opening, ejection, parts removal, and mold closing. So you have the entire time from mold open to mold close to get the screw back. This can add a few precious seconds of extra plasticating time to get the screw to the shot size. Various types of shutoff nozzles are available, and you should pick one that is robust, provides minimal pressure drop, doesn’t drool, and is easy to install.
•Spring-loaded: These are basically a needle valve that is held shut via a heavy spring. When injection starts, the screw moves forward and compresses the plastic to a certain pressure, which pushes the needle valve open to allow plastic to flow through the nozzle into the sprue bushing of the mold. Spring-loaded nozzles may not adequately decompress the melt after injection, leading to stringing out of the gates when the mold opens.
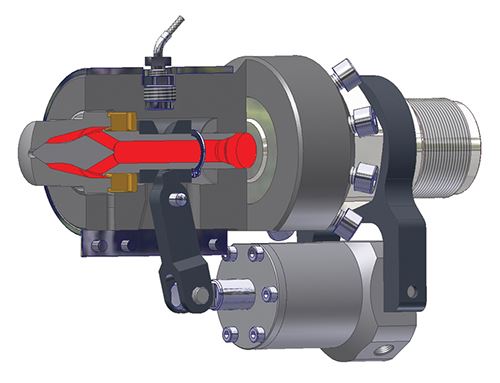
•Mechanically driven: There are two variants here. One type has a needle valve that lies in the direction of flow and is mechanically opened and closed with either a hydraulic or pneumatic drive cylinder. At injection (or a fraction of a second before), the drive cylinder is actuated to mechanically open the shutoff valve and actuated in the reverse direction at the end of hold or second stage. These tend to develop a high pressure loss, as the needle is usually in the middle of the plastic flow channel. Instead of having a full-round tube for a flow path (the ideal), the plastic has to pass through an annular channel (see Fig. 1).
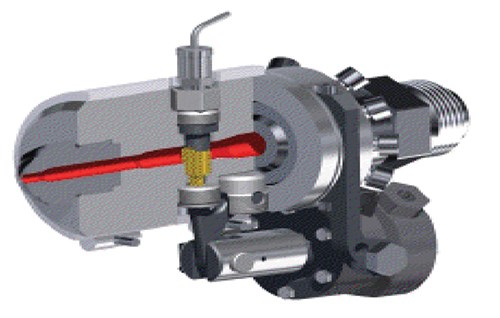
The second variant has a pin valve that is again actuated by a hydraulic or pneumatic drive cylinder. However, this type has a full-open flow path because the pin is perpendicular to the flow path and is pulled out of the flow path when in the open position and is pushed forward to block the flow path in the closed postion (Fig. 2). With this type of shutoff valve it is important to ensure the pin is aligned properly. Side loads can cause premature failure. Shutoff valves are high-maintenance devices that add cost to the process. Often it is wise to have a spare handy to keep production going.
About the Author
John Bozzelli is the founder of Injection Molding Solutions (Scientific Molding) in Midland, Mich., a provider of training and consulting services to injection molders, including LIMS, and other specialties. E-mail john@scientificmolding.com or visit scientificmolding.com for scheduled dates.
Related Content
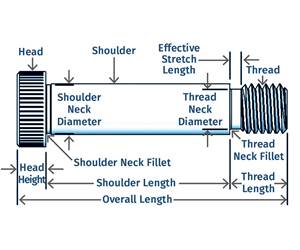
Why Shoulder Bolts Are Too Important to Ignore (Part 1)
These humble but essential fasteners used in injection molds are known by various names and used for a number of purposes.
Read MoreHow to Select the Right Tool Steel for Mold Cavities
With cavity steel or alloy selection there are many variables that can dictate the best option.
Read MoreInjection Molding: Focus on these Seven Areas to Set a Preventive Maintenance Schedule
Performing fundamental maintenance inspections frequently assures press longevity and process stability. Here’s a checklist to help you stay on top of seven key systems.
Read MoreBack to Basics on Mold Venting (Part 1)
Here’s what you need to know to improve the quality of your parts and to protect your molds.
Read MoreRead Next
People 4.0 – How to Get Buy-In from Your Staff for Industry 4.0 Systems
Implementing a production monitoring system as the foundation of a ‘smart factory’ is about integrating people with new technology as much as it is about integrating machines and computers. Here are tips from a company that has gone through the process.
Read MoreSee Recyclers Close the Loop on Trade Show Production Scrap at NPE2024
A collaboration between show organizer PLASTICS, recycler CPR and size reduction experts WEIMA and Conair recovered and recycled all production scrap at NPE2024.
Read MoreLead the Conversation, Change the Conversation
Coverage of single-use plastics can be both misleading and demoralizing. Here are 10 tips for changing the perception of the plastics industry at your company and in your community.
Read More
.jpg;width=70;height=70;mode=crop)
