Prevent & Minimize Downtime in Hot Runner Molding
There are simple explanations for the most common hot-runner problems and equally simple ways to prevent them. One is to take advantage of features often overlooked in today’s hot-runner controls.
The objective of all injection molders is to maximize uptime and minimize scrap, and they are increasingly turning to hot-runner molding as a way to speed up the cycle and reduce the use of materials. While hot-runner molding can provide excellent results, things can and do go wrong. If the process is not properly controlled, costly repairs and downtime can be potentially devastating.
This article discusses the use of machine interlocks, procedures, and advanced monitoring features available on today’s hot-runner temperature controls to identify and prevent problems from occurring, detect plastic leaks early, and predict heater failure.
MOLDING MACHINE INTERLOCKS
Molders at some point will probably encounter the three problems listed below:
• The hot runner is up to heat, but the mold’s cooling water isn’t on.
• Someone tries to move hot-runner valve-gate pins when plastic is cold and frozen in the mold.
• The machine stops for too long, causing material burning and degradation.
To prevent these from happening, three machine interlocks are recommended:
1. Don’t heat the hot runner when the water isn’t on. Water is used to cool hot-runner molds and provide stable temperature control. If you don’t have adequate fluid flow and the hot-runner heat is on, the hot-runner water seals get too hot and burn out, causing leaks. Replacing the seals is difficult, time-consuming and costly.
By implementing a simple interlock, molders can prevent this condition from occurring. Protect your seals by ensuring the water is on. There are two main interlock choices: The first is to monitor flow at all times using flow, pressure, and/or temperature sensors. These sensors will provide key data and send a signal when there is a problem. The controller will go to “inhibit” or standby when the problem signal is received.
Alternatively, you can monitor the hot-runner plate temperature to ensure it’s not too hot. Install extra thermocouples in the mold plates. These will show when the mold temperatures are out of range and indicate when fluid is not circulating, identify blockages, etc. The controller can be programmed to alarm only or go to standby or “inhibit” when the monitoring zone is out of range.
2. Avoid injecting or moving the hot runner valve-gate pins when the plastic is cold. If the plastic has solidified in the hot runner, it’s essential that the entire hot-runner system be brought up to the correct operating temperatures to begin injection. If the valve pins move while the resin is still cold, you will likely do serious damage to the system: The pins can bend or break, requiring repair and replacement. This is not an easy task and it tends to be expensive, both in downtime and the cost of system repair.
To prevent this from occurring, use the same interlocks mentioned above in #1: monitoring water using flow, temperature, or pressure sensors; or measuring temperatures of the mold plate—which should be coupled with an “OK to Run” signal.
This signal tells you everything is at setpoint temperature, all unlocked zones are on, and there are no alarms, indicating that water is working properly, the system is ready to run, and the valve pins can move safely.
3. Eliminate burned or degraded material as the result of a prolonged machine stoppage. Residence time is a key parameter for any plastic material in a hot-runner system. It’s important to know the proper number of shots of material that “reside” in the machine barrel and hot-runner system. Resin suppliers publish data providing valuable information on how long specific materials can stay idle before they begin to degrade. In addition to virgin resins, material compounds must also be considered.
Additives such as glass, talc, UV stabilizers, colors etc. all have their own residence-time limits.
Another point about residence time: It’s important to ensure that the molding machine never stops running for a greater amount of time than has been calculated as safe. If a problem is detected and the machine goes from auto to semi-auto or manual operation, someone or something needs to intervene.
The recommended interlock for this condition is to set timers to deal with this issue. Whenever they detect longer residence time than normal, they can notify the operator and tell the machine or hot-runner controller to shut down the machine or go to standby.
In our experience, we’ve seen 10% or fewer of our molding customers using the “standby” condition on the controller to prevent burning material. While that number should be higher, it’s still a better percentage than those molders who don’t set interlocks for #1 and #2 above.
One percent or less—that’s right, 1% or fewer molders—are actually setting interlocks to deal with monitoring water flow or stopping valve pins from operating in a cold mold. That means 99% or more of these molders are still relying on their plant-floor personnel to catch problems before they happen. This is a practice that can be improved. It’s clear that to maximize uptime and productivity, and to be more globally competitive, implementing a few simple interlocks can greatly improve molders’ operations.
BETTER PROCEDURES
Now let’s consider best practices for heating/cooling the hot-runner mold sequentially and not creating a large temperature difference inside the mold that could result in losing the manifold seal.
To maintain the hot-runner manifold seals and maintain the supplier’s stack-up recommendations, proper startup of the hot-runner mold is essential. While some hot-runner suppliers have tighter tolerances than others, the following guidelines provide good habits that should be followed for starting up any hot-runner mold.
First, heat the mold sequentially; larger masses such as the manifold block, including the inlet, should be heated first, followed by the faster heating nozzles. This is logical, as the larger masses take longer to heat up and expand, and the nozzles heat quickly.
Allowing the nozzles to race to setpoint could result in uneven thermal expansion within the tool, causing warpage within the system, which leads to leakage. Also, if nozzles are heated first, by the time the manifold is up to heat and you’re running, you could be burning the material.
Note: It is critical to give expanding material a relief outlet. If you heat the inside of the mold (manifolds) without the inlet the material expands and can dislodge the inlet like a cork in a champagne bottle followed by a potentially hazardous spurt of molten material.
Once operating, it’s common for one or more cavities in the hot-runner mold to have problems. Blockage from bad resin (metal fragments, etc.) is one frequent issue. If it’s essential to keep molding parts with the remaining “good” cavities, it’s important to not shut off heat to the bad nozzle(s). The thermal contraction created by doing this could result in hot-runner seal damage, leading to leakage. The proper procedure is to turn down the temperature on the “bad” nozzle(s) to a point where the material solidifies. This stops the flow of material and prevents burning or degrading the material, the same as turning the zone off, while providing the maximum thermal expansion to maintain the manifold seal.
THE PROBLEM WITH LEAKS
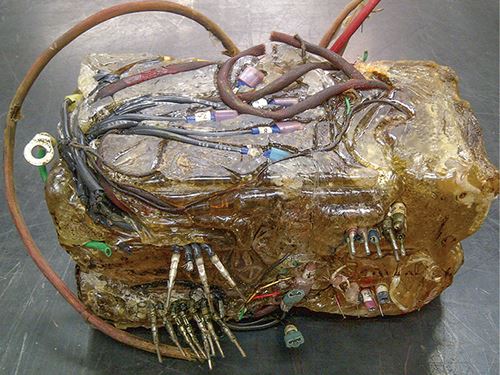
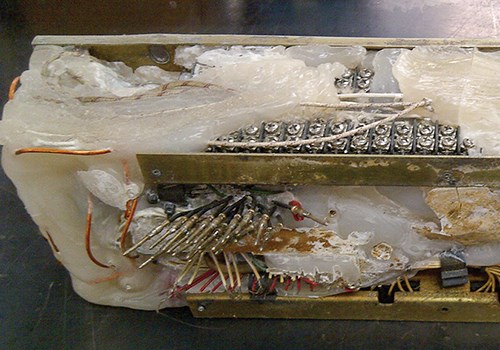
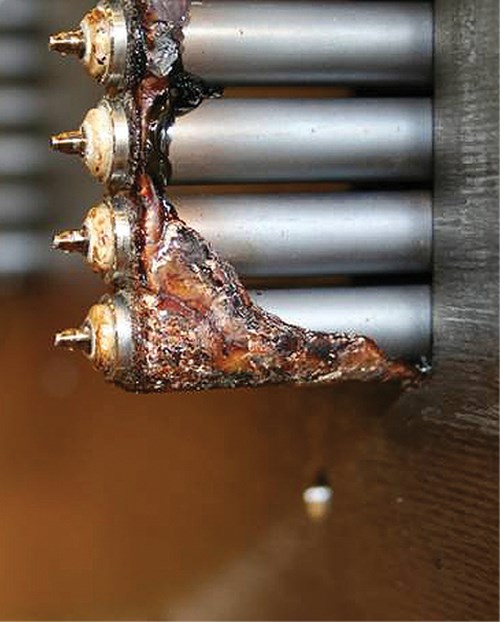
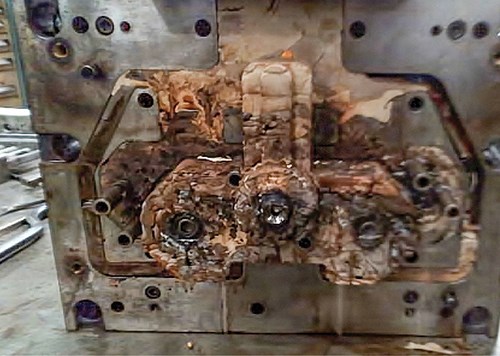
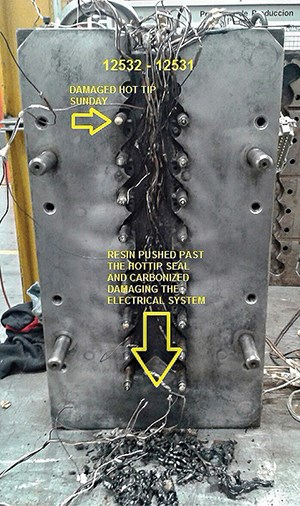
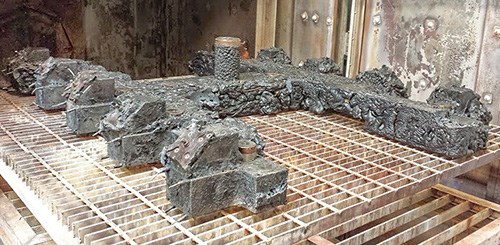
All too many molders have seen what happens when material leaks occur within a hot-runner system. The leaking plastic emerges outside the manifold and nozzles. If these leaks go undetected the damage they cause can be nothing less than catastrophic (see accompanying photos).
Hot-runner systems rely on a large number of heaters and thermocouples to perform effectively. These are present inside and outside the manifold and nozzles, and sometimes even on the nozzle tips themselves. A 64-cavity hot-runner mold can easily have 75 control zones or more. Every heater and thermocouple has associated wires that run from the hot-runner mold to a connector where cables connect the hot runner to the temperature controller.
When leaks occur, it’s common for wires to get coated in molten plastic, and the usual end game is the affected heaters and thermocouples all must be replaced. Some hot-runner suppliers integrate the heaters into the hot runner nozzles, which usually means the entire nozzle must be replaced. Needless to say, this gets very expensive and leads to significant downtime.
The cost to repair a downed hot-runner system due to leaks is estimated at $500 per zone, and that’s conservative—this figure doesn’t include lost machine time. So that 64-cavity hot-runner mold that is full of material and needed to be repaired? It will cost $37,000—at least!
All this can be avoided with proper use of the above-mentioned machine interlocks and procedures. Even better, use of advanced monitoring techniques available in today’s hot-runner temperature controllers can greatly diminish the chances of material leakage in your hot-runner system.
ADVANCED MONITORING FEATURES
Today’s best hot-runner temperature controllers employ excellent tools to help molders detect and prevent potential material leakage in their hot-runner molds. When plastic leaks into the mold, it occupies a former air space. Eliminating the air space creates a heat sink to the surrounding mass. In automatic mode, the controller increases the power to compensate for the heat loss. Some controllers monitor heaters’ electrical use in various ways to detect such trends.
For example, the Gammaflux watt/leak alarm monitors wattage consumption of each hot-runner control zone and alerts the user when a leak first occurs. When wattage readings from any control zone are too high (typically 10% above normal), this indicates potential material leakage and alerts the user to inspect the manifold. Precisely measuring the actual wattage—and acting promptly on suspicious readings—can be the difference between a short trip to the tool room for repair, or weeks of lost production. The sad fact is that many molders have leak-detecting controls but fail to use them.
Related Content
What to Look for in High-Speed Automation for Pipette Production
Automation is a must-have for molders of pipettes. Make sure your supplier provides assurances of throughput and output, manpower utilization, floor space consumption and payback period.
Read MoreBack to Basics on Mold Venting (Part 2: Shape, Dimensions, Details)
Here’s how to get the most out of your stationary mold vents.
Read MoreA Systematic Approach to Process Development
The path to a no-baby-sitting injection molding process is paved with data and can be found by following certain steps.
Read MoreInjection Molding: Focus on these Seven Areas to Set a Preventive Maintenance Schedule
Performing fundamental maintenance inspections frequently assures press longevity and process stability. Here’s a checklist to help you stay on top of seven key systems.
Read MoreRead Next
Beyond Prototypes: 8 Ways the Plastics Industry Is Using 3D Printing
Plastics processors are finding applications for 3D printing around the plant and across the supply chain. Here are 8 examples to look for at NPE2024.
Read MoreFor PLASTICS' CEO Seaholm, NPE to Shine Light on Sustainability Successes
With advocacy, communication and sustainability as three main pillars, Seaholm leads a trade association to NPE that ‘is more active today than we have ever been.’
Read More
