Take the Guesswork Out of Determining Screw, Barrel Wear
New technology from Glycon takes real-time measurements of screw and barrel wear and provides data to guide processors as to when the time may be right to swap out these components.
Screw and barrel wear wreak havoc on every process, slashing throughput rates while generating additional scrap before shutting the line down altogether. But the what and when of such wear is somewhat mysterious; ascertaining the extent of it—or whether it exists in the first place—often leads to head scratching and guesswork.
Over the past year, injection molding machine builders have tried to shed light on this vexing problem (see Keeping Up with Technology, February 2021). And now, Glycon Corp. is introducing technology to measure screw and barrel wear at the source—inside the plasticating unit. Glycon is in the first stage of rolling this technology out to the market, focusing on extrusion and blow molding, explains company founder and CEO Jeff Kuhman.
Kuhman notes that Glycon has actually been developing technology to measure wear since 1986, when, as Great Lakes Feedscrews, it was granted its first patent to measure screw wear. The company, which supplies a wide range of screws, barrels and other machine components, refined the technology to include measuring barrel wear, and was granted additional patents in 2006, 2007, 2008 and 2019. It has tested the technology both at its lab in Tecumseh, Mich., which houses a 2.5-in. extruder with 24:1 L/D, and in the field at an undisclosed sheet processor in the Midwest, which runs a 6-in., 32:1 extruder.
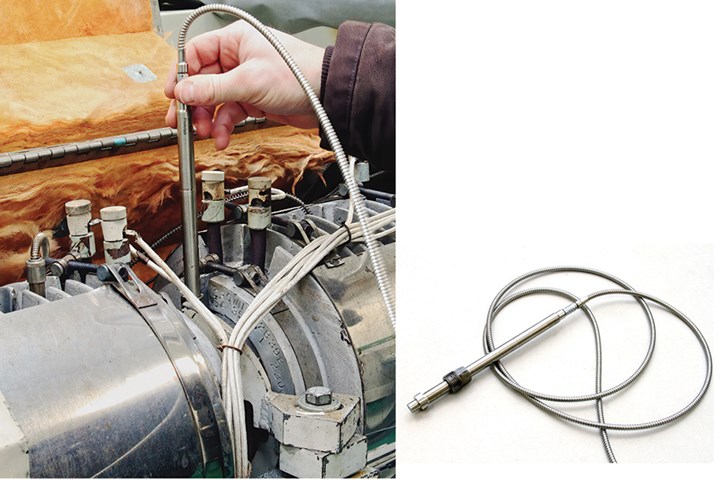 Technician installs proximity-detection sensor (right) into SmartPort on barrel to measure the wear on both the OD of the feedscrew and the ID of the barrel.
“Much has been written over the years on the causes and effects of wear in a plasticating extruder, and most plastics processors recognize the symptoms of wear, usually from a reduction in melting rate,” Kuhman states. “At that point, most machine operators try to compensate by making adjustments to the screw speed or temperature settings. The problem is, each of these adjustments constitutes a departure from optimum conditions and will eventually result in lower productivity and higher scrap rates.”
The new Glycon system seeks to avoid all that. Called EMT (for Electronic Measurement and Tracking), the system consists of Glycon’s Flite-Scan eddy-current sensors that are installed at one or more locations in what Glycon calls a SmartBarrel. These barrels are furnished with a SmartPort, which Kuhman describes as an aperture through the wall of the barrel, together with a barrel-measuring plug configured for insertion in the aperture, a threaded retainer to hold the measuring plug in place, and a second set of threads to secure the electronic sensing unit for measuring the distance from the ID of the barrel to the surface of the feedscrew flight land, or the “gap.”
When ordering a new barrel, adding the SmartPort will cost a few hundred dollars extra, Kuhman says. At the outset, wear measurements will be performed periodically at the processor’s plant by Glycon field technicians utilizing a Flite-Scan sensor. Over the years, Glycon has worked with several suppliers of eddy-current sensors in search of the most robust design, finally settling on sensors developed jointly with Micro-Epsilon in Germany.
Kuhman explains, “We worked with a couple of other suppliers of sensors over the years and ran into problems related to high temperatures within the plasticating unit, which affected the accuracy of the sensors. Initially, processing temperatures above 300-350 F would result in inconsistent readings of the critical gap between the flight OD and the barrel ID. The initial sensors were fragile, and were susceptible to damage from abrasive fillers, metal-to-metal contact, and tramp materials in post-consumer reclaim.
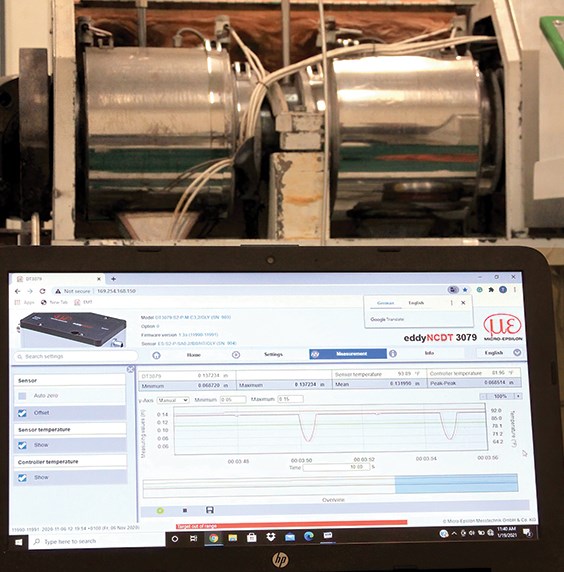
The Micro-Epsilon sensors are more robust and can provide accurate readings at operating conditions up to 600 F. Processors who prefer to take their own measurements can purchase the sensors directly from Glycon.
To take a measurement, technicians remove the barrel plug from the SmartPort. The proximity-detecting sensor is then installed in the SmartPort and secured by the retainer.
The machine can be at or near operating temperature when the measuring process takes place. Ideally, material should be purged or nearly purged to facilitate removal of the plug and installation of the sensor. The screw is then rotated at minimal speed and the distance between the screw OD and barrel ID is measured, recorded and averaged, recognizing precession, or the orbital rotation of the screw inside the barrel. The rotation of the screw can be observed on the screen of the recording device.
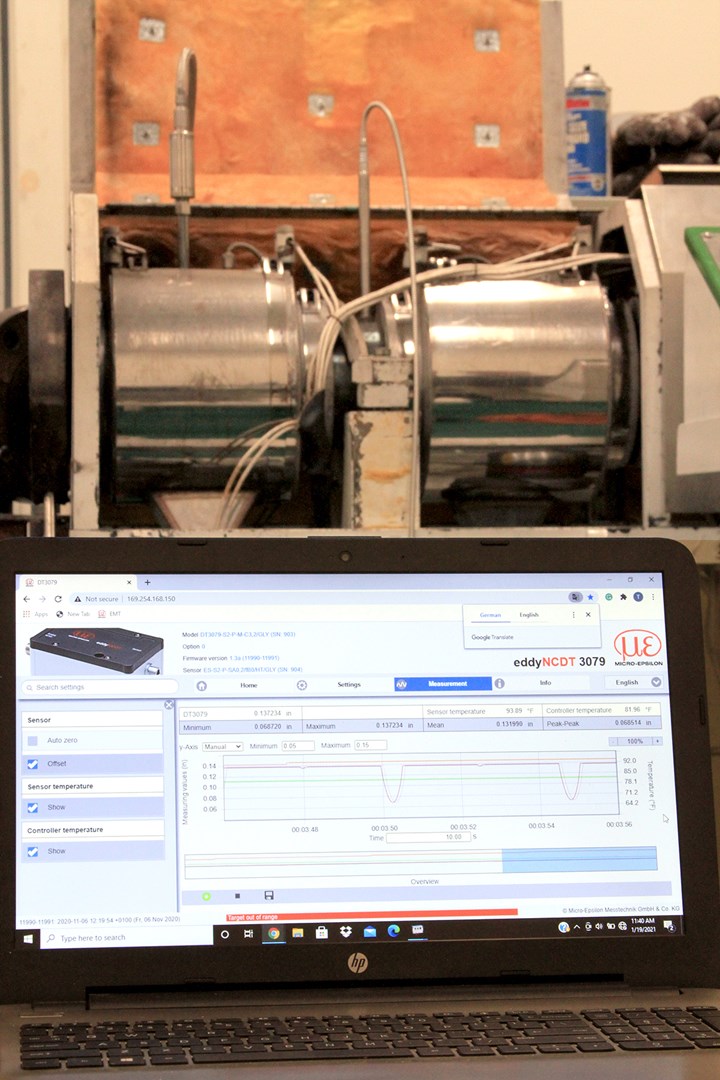
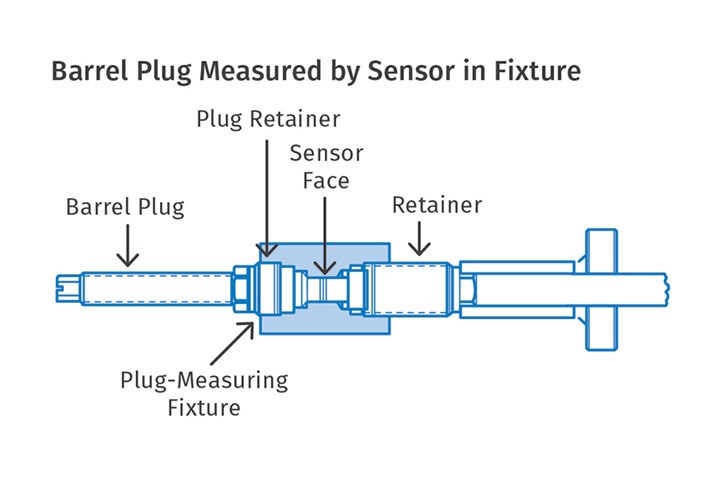
The barrel plug, which is installed in the new barrel during the manufacturing process, is finish-honed with the barrel to ensure that the plug will match the barrel ID When the barrel plug is removed during the measuring process, it is installed in a “measuring fixture.” The sensor is then installed in the opposite end of the fixture and used to measure the wear on the barrel plug. While the sensor is installed in the measuring port, the average reading will provide the wear on the screw, while the minimum reading indicates the wear on the barrel. The barrel wear can then be confirmed by the measurement of the barrel plug in the fixture.
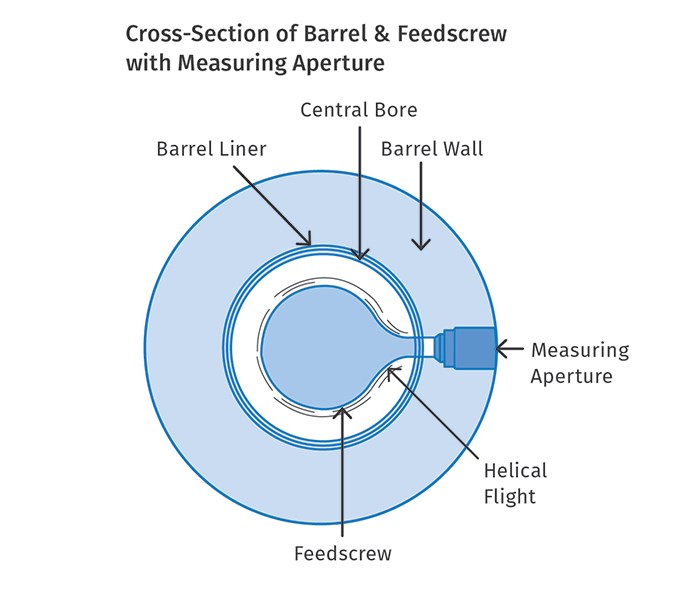 Cross-section of Glycon SmartBarrel with feedscrew installed and measuring aperture called SmartPort. To take readings, technicians insert an eddy-current sensor in the port after removing a barrel plug.
Whether done by Glycon’s technician or by the processor’s own personnel, data is transmitted to a customer’s EMT portal at Glycon, where it will be maintained on each of the customer’s production machines, showing the date of installation, initial measurements, hours run, type of material being processed, approximate pounds of material processed, instrument readings and the total amount of wear.
Kuhman says the objective of the EMT system is not only to analyze the data to determine the optimum time to replace or repair worn screws or barrels to optimize productivity, but also to relate the wear to:
• Materials of screw/barrel construction.
• Screw/barrel alignment.
• Polymers being processed.
• Impact of abrasive fillers.
• Performance related to wear, including production rates, cycle times, energy consumption, melting rates, head pressures and melt temperatures.
“Wear data obtained will allow engineers to determine the relationship of screw/barrel wear to key performance data,” Kuhman says. “When this data is compared with the rate of wear or wear over time, it will allow processors to determine their most cost-effective time to rebuild or replace parts.
Additionally, it will allow the screw and barrel supplier to recommend metallurgical solutions that could provide better wear resistance and longer life in their replacement parts.”
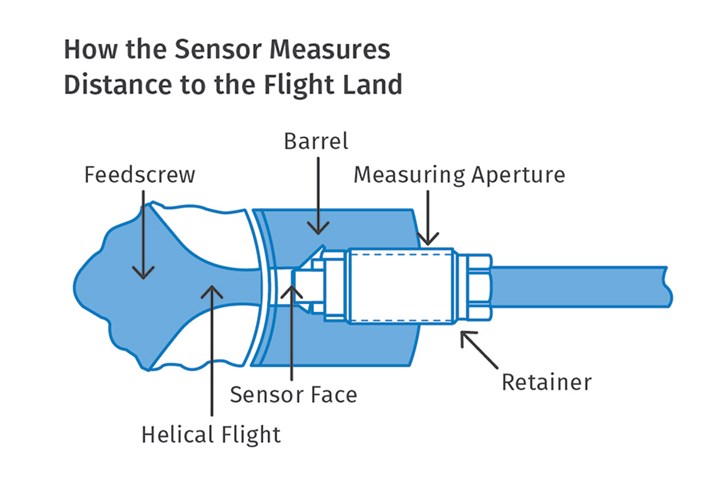 Cross-section of eddy-current measuring sensor installed and secured by a retainer in the SmartPort. The machine can be at or near operating temperature when the measurement is done.
He continues, “The advantages of the Glycon EMT system are that it provides precise measurement of the wear on the OD of the feedscrew and the ID of the barrel and its simplicity and cost-effectiveness. It allows maintenance personnel to plan measuring intervals and to schedule changeouts at convenient times based upon wear-rate data rather than ‘running to failure’ and having to run inefficiently or not at all.”
At the same time, drawing on a NASCAR analogy—recalling a race in which worn tires cost the driver a victory, Kuhman recognizes the reluctance of most processors to make “pitstops” to interrupt production by tearing down the machine to take measurements of the screw and barrel.
Notes Kuhman, “And who can blame them? Sometimes on larger machines, taking a machine out of production, removing the screw, cleaning and measuring both the screw and barrel, then reassembling the machine can take two or three days. Glycon can now reduce that process to less than 1 hour and eliminate removing the screw and cleaning the barrel, while maintaining the machine at or near operating temperatures.”
Says Kuhman, “As nearly as we can tell, Glycon was the first company to have the foresight to envision the practicality of predictive analytics based on precise electronic measurement in plasticating machines—at least as far as foreseeing the value of being able to measure screw and barrel wear on an extruder or injection molding machine without having to shut down the line and disassemble the machine.”
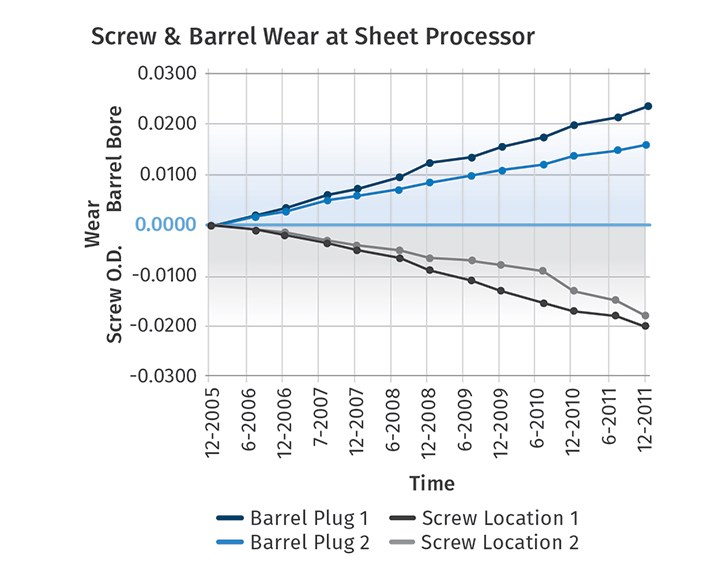
He adds, “With this capability, we have developed the technology to then calculate the rate of wear and predict future wear, and with this data determine the most cost-effective time to replace these components.”
Related Content
Open Automation Enables Flexibility in Chemical Recycling
Software-defined equipment control systems can be duplicated, transferred and scaled with ease.
Read MoreLSR Advances in Dispensing, Tooling and Automation
At Fakuma 2023, Sumitomo (SHI) Demag’s LSR injection molding machines showcased advances from itself and partners Reinhardt-Technik, Rico and Sepro.
Read MoreSmart Granulator Control Integrates Size-Reduction Systems, Enables Predictive and Knife Maintenance
NPE 2024: Conair’s New SG Control is available for its Viper Granulators
Read MoreSmart Systems Illuminate Material Recovery for Enhanced Plastics Recycling
Data collection and machine learning can give MRF operators and brand owners an enhanced view of the fate of recyclable materials.
Read MoreRead Next
New Technology Opens a Predictive Window Onto Screw Wear
Despite their integral role in transforming pellets fed through the hopper into parts ejected from the mold, visibility into the performance, health and efficiency of screws is difficult to discern for many reasons, not the least of which being the fact they’re located inside a barrel.
Read MoreScrew Wear: Understanding Causes, Effects, and Solutions
Here’s how to find out what’s happening to your screw and what to do about it.
Read MoreTelltale Signs of Screw Wear
Determining the cause of wear is the first step in eliminating it.
Read More


