Dimensional Stability after Molding—Part 5
All materials possess a property called the coefficient of thermal expansion (CTE). The vast majority of materials increase in size as their temperature increases and decrease in size as their temperature declines.
At the International Bureau of Weights and Measures near Paris, sits a bar made of 90% platinum and 10% iridium with two marks engraved very precisely into it. The bar is stored under very controlled conditions, and at 0° C the distance between the two marks represents one meter. For more than 70 years this bar served as the worldwide standard for this fundamental unit of measure in the SI system (International System of Units).
Why would so much effort go into defining a unit of length? The answer lies in part on a property that all materials possess: the coefficient of thermal expansion (CTE). The vast majority of materials increase in size as their temperature increases and decrease in size as their temperature declines. For most metallic materials this value is approximately 10 x 10-6 m/moC. For most unfilled polymers the number is approximately an order of magnitude greater or about a tenth of a thousandth of an inch per inch per °C change in temperature.
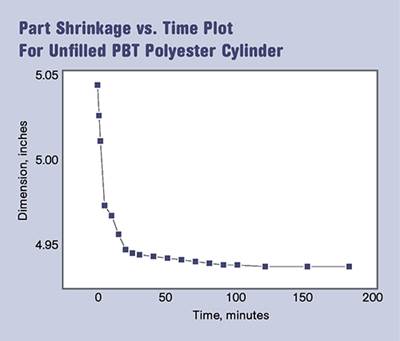
A story from the world of producing and measuring close-tolerance parts provides an illustration of the importance of this property. In the first part of this series we reviewed a part molded from unfilled PBT polyester. This part was essentially a cylinder approximately 5 in. high and closed at the end at which it was gated. It had a critical depth dimension from the bottom flange to the other end of the part of 4.941 +0.008 in. Maintaining this dimension was a challenge every time the job ran, particularly since the nominal wall thickness was 0.250 in. and the part was not dimensionally stable until 2 hr after it was molded.
This uncertainty was solved by creating the graph of the critical dimension vs. time discussed in Part 1. But this part had presented a number of challenges over the years that always had us looking over our shoulders for some unexpected calamity.
These parts went out for a machining operation and then came back to our plant for a final inspection before being shipped to our customer. One day the parts came back from the machinist and were dropped off on the dock. It was mid-January in Wisconsin and the outside temperature was typical for that time of year: 10 F (-12 C), a full 35° C below room temperature.
Since the boxes were heavy, rather than haul the parts upstairs to the QC lab the quality person took the depth micrometer down to the dock and began to perform a final inspection on this critical dimension. Upon finding the parts to be undersized, he announced this with the singular delight that only a QC person can display when delivering bad news to the production staff. When I picked up a part to verify the measurement, I noticed that it was ice cold. I advised QC to take the parts to the lab and allow them to come to room temperature before measuring them. When they did, magically, the parts were to print again.
Looking at the properties of the PBT polyester in question, the behavior was predictable. With a CTE of 0.000075 in./in.°C, multiplied by a 35° C change in temperature and a length of nearly 5 in., the parts had “moved” almost 0.013 in., or almost the entire span of the print tolerance. This illustrates the importance of measuring critical dimensions at standardized conditions.
Occasionally you may see a print that actually calls out a temperature range at which dimensions are to be checked. This reflects an awareness of the importance of CTE to the size of the part, a factor that escapes many. As with all of the other considerations we have been discussing, the larger the part the more important this becomes.
This also relates to a lesson that was learned when we first began to perform SPC at the molding machines in the early 1980s. The importance of checking and charting critical dimensions while the parts were running was one of the big messages of SPC. So it made sense to put the inspection tools right at the press, where the operator could check and input the dimensions and observe the control charts as they developed. Some of the gauges were measuring critical dimensions to the tenths of thousandths of an inch. When we would analyze the data for Cp and Cpk values, we found disappointingly low process-capability results, even though the ranges for any given set of samples taken at a particular time did not suggest that this should be the case. In addition, when the parts collected for SPC over the course of a run were reviewed by the quality people after the fact, the variation was much smaller.
This was initially attributed to the greater expertise that the QC people brought to the measurement process and the fact that having a single person making all the measurements reduced some of the aspects of gauge repeatability and reproducibility. But further investigation showed that there was more to it. When the efforts to bring SPC to the production floor began, the plant had not yet gone through the conversion to a climate-controlled environment. Anyone who has worked in a molding plant without climate control knows that during the summer months, even in Wisconsin, the temperature in the building can vary significantly, from relatively cool conditions first thing in the morning to sweltering heat in early second shift.
Temperature gauges in the plant documented swings of as much as 50° F (28° C). When we looked at our control charts we could see the waveform associated with these temperature fluctuations superimposed onto the normal variation of our processes. Parts molded when the plant was at its hottest did not shrink as much as the parts molded when it was cooler simply because of the effects of the CTE. Not only did it make the process look less capable, it often gave the impression of a trend that the technicians and quality people reacted to that was not really there.
So in addition to all of the other considerations that we have discussed relating to dimensional stability, we must add one more: Even parts that have become stable will still produce different measurement results when checked under different environmental conditions. The CTE of the material, the size of the part, and even the orientation of the polymer relative to the dimension being checked, will all have an influence on the sensitivity of the measurements to the temperature at which these measurements are made.
Related Content
Where and How to Vent Injection Molds: Part 3
Questioning several “rules of thumb” about venting injection molds.
Read MoreThe Fundamentals of Polyethylene – Part 2: Density and Molecular Weight
PE properties can be adjusted either by changing the molecular weight or by altering the density. While this increases the possible combinations of properties, it also requires that the specification for the material be precise.
Read MoreThree Key Decisions for an Optimal Ejection System
When determining the best ejection option for a tool, molders must consider the ejector’s surface area, location and style.
Read MoreBack to Basics on Mold Venting (Part 1)
Here’s what you need to know to improve the quality of your parts and to protect your molds.
Read MoreRead Next
Dimensional Stability After Molding: Part 1
The degree to which molded parts shrink as they cool is largely dependent upon the composition of the material being processed.
Read MoreDimensional Stability after Molding—Part 3
Any process that involves melting and re-solidifying a polymer involves a compromise between achieving the perfect structure and producing a part that can be sold at a price that the market is willing to pay.
Read More
.jpg;width=70;height=70;mode=crop)
