Eliminate Problems with Container Handles
Extrusion blow molding a container with a handle may sound easy.
Extrusion blow molding a container with a handle may sound easy. But not every handle that can be drawn by a de-signer or that looks attractive to the marketing department can be molded successfully. Many process engineers have been asked to help dig a project out of trouble when the handle area emerges as a problem spot. Sticking to time-tested design and processing principles will solve such problems or prevent them from occurring in the first place.
Tackling design issues
The most important step is designing the container so that the handle can be properly processed. This requires an understanding of how the parison falls and how it is captured by the mold and pinched and blown out into the final container shape.
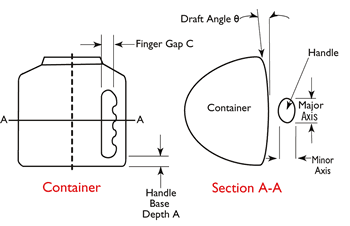
In a typical handleware container (Fig. 1), the aspect ratio of the handle is the ratio of the major axis (width of the handle perpendicular to the parting line) to the minor axis (width of the handle parallel to the parting line). An aspect ratio of 1:1 is optimum; at most, a 2:1 ratio can be blown. Higher aspect ratios are certain to create narrow or impossible processing windows.
An optimum processing window requires a draft angle of 5° to 8° in the handle area (Fig. 1) so the part can be easily released from the mold. Textured parts will require more draft angle than polished parts.
Handle webbing is the most common problem that surprises designers who are unfamiliar with proper handle design principles. Webbing is an undesired fold of plastic that forms on the inside of a container when two relatively unrestricted sections of the parison expand and then meet in the constrained section. This fold of plastic sticks together and cools without being pushed to the mold wall, usually resulting in a bottle that is technically functional but aesthetically unacceptable.
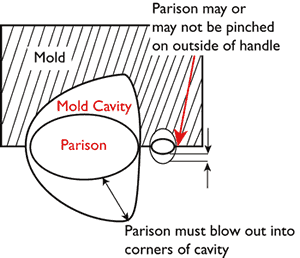
To understand webbing, you must first understand how the parison is captured as the mold closes, as shown in Fig. 2. The parison extends outside of the handle area, forming a completely pinched tube as shown in the cross section. (This may not be necessary for all containers, depending on the overall geometry.) Notice that when the mold closes, two distinct tube sections are formed due to the pinching together of the handle section. It becomes more evident why the handle aspect ratio is important—if the handle is very “wide” a large blow-up ratio will result. It’s also important not to create weak sections in the corners of the container.
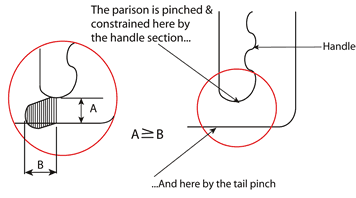
Figure 3 shows how webbing occurs. At the base of the container, the parison is constrained by the pinch at the bottom of the handle opening and by the base pinch. The handle base depth (A) must be greater than or equal to the distance the parison has to blow out to the sides (B). Otherwise, two distinct sections in the container and handle will blow out in direction “B” and the blown sections will meet, creating a web.
Remember A ≥ B as the first rule of handle design. When in doubt, cut your development mold “metal-safe” and plan on several iterations to optimize the design.
Handle dimensions and the finger gap (Fig. 1) also play a role in webbing. In general, webbing is likely if the handle opening dimension is too close to that of the base.
Processing solutions
Astute processors will often tilt the mold when processing handled containers. Handles often extend far down the side of the container. It is usually desirable to form a pinch as far down the outside of the handle as possible so there is enough material in the handle to form a good sidewall. However, it is generally not desirable to pinch below the handle on the container sidewall. A handle that is vertical or nearly vertical can create a very delicate balancing act for the processor. If the parison swells a little too much, the pinch travels down to the sidewall. If parison swell is a little below normal, the handle may not pinch and blowing will be compromised.
Tilting the mold provides a much wider processing window. If the handle is on the right, the processor will rotate the mold counterclockwise, and vice versa. So when the parison drops, small variations in horizontal position caused by variations in die swell, parison swinging, or parison air pressure do not have as much effect on processing. Tilting the mold ensures that the parison is pinched far enough down the handle to avoid thin sections. An added benefit is that the bottle is formed with no pinch on the pour side of the opening, thus ensuring smooth pouring.
If the flash pockets and pinches are not properly designed, excess material can be squeezed into the container around the handle. These thick sections are visually unattractive, particularly in clear containers, and may increase the cycle time. In general, the design of flash pockets and pinches for handles is the same as for tails and flash.
It is always good to start with a single-cavity mold so all the bugs can be worked out before cutting production molds. Start metal-safe and keep the pinch pockets a little shallow on the first cut. It is always easier to deepen the pockets by removing metal than having to add metal back.
With the single-cavity test mold, check the amount of material that is pushed back into the container at the handle pinch areas. Make sure there is enough material to form a good seal but avoid any excess that may form a thick bead that will cool slowly and add weight. The amount of material in the handle pinch areas is best adjusted through a combination of mold design (e.g., pinch land and pinch-pocket depth) and processing (die swell, mold positioning under the parison, parison programming, and mold tilting). The right balance can be achieved only when also considering factors such as resin type, container design, and end-use requirements like drop impact and appearance.
Proper resin selection
In general, if a resin can be extrusion blow molded, it is possible to blow it into a handleware container. HDPE and polypropylene are by far the most popular resins for handleware containers. PVC still sees wide use in some markets as well.
In extrusion blow molding, producing clear handleware has long been an elusive target. While PVC and clarified PP can provide good contact clarity, they do not match the excellent clarity of stretch-blow molded PET. And while extrusion blow grades of PET and PETG have attempted to make inroads into this market, they have suffered from low melt strength and impact strength.
New resins are showing great promise in finally overcoming the deficiencies of older versions. For example, a new clear handleware resin, Eastar copolyester EB062 from Eastman Chemical Co., Kingsport, Tenn., is said to provide PET-like clarity with better melt strength and drop impact than standard PETG. Many processors and machinery suppliers are evaluating this material, driven by customers that seek to differentiate their products with clear containers for items such as juice, soap, and household products.
Brian L .Dowler has nearly 20 years of experience in blow molding, injection molding, and other plastics processes. He has worked for Borg Warner Chemicals, Bayer, and Eastman Chemical, and is now director of market development for Graham Engineering Corp., York, Pa. He can be reached at (717) 505-4802 or e-mail bdowler@grahamengineering.com
Related Content
Lighter, Higher Performance Base Design for Premium rPET Bottles
Sidel’s StarLITE-R Premium base for thicker rPET bottles ensures bottle stability in high-speed production, while saving energy.
Read MoreBreaking News From NPE2024
Here is a firsthand report of news in injection molding, extrusion, blow molding and recycling not previously covered.
Read MoreAll-Electric Shuttle and Stretch-Blow Machines
NPE2024: Meccanoplastica shows off a double-sided shuttle for containers up to 5 L and a reheat stretch-blow molder for up to 2.5 L PET containers with four cavities — both all-electric.
Read MoreServices to Help Blow Molders Convert to rPET
Sidel launches “RePETable” range of services as “one-stop” solution to efficient adoption of rPET for bottle production.
Read MoreRead Next
Making the Circular Economy a Reality
Driven by brand owner demands and new worldwide legislation, the entire supply chain is working toward the shift to circularity, with some evidence the circular economy has already begun.
Read MorePeople 4.0 – How to Get Buy-In from Your Staff for Industry 4.0 Systems
Implementing a production monitoring system as the foundation of a ‘smart factory’ is about integrating people with new technology as much as it is about integrating machines and computers. Here are tips from a company that has gone through the process.
Read MoreBeyond Prototypes: 8 Ways the Plastics Industry Is Using 3D Printing
Plastics processors are finding applications for 3D printing around the plant and across the supply chain. Here are 8 examples to look for at NPE2024.
Read More


