Graphical Analysis Helps Find and Fix Ultrasonic Welding Problems
Using Real-Time Weld Graphs to Achieve Process Repeatability and Control Limits in Ultrasonic Welding
Ultrasonic plastic welding uses acoustics (mechanical sound waves) to create frictional heat, producing a molecular bond between plastic materials. The essence of process control for ultrasonic welding is to introduce mechanical vibrations into the plastic parts utilizing a specific amplitude, force, and duration. Research has proven that the consistency of the melting rate has a direct influence on bond strength. The more linear the joining velocity profile, the steadier the melting rate, the more homogeneous the molecular structure of the melt, and the stronger the weld.
Graphical analysis of joining velocity, welding power, and force has emerged as a highly effective tool to fix a range of problems, including inconsistent welds, poor weld strength, and non-hermetic seals. It also helps detect a number of equipment-related maintenance issues involving the acoustic stack, power supply, and pneumatic system.
How to read the curves of an ultrasonic weld graph
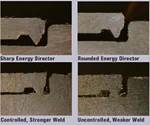
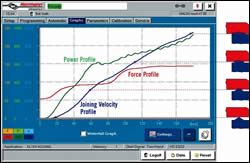
Computer-controlled ultrasonic welding equipment offers visualization of the welding process with a weld graph. This is a great tool for understanding and optimizing the welding process. Figure 1 is a typical weld process graph showing force, power, and joining velocity. The diagram to the right of the graph shows the progression of the weld as the energy director (blue) is forced against the mating part (red). Frictional heat generated by vibration and pressure initiate melting at the apex of the energy director and the contact point on the mating part. Melt flow continues until the weld surface is bonded together homogeneously. A decrease in velocity and the flattening of the joining-velocity profile curve as the two parts come together indicates that the weld can be terminated at this point.
Frictional heating is controlled by the amplitude of vibration of the welding horn and the forces applied to the part during the weld. The greater the amplitude and force, the greater the frictional heating in the plastic. The joining velocity profile will depend on the plastic material (amor phous or semi-crystalline), the weld area or joint design, and the overall size and shape of the part assembly.
Amorphous resins have a gradual glass-transition phase (softening and melt flow) resulting in a slower rise in the slope of the joining-velocity curve. Less amplitude and force over a longer weld time may be used to achieve a successful bond. The amplitude and force range is usually very broad for amorphous resins.
Semi-crystalline materials first pass through their amorphous stage before entering their crystalline stage, which has a sharply defined melting point. Higher amplitude and forces are needed to achieve the desired melt flow. The range of amplitude and force to achieve the weld is very narrow.
Analysis of the joining-velocity profile curve versus test data on the resulting weld strength, burst pressure, and part appearance helps the process engineer adjust welding amplitude and force. Studies show that a constant joining velocity of the horn during welding produces a more homogeneous molecular bond and a more robust weld. Changing amplitude and force will affect the slope of the joining-velocity profile. In addition, if there is insufficient frictional heat to keep the plastic flowing at the same velocity throughout the cycle, this will be evident in the joining-velocity profile. As the joining velocity (slope) changes, the process engineer can increase weld force to maintain constant flow of the plastic. The objective is to adjust the amplitude and weld force to make the joining-velocity profile as linear as possible.
The power profile curve gives a visual record of the power needed to maintain constant amplitude throughout the weld—analogous to a graph of the horsepower required in a car engine to maintain acceleration and constant speed. This information is recorded at millisecond intervals. A sharp peak in power, excessive power draw in relation to maximum generator power, or erratic power draw over the weld cycle negatively influences the strength, reliability, and repeatability of the weld. Since higher amplitude and/or force demand higher power levels—and vice versa—the power curve can tell whether the welding system is being under- or overloaded.
Using Real-Time Weld Graphs
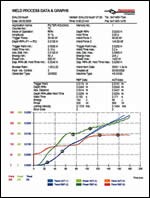
Engineers can now “visualize-to-optimize” their welding process by using these real-time weld graphs. Once optimized, a “fingerprint” of the weld can be recorded and stored to document a specific assembly process. All critical data such as depth RPN (actual weld depth), weld time, weld energy, peak power, trigger position, and end-of-weld position can be reviewed to establish process repeatability and control limits. These process limits can alert the operator or manufacturing engineer when the desired weld quality is not achieved.
Once an optimized welding process is established, the weld process data and graphs can be stored as a reference (see Fig. 2). All subsequent weld cycles are then compared with the reference. As a troubleshooting tool, this information is invaluable in analyzing problems.
Computer-controlled welding systems offer force calibration, down-speed calibration, linear encoder (travel) calibration, and amplitude calibration. This makes it easy to determine if a problem is related to the ultrasonic welder or the plastic part.
Differences in the force-profile graph would alert the engineer to verify that the welder’s pneumatic system is working properly. Load cells with force gauges can be used to verify and calibrate welding force.
Down-speed calibration will verify whether there is any external influence on velocity from the pneumatic system or mechanical slide. Valves, air cylinders, regulators, and slide friction may influence the joining velocity and will cause inconsistencies in the welding process.
Differences in the power profile would indicate that greater or less power is required at certain points during the welding cycle.
Troubleshooting Your Ultrasonic Welding Process
The most meaningful weld process graph is the joining-velocity profile. This is a true indication of the actual melt flow as the parts are joined. Abrupt increases in slope may indicate that the joint material has been pushed out of the way and the parts are unintentionally sliding by one another (cold forming). This would also show up as a decrease in power as the damping of the horn vibrations is decreased and power output lessens. Improperly supported sidewalls in mash or shear joints are the most common example.
A decrease in slope means that velocity is decreasing due to the process having used up all the joint detail. Further energy is being used to melt areas outside of the intended joint area. This would lead to stress-cracking and part marking or scuffing from the horn. A decrease in velocity accompanied by a “spike” in power may indicate that power output of the generator may not be sufficient for the intended weld.
Since power demand from the generator is directly proportional to welding force and amplitude, the process engineer can verify and calibrate force and amplitude using a photonic sensor or a laser measurement system to record the actual amplitude at the face of the horn. If the targeted amplitude cannot be reached, there may be issues with the acoustic stack (converter, booster, weld horn). These items can be exchanged individually to determine the problem area or they can be tested to determine the root cause. Most ultrasonic manufactures will perform this evaluation free of charge.
To find the source of problems with weld quality and consistency, one should also examine the plastic parts themselves: Are there variations in dimensional tolerances, molded-in stress, material degradation, warpage, and sinks? Look for cavity-to-cavity variations in tightness of fit of mating parts as well as the fit of the parts to the tooling (horn and nest). Other considerations include presence of mold release or other contamination in the joint area, and possible changes in the plastic material due to changes in vendor or regrind level.
About the Author
Bill Lynch
At the time of publication, Bill Lynch was a key account manager for Herrmann Ultrasonics Inc. in Schaumburg, Ill with more than 30 years of experience in application engineering, service, marketing, and sales of ultrasonic equipment.
Related Content
Inline Inspection System for Wood Plastic Composites
Pixargus’ ProfilControl 7 DX WoodPlasticComposites measure all dimensions and geometrics, including deep grooves.
Read MoreUpgraded CT Scanning and Multi-Sensor Coordinate Measuring Machines
Werth’s TomoScope S Plus 240 systems boast more than double the measuring volume as their predecessor with almost the same size.
Read MoreOxygen Permeation System Also Tests Relative Humidity
Ametek Mocon expands Ox-Tran 2/28 instrument portfolio
Read MorePolyfuze Graphics Corp. Partners With RFID Specialists
To help customers navigate the complexities of RFID technology, Polyfuze has partnered with such companies as HID Global.
Read MoreRead Next
What Happened to Your Ultrasonic Weld Quality?
The most important factor in troubleshooting problems in ultrasonic welding is understanding the fundamentals of the process.
Read MoreHow to Solve Common Ultrasonic Welding Problems
Understand and address the likely origins of welding problems to keep production on track.
Read MoreA Guide to Ultrasonic Welding Controls
Ultrasonic welding today is a sophisticated process that offers numerous features for precise control. Choosing from among all these options can be daunting; but this guide will help you make sense of your control features so you can approach your next welding project with the confidence of getting good results.
Read More
