How to Establish an Acceptable Range for Pressure at Transfer
Pressure at transfer tells you the viscosity of the resin, providing the fill time is the same. Monitoring pressure at transfer—or better yet, the integral under the pressure vs. time curve—provides insight into the process.
There are hundreds of variables that influence the injection molding process. It is not practical to watch them all, so which should you track? As I understand it, Dr. Deming said that if you are watching more than four variables you don’t know what you are doing. Thanks to computers, you may be able to watch all of them, but it’s difficult if not impossible to analyze more than a handful. We need to pick as few variables to track as possible, and those few have to be carefully selected as indicators of the process and product quality. Which ones should we watch? If we ask 8000 molders, we’d get 8001 different answers.
Here is my take on which variables to watch—not four, Dr. Deming, but six:
1. Fill time.
2. Pressure at transfer.
3. Cushion.
4. Screw-rotate time.
5. Cycle time.
6. Part temperature.
I would have added a seventh—melt temperature, but I do not know of an acceptable method to measure melt temperature during production.
Someone on every shift should go to each running job and log these six values. Get them into a spreadsheet and hold an appropriate person responsible for ensuring the processes are run on these guidelines. And they ought to be in the same range for a given job on any machine.
In this column I will tackle how to establish the acceptable range for #2, the pressure at transfer. This procedure requires that the nozzle body, nozzle tip, first-stage part size and weight, first-stage injection time, resin granule size, cycle time, and backpressure are identical from machine to machine, run to run, shot to shot. By pressure, I mean melt pressure, not hydraulic. Also, melt temperature must be within ±10° F (5° C) of target and screw rotate time within 7% of target. Again, that means from machine to machine, etc.
First, let’s make sure we are all on the same page for the definition of pressure at transfer: This is the pressure at the end of first-stage injection or the beginning of the second stage. It is often described as the “peak pressure.” If you have a cold slug in the nozzle, which is fairly common, or you profile injection velocity, “peak pressure” may or may not be the actual peak. Some machines provide both numbers—pressure at transfer and actual peak pressure; if yours does not, check what the control screen is telling you.
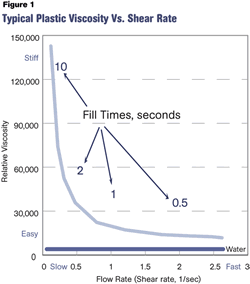
Why watch pressure at transfer? Because it tells you the viscosity of the resin, providing the fill time is the same (±0.04 sec for most jobs). Monitoring pressure at transfer—or better yet, the integral under the pressure vs. time curve—provides insight into the process.
For example, if you are molding polycarbonate, nylon, or any other moisture-sensitive resin, knowing the normal or “good” range of pressure at transfer can tell you if the material is properly dried. Moisture in these resins causes hydrolysis, which breaks the polymer chains. Breaking down those chains leads to molecular-weight degradation, which shows up as lower viscosity. If the molecular weight of the material is lowered, the part may not perform as expected. It will look fine, with no splay, but could fail prematurely due to the compromised chain length.
Pressure at transfer will also provide information on material lot variations, how to adjust the process when parts do vary, influence of colors, whether a part or tool is ready for production, when to start taking parts for production upon startup, and more.
Knowing the acceptable or “good part” range for pressure at transfer is a powerful tool for monitoring your process and part quality. Establishing what the “good part” range is something of a challenge. It cannot be predicted. To find the allowable range for pressure at transfer you have to follow Dr. Deming’s rule: Take data over time and study it.
What does that mean? When starting a new job or restarting after it has been down for a while, always start with second-stage or hold pressure turned down to a very low level (5-10 psi if possible), leaving time on the hold timer. Make sure the first shots are short by volume. Make sure they are consistent, that fill time is constant, and that you have an appropriate Delta P (the difference between pressure available and pressure actually used. See link to related artice under Editors' Picks top right). Now add the second-stage pressure that packs out the part and provides the part size/dimensions required. This also assumes you have the right hold time, found by testing parts with and without gate seal (see Oct. 2010 and Feb. 2011 columns).
Now, with fill time constant, start tracking the pressure at transfer. When it stops trending, make a few more shots, start collecting parts and data on the associated pressure at transfer. Measure or test groups of parts for the criteria you selected to meet form, fit, and function requirements for at least a few hours, or until you have developed some sense the process is stable. Again, fill time must not vary; if it does, fix whatever is broken. Check all parts to ensure they meet customer requirements. If they are bad from the start you do not have a viable process and you have to backtrack. Assuming most (90% or more) are good, compare the pressure at transfer for each part, and you should be able to see what pressure-at-transfer range makes good or bad parts.
The next step is to force a viscosity change. Ideally you could go to the resin supplier and ask for samples of the easiest- and stiffest-flowing lots they would ever send you. But that’s not going to happen. So instead, get some different lots from the manufacturer or resin distributors, or use 100% regrind, etc. The point is that you have to force a viscosity change to see what happens to the pressure at transfer and the corresponding effect on the part.
As you change lots you will see the pressure at transfer trend up or down as the lots vary in viscosity. Do not allow any parts made during any trending to go into the “good” bin. Instead, wait until the trend stops and take parts to quality control to see if they are acceptable. If the trend was toward higher pressure, you may have to raise hold pressure—nothing else—to get the part in specification. If the pressure at transfer trends to lower pressures, you may have to reduce hold pressure to get parts into specification. Test first before you change hold pressure.
Taking data over time, you will find the range of pressure at transfer that makes good parts and what to do for second-stage pressure when it drifts high or low.
The more data you get, the less testing you will be doing. Yes, at first, do lots of testing; but after some production, testing should go down dramatically and you can actually do statistical quality control (SQC) on the fly.
About the Author
John Bozzelli is the founder of Injection Molding Solutions (Scientific Molding) in Midland, Mich., a provider of training and consulting services to injection molders, including LIMS, and other specialties. E-mail john@scientificmolding.com or visit scientificmolding.com.
Related Content
Is There a More Accurate Means to Calculate Tonnage?
Molders have long used the projected area of the parts and runner to guesstimate how much tonnage is required to mold a part without flash, but there’s a more precise methodology.
Read MoreInjection Molding: Focus on these Seven Areas to Set a Preventive Maintenance Schedule
Performing fundamental maintenance inspections frequently assures press longevity and process stability. Here’s a checklist to help you stay on top of seven key systems.
Read MoreGot Streaks or Black Specs? Here’s How to Find and Fix Them
Determining the source of streaking or contamination in your molded parts is a critical step in perfecting your purging procedures ultimately saving you time and money.
Read MoreBack to Basics on Mold Venting (Part 1)
Here’s what you need to know to improve the quality of your parts and to protect your molds.
Read MoreRead Next
Injection Molding Know-How: The ABCs of Delta P: Setting the First-Stage Pressure Limit
Here’s another trick of the trade that will make your life easier.
Read MoreLead the Conversation, Change the Conversation
Coverage of single-use plastics can be both misleading and demoralizing. Here are 10 tips for changing the perception of the plastics industry at your company and in your community.
Read More
.jpg;width=70;height=70;mode=crop)
