How to Mount an Injection Mold
Five industry pros with more than 200 years of combined molding experience provide step-by-step best practices on mounting a mold in a horizontal injection molding machine.
What started out as a routine request from one Plastics Technology columnist to another to review a draft for an upcoming article led to five highly experienced industry professionals collaborating to create this article about something virtually every molder does every day—sometimes many times a day—mounting a mold in a press.
A well-trained and knowledgeable setup person understands the importance—and dangers—associated with the job. They have a heightened respect for their safety, as well as the safety of others, and for the molds, machines, and equipment they work with. They are an extremely valuable asset to every molding company.
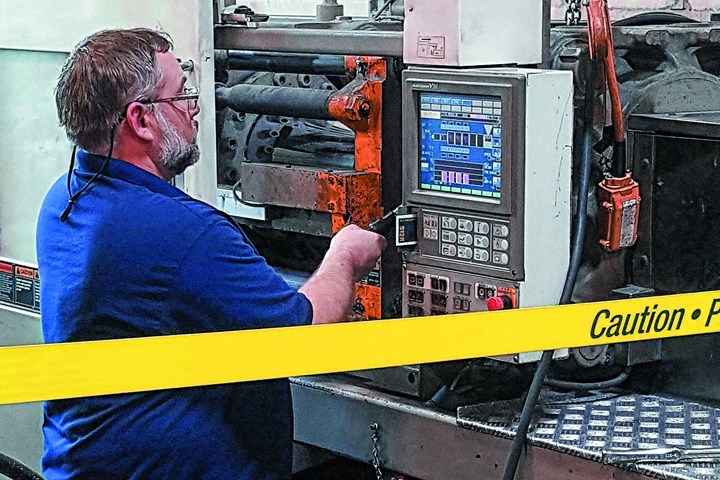
Knowledgeable personnel are essential to a molding operation.
Before digging in, take note: No single procedure is correct for all applications. This procedure most likely will need to be modified to suit your special/unique situation or conditions. Also note that for safety reasons, the general procedure outlined here requires the pump to be turned on and off repeatedly. This and all other applicable safety requirements must be observed.
WITH THE PUMP MOTOR OFF:
1. Check that the mold will cover at least 70% of the distance between the tiebars.
a. This is a good rule of thumb. Most machine manuals will specify the minimum mold size for a given machine. Some machines even have placards mounted on the frame.
b. The smaller the mold, the more the platens will “wrap around” or bow when clamped under high pressure. This can cause flash in the center of the mold.
c. If the mold is excessively small, catastrophic damage to the platen can occur.
2. Ensure the safety strap is in the correct position and in good condition.
3. Check that the mold’s eye bolt is secure.
a. Only use shouldered eyebolts, or preferably, swivel-type hoist rings.
b. Eyebolts must be threaded all the way in and tightened. c. Two eyebolts are safer than one and can help prevent the mold from tilting.
d. Ideally, the location of the eyebolt is at the mold’s center of gravity, so it does not tilt.
4. Check the size and condition of the nozzle seat. It will be difficult to check after the mold is installed.
a. Write down or find an appropriate nozzle tip type and size before you forget.
5. Ensure the carriage is back and/or the screw is forward.
a. Be alert for resin drool or spitting.
b. The barrel heats may be on or off, depending on the situation.
6. Check that the resin is not degrading in the barrel from sitting there too long.
a. Many materials, such as PVC or POM (acetal), produce gases that can develop high pressures within the barrel.
7. Clean the machine platens and the mold’s clamp-plate faces.
a. Check for “dings” or raised areas on the mold and platen—especially the locating-ring alignment hole. Stone flush if necessary.
8. Check for damage to the clamp bolt threads in the platens.
9. Spray a light mist of “overnight” preservative or WD-40 on the platens and the clamp-plate faces of the mold.
10. Check that the clamp bolts have the correct thread type: English (SAE) versus Metric.
11. Check that the clamp bolts are the correct length.
a. If the bolts are too short, with insufficient engagement, or too long and “bottom out,” you can strip the threads in the platen.
12. Lubricate the clamp bolts.
a. If the bolts are not lubricated, 85% of the torque is used to overcome friction and only 15% is available to produce bolt load. If the bolts are lubricated (with cadmium plate, molybdenum disulfide, anti-seize compounds, etc.), the friction is reduced and greater preload is produced with the same torque.
13. Check that the crane can adequately lift the mold over the machine’s tiebars.
a. Check for obstructions above the machine, such as sprinkler heads, ceiling fans, etc.
b. Check that the robot, picker, or other automation is safely out of the way.
14. Lift the mold up over the tiebars and lower it into the molding area.
a. Keep your fingers away from the chain links.
b. Make sure no one is in the immediate area during this process. Use safety cones, barrier tape, or other preventive measures.
15. With your hand on the side or top edge of the mold, guide it into the machine and engage the locating ring into the alignment hole in the fixed platen.
a. Do not let the edges or corners of the mold hit the platens or tiebars.
IN SETUP MODE:
16. This is a good time to check the machine’s safety switches.
17. Advance the moving platen until it just touches the back of the mold.
a. You can make sure the locating ring remains engaged in the platen alignment hole by occasionally looking at it from the barrel side.
WITH THE PUMP MOTOR OFF:
18. Open the gate and level the mold.
19. Attach the clamps on the fixed-platen side to prevent the mold from rotating or the locating ring from disengaging from the alignment hole, but do not yet fully tighten the bolts to the specified torque value.
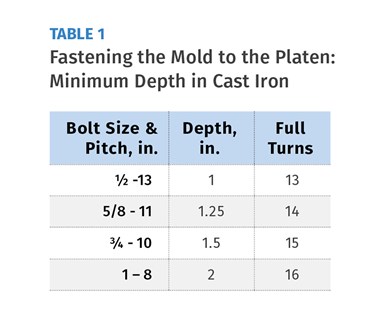
a. Grade 8 bolts should engage the relatively soft die-cast platens by a minimum of 1.5 times their diameter to prevent stripping he threads. Two times their diameter is preferred (see Table 1).
b. Ideally, the mold clamp should be square with the mold and the toe of the clamp be fully engaged in the slot.
c. The clamp bolt should be as close to the mold as possible. You want the pressure of the bolt acting on the toe—not the heel (see Fig. 1).
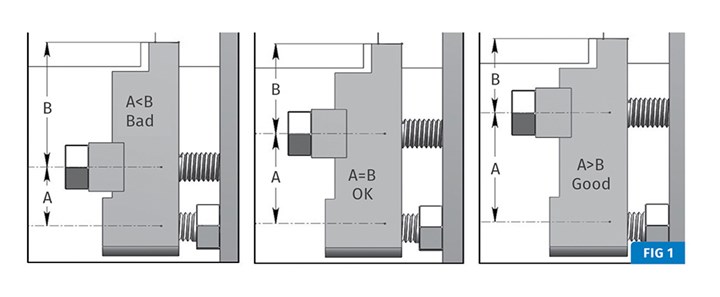
The clamp bolt should be closer to the toe than the heel.
d. If the bolt is closer to the heel end than the toe end, switch to a longer clamp.
- It is acceptable for the clamp to be parallel with the platen, but it is preferred that the heel end of the clamp be slightly farther from the platen than the toe end. This puts the front edge of the toe in contact with the face of the clamp slot (Fig. 2).Failure to do either of these two steps may result in the mold dropping out of the machine.
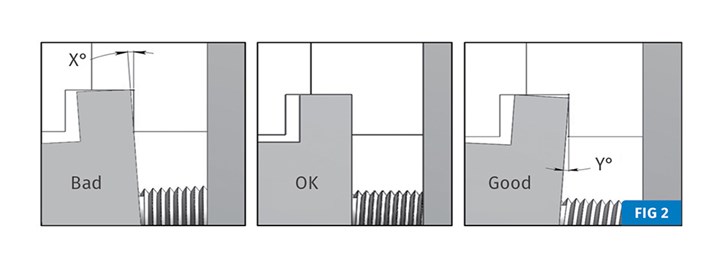
Ideally, the tip of the mold clamp should touch the face of the clamp slot at about a 1° angle.
- Forged, closed-toe clamps with “no-turn” washers are preferred.
20. Use only hardened-steel washers designed to distribute the load on the clamp. Soft “hardware-store” washers will deform and come loose.
IN SET-UP MODE:
21. Retract the moving platen enough to install the ejector bars—typically 8 to 12 in.
WITH THE PUMP MOTOR OFF:
22. Put ejector bars in the holes matching the pattern on the mold.
a. Make sure ejector bars are the correct length, the same length, that they are straight, and the threads are in good condition.
b. If the mold is equipped with knockout extensions, the ejector bars should be flush or slightly recessed from the face of the moving platen when the machine ejector (aka butterfly) plate is fully retracted.
IN SET-UP MODE:
23. Advance the moving platen until it is 4 to 6 in. away from the back of the mold.
WITH THE PUMP MOTOR OFF:
24. Slide the knockout bars forward and thread them into the back of the mold.
25. Tighten the knockout bars with a pipe wrench or other suitable tool.
IN SET-UP MODE:
26. Advance the moving platen up against the back of the mold. a. Look and listen for the knockout rods binding or bending.
27. Lower the chain hoist slightly to remove any tension.
28. Set the die height to the pre-established clamp pressure.
a. If the clamp pressure has not been established yet, use a high pressure value for large molds or large parts, and a medium pressure value for small molds or small parts.
WITH THE PUMP MOTOR OFF:
29. Attach the clamps on the moving-platen side (see steps 19 a-e)
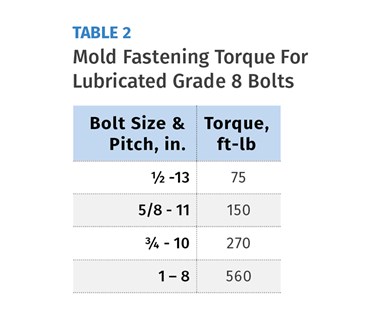
30. Torque the clamp bolts on both the fixed and moving platens to the appropriate value (see Table 2).
a. “Click-type” torque wrenches help ensure all of the clamps have the same amount of torque. If all the clamps are not torqued evenly, the one(s) with the lower torque value may come lose.
31. Remove the safety strap(s) and eyebolt(s).
32. Move the hoist out of the molding area.
IN SET-UP MODE:
33. Open the mold and advance the ejector plate, if needed, to gain access to the back of the knockout rods.
WITH THE PUMP MOTOR OFF:
34. Install the hex nuts or socket-head cap screws on the end of the knockout rods with a ratcheting socket wrench or other suitable tool until they are tight.
IN SET-UP MODE:
35. Stroke the ejectors forward and backward a few times to make sure they function properly and nothing is binding or squealing.
36. Wipe off any dirt or grease you may have deposited on the machine and clear the area of your tools and equipment. If you want to maintain a clean work environment, lead by example.
The above procedure ensures that the mold is securely fastened to the platens and will not shift or loosen during production. But there is one final step to consider, which will help prevent premature tool wear and rejected parts.
On occasion you might hear the leader pins hit the bushings when you slowly close the mold. This is not uncommon when hanging a mold that doesn’t have a lifting strap or interlocks that help vertically align the two mold halves. To correct the problem, the mold half attached to the moving platen should be “re-hung” with a slight amount of lift or pre-load from the hoist. This usually helps, but does not solve the root cause, which is platen tilt. Platen tilt will be the subject of a future article.
(If readers think anything should be added here, the authors would like to hear from them.)
ABOUT THE AUTHORS:
John Bozzelli is the founder of Injection Molding Solutions (Scientific Molding) in Midland, Mich., a provider of training and consulting services to injection molders, including LIMS, and other specialties. Contact john@scientificmolding.com; scientificmolding.com.
Ernie Di Siro is the Molding Manager for Nordson EFD LLC, a proprietary injection molder. He has 40 years of injection molding experience – starting out as a machine operator. Contact ernie.disiro@nordsonefd.com
Jim Fattori is a third-generation injection molder with more than 40 years of molding experience. He is the founder of Injection Mold Consulting LLC, and is also a project engineer for a large, multi-plant molder in New Jersey. Contact jim@injectionmoldconsulting.com; injectionmoldconsulting.com.
John Klees is a retired plastics specialist with more than 40 years of processing, part and mold design and construction expertise.
Piotr Witaszek is the plant manager for LMT-Mercer Group, Inc., a custom injection molder with multiple facilities. He has 25 years of injection molding experience, starting out as a machine operator. Contact pwitasek@lmtproducts.com.
Related Content
Medical Molder, Moldmaker Embraces Continuous Improvement
True to the adjective in its name, Dynamic Group has been characterized by constant change, activity and progress over its nearly five decades as a medical molder and moldmaker.
Read MoreWhy Shoulder Bolts Are Too Important to Ignore (Part 1)
These humble but essential fasteners used in injection molds are known by various names and used for a number of purposes.
Read MoreDesign Your Tools for Moldability ... and Maintenance
In the initial design phase, when considering the structure and elements of the tool, are you designing them to be maintenance friendly? Canon Virginia has used this approach and preventive maintenance to make tool replacement a thing of the past. You can, too. Here’s how.
Read More3D Printing of Injection Molds Flows in a New Direction
Hybrids of additive manufacturing and CNC machining can shorten tooling turnaround times.
Read MoreRead Next
Tension-Indicating ‘Smart’ Bolts Make Mold Mounting Safer, More Efficient
No more guessing about whether mold-mounting bolts are tightened properly, with an alternative to unreliable torque measurements.
Read MoreLocating Rings and Platen Damage: Part 2
Selecting the right locating ring and putting it to good use takes careful consideration.
Read MoreAvoid Common Mold Set-Up Mistakes
Every molding machine has to shut down periodically for a mold set-up.
Read More

.jpg;width=70;height=70;mode=crop)

