Use a DOE to Improve Consistency of Your Resin-Drying Process
Conducting a drying design of experiments (DOE) will ensure your polymer is properly dried every time. Here’s how to do it.
Hygroscopic polymers such as PET, ABS, TPU, PC, nylon, and many others absorb moisture from the surrounding environment. These types of polymers have a polar molecular structure that attracts the polar water molecules from the air. If these materials are processed with high moisture content, the high temperature causes a chemical reaction (hydrolysis) that breaks the polymer chain into smaller molecular weights. Prior to processing, hygroscopic materials must be properly dried to prevent processing issues and poor end-product performance.
Conducting a drying design of experiments (DOE) will ensure your polymer is properly dried every time. Performing a DOE saves significant time because you get the most information with the least data possible and can determine direction and magnitude of each process input. The power of a DOE is the ability to use a simulation model to change input settings and predict the outputs. This will enable to you to establish the optimum input settings that are most efficient at the lowest possible cost. Instead of following datasheet recommendations, develop the process based on scientific data. You will be surprised by how much time and cost savings you will gain by conducting this simple experiment.
Most of the time needed to perform a DOE should be spent in the design or planning phase.
Don’t fall into the trap of jumping prematurely into execution of the DOE. Most of the time needed to perform a DOE should be spent in the design or planning phase. Prior to running the experiments, consider answering the following questions and follow our best practices.
How Will Samples Be Collected?
It is important to select the proper container for collecting the pellet samples. Plastic bags and bottles are permeable and allow moisture to penetrate into the sample. Sealable glass jars are ideal vessels for collecting the samples. Ensure that the container is completely full and close it immediately. This will eliminate the empty air volume containing moisture that is absorbed by the polymer. Allow resin to cool before testing. Some testing temperature conditions are below the drying temperature. Avoid touching resin to prevent contamination and reduce test variation. Open the container only when the sample is ready for testing and re-seal it immediately. Following these steps will allow retesting the samples multiple times, even months later, with consistent results.
How Will the Moisture Level be Tested?
Testing the material requires knowledge of moisture-analyzer equipment and material properties. Not all moisture analyzers have the same capability. Many materials require a moisture level of 0.02% before processing; therefore it is required to have a moisture analyzer capable of measuring down to 0.001%. The Karl Fischer Titrator is the standard method for determining the water content of a sample, but it is not practical in a manufacturing environment. Thus, the weight-loss method has been widely used in the plastics industry for many years because the test can be completed quickly and at low equipment cost.
The testing conditions are dependent on the material being tested. Unfortunately, conditions such as, temperature, sample weight, and test end criteria are not widely published or provided by material suppliers. We have developed our own procedures for hundreds of materials, which have proven to generate accurate and consistent results.
Must the Material Be Conditioned?
Material that is dried by manufacturers and shipped in sealed bags typically meets the recommended moisture content level … but not always. We recommend to “dry” (heat) all materials to ensure consistent process temperature into the extruder or molding-machine feed zone and remove any surface moisture from the pellets. If material is stored inside a container such as a gaylord with a PE bag and a cover on it, this material will absorb moisture over time.
Material that is dried by manufacturers and shipped in sealed bags typically meets the recommended moisture content level … but not always.
In order to ensure the experiment is applicable to any resin lot and condition, the material must be exposed to moisture at the expected storage condition and location until it reaches the ambient saturation level. This is simply accomplished by measuring the moisture content over time. Open the material package and place it in a container inside the location where material is stored. Measure and record the moisture content of the undried material immediately after opening the package. Let the material sit in the open container for one week. Take a sample from the top of the container and remeasure and record the moisture content after one week. Repeat the measurement every week until the moisture content stabilizes.
In Fig. 1, four sealed bags were placed in bins at the manufacturing storage location. The moisture level was tested at time zero and every week. Notice that after seven to eight weeks, the material did not absorb significantly more moisture because it reached the ambient saturation level. If the material has already been open in the storage location for a long time, this step may be complete in two weeks or less.
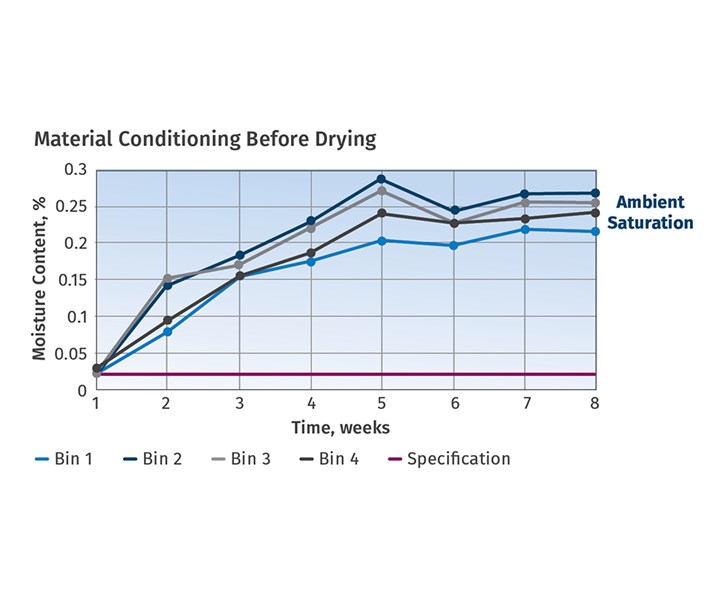 FIG 1 Material from four sealed bags was placed in bins at the manufacturing storage location. The moisture level was tested at time zero and every week. After 7 to 8 weeks, the material did not absorb significantly more moisture because it had reached the ambient saturation level.
What Inputs Are Important and How Many?
The drying process and equipment can have a lot of variables that impact how a material is dried. Figure 2 shows many of the key functions of a desiccant dryer, which are also opportunities for the process to go wrong. However, from a materials standpoint, the key factors that affect how effectively a material is dried are time, temperature, dewpoint, airflow rate, pellet size, and material initial moisture content. Completing a DOE with all these factors would take too long and a lot of effort.
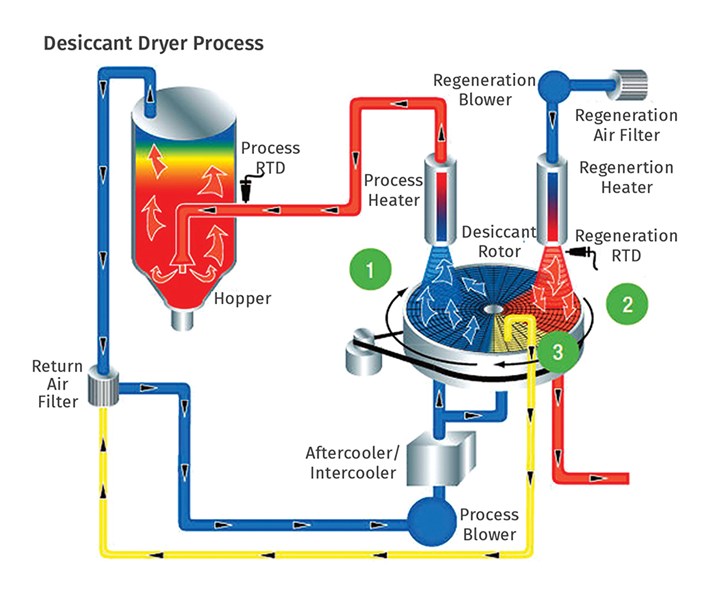 FIG 2 Many of the key functions of the desiccant dryer are also opportunities for the process to go wrong.
Therefore, narrow the factors to two or three, if possible. When the air dewpoint is -40 C or below, the percentage of water vapor the air can contain is extremely low and can be taken as a relative zero point. Therefore, this factor can be fixed and eliminated from the experiment. Most dryers do not have a variable-frequency drive (VFD) to control the airflow rate. The blower is either on or off; thus, this factor can also be omitted from the experiment. The pellet size can have a big impact on drying, but its size is relatively consistent and is controlled by the supplier.
It is important to measure and document the pellet bulk density prior to executing the experiment. The previous step explained how to ensure the material’s initial moisture content reaches ambient saturation. Now that we have fixed four of the six factors, the only two remaining factors are time and temperature. With two factors, we can easily and quickly complete a full factorial DOE (two factors, two levels) with as little as four runs. Note that a replicate is also required to determine whether each main factor is significant. We also recommend including center points to determine curvature.
It is important to measure and document the pellet bulk density prior to executing the experiment.
With the design and the planning complete, let’s consider an example using Pellethane 90AE TPU and see how much time can be saved by conducting this experiment. The material datasheet recommends drying the material for 6-8 hr at 220 F to reach a moisture content of 0.02% or lower. For the two levels, we selected time from 1 hr to 8 hr and temperature from 190 F to 220 F. After running the replicates, you should have a table with moisture content for eight runs.
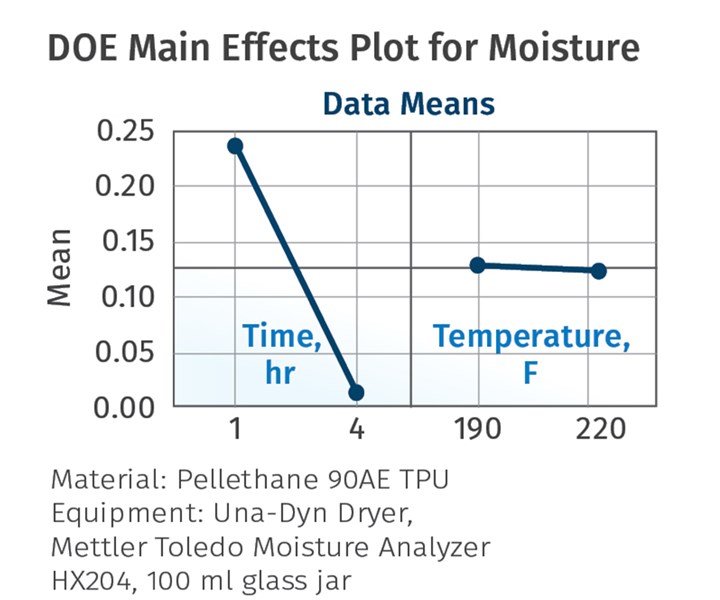
The graphs in Fig 3 above demonstrate that time is the only significant factor that impacts moisture content of this resin. The temperature between 190 F to 220 F had no effect, as indicated by the nearly horizontal line. Figure 4 also indicates that there is no interaction between the two factors. Note that the experiment was only analyzed for 4 hr, not 8 hr. This is because the material was below 0.020% after 4 hr. In order to validate the model, analyze the DOE residuals to ensure they meet the acceptance criteria.
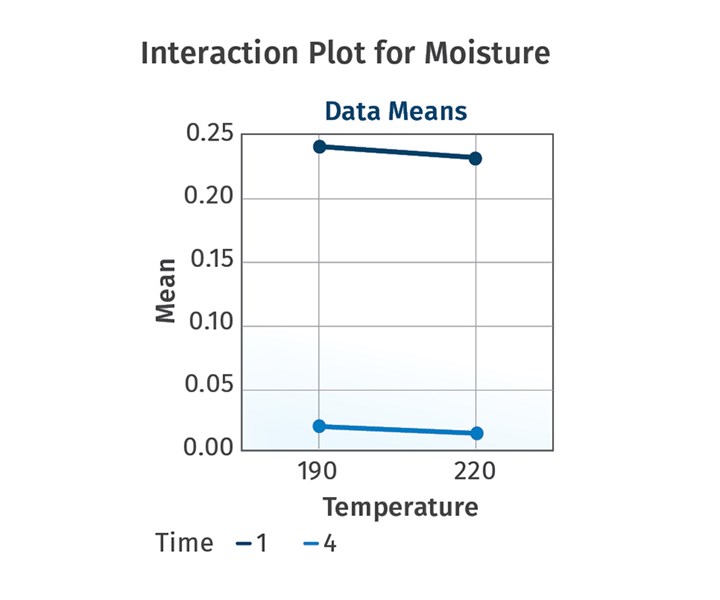 FIG 4 As shown, no interactions exist between time and temperature—both factors are independent.
The power of the DOE is the ability to predict the result based on the model and to optimize each factor for efficiency and lowest possible cost. In Fig. 5, we used Minitab Response Optimizer software (minitab.com) to predict the moisture level as a function of time and temperature. Note that you can only make conclusions within the levels chosen for each factor. In this case, we like to minimize the response (lower moisture content is better). Therefore, time should be set to 3.9 hr at 220 F.
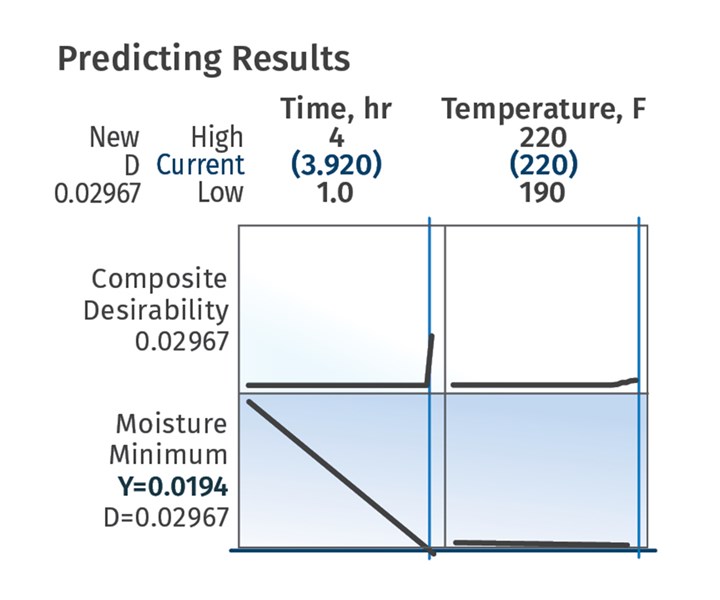 FIG 5 The power of the DOE is the ability to predict the result based on the model and to optimize each factor for efficiency and lowest possible cost. Here, we used Minitab Response Optimizer software to predict the moisture level as a function of time and temperature.
However, since temperature was not significant, the temperature can be set to 190 F to save energy cost. Compared with what the material datasheet recommended, we just saved 4 hr of drying time at significantly lower temperature. This translated to 100% higher drying capability with significant cost reduction, while ensuring the material is completely dried every time.
About the Author: Braulio Polanco has more than 20 years of experience in plastics with leadership roles in R&D, NPI, engineering, quality, and manufacturing at companies of all sizes. He has gained experience with Class I, II, & III medical devices and the pharmaceutical industry. A graduate of U.-Mass. Lowell with a degree in Plastics Engineering, Polanco has worked for many industry leading companies involved in all phases of the product life cycle from concept to launch. He is a co-founder of Systematic Extrusion, an extrusion consulting firm whose objective is to take some of the art and “black magic” out of the extrusion processing and replace it with science. Contact: (786) 398-7833; info@systematicextrusion.com; systematicextrusion.com.
Related Content
Using Data to Pinpoint Cosmetic Defect Causes in Injection Molded Parts
Taking a step back and identifying the root cause of a cosmetic flaw can help molders focus on what corrective actions need to be taken.
Read MoreBack to Basics on Mold Venting (Part 1)
Here’s what you need to know to improve the quality of your parts and to protect your molds.
Read MoreProcess Monitoring or Production Monitoring—Why Not Both?
Molders looking to both monitor an injection molding process effectively and manage production can definitely do both with tools available today, but the question is how best to tackle these twin challenges.
Read MoreWhat to Look for in High-Speed Automation for Pipette Production
Automation is a must-have for molders of pipettes. Make sure your supplier provides assurances of throughput and output, manpower utilization, floor space consumption and payback period.
Read MoreRead Next
How to Dry PET for Container Applications
PET is extremely hygroscopic, highly moisture sensitive, and one of the toughest challenges to dry. Here are the basic principles of doing it right for rigid packaging applications
Read MoreSavvy Processors Reveal Best Practices on Drying
The processors speak: Here’s how some smart molders and extruders tackle the vexing problem of resin drying.
Read More
