Measuring Multilayer Plastic Containers Made Easier With Today's Ultrasonic Gauges
Ultrasonic gauge technology has evolved to simplify measurement of very thin layers in plastic containers. Today’s gauges with high-frequency capabilities and specialized software can make multilayer container measurement quick and easy for ordinary users.
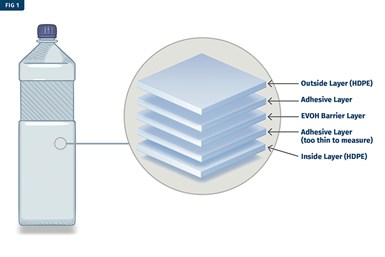
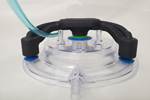
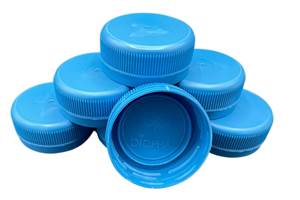
FIG 1 Up-to-date ultrasonic gauges can measure individual layer thicknesses in plastic containers with much greater ease and simplicity than in the past. Ensuring quality and cost-effective use of barrier materials are key benefits. Photo Credits: Evident
Ultrasonic thickness gauging is a widely used technique to measure the thickness of single-layer plastic containers and individual plastic layers in multilayer containers. In the past, ultrasonic thickness gauges were limited in their high-frequency capabilities, making the measurement of thin multilayer plastic a complicated task that required a highly skilled user. Today, ultrasonic thickness gauges enable an average user to obtain a digital thickness reading on very thin multilayer plastics.
Modern gauge features can further streamline the measurement process for manufacturing quality control. Application setups for routine thickness measurements can save time by eliminating the need to manually select and adjust settings before each inspection.
This article will explore how these modern ultrasonic gauge capabilities work to measure multilayer plastic containers, providing tips on application setup and calibration.
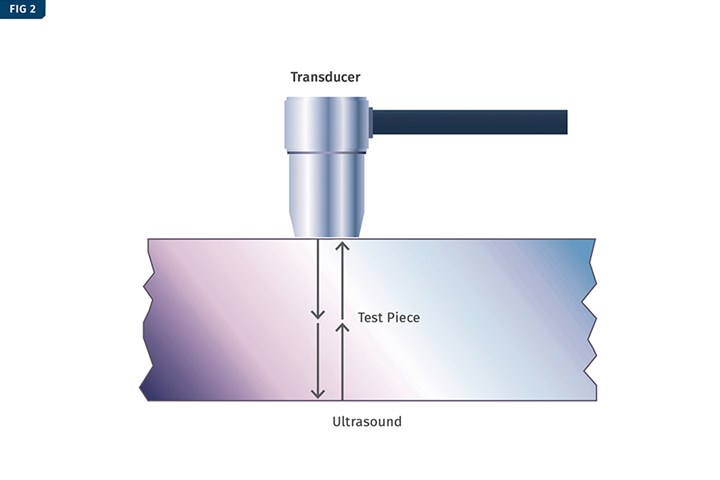
FIG 2 The ultrasonic transducer is placed on the part, then sound from the transducer makes a round trip between the contact surface and the back surface.
The Importance of Measuring Layer Thicknesses
Many containers for carbonated beverage bottles and packaged food products have a gas-barrier layer between two layers of structural plastic, such as PVC, polyethylene, polypropylene or polycarbonate (Figure 1). The thin gas-barrier layer is designed to preserve freshness and lengthen shelf life by preventing the migration of gas into or out of the package. For instance, this layer can keep carbon dioxide inside a beer bottle or keep oxygen out of a frozen-food package. It is commonly made of ethylene vinyl alcohol (EVOH), polyvinylidene chloride (PVDC), polyester or acrylic copolymer.
For quality control, high-precision thickness measurement is used to inspect the various layers of multilayer plastic containers. This can be done using ultrasonic gauging. This is a nondestructive technique used to measure a material’s thickness by measuring the travel time of ultrasonic waves passing through the material.
Ultrasonic gauging is a widely used technique for multilayer plastics because it provides reliable, accurate and repeatable results. Modern ultrasonic thickness gauges can measure the individual plastic layers and total thickness in one test, saving time. This technique is convenient and flexible because ultrasonic gauges can measure the wall thickness from one side of a part. That permits measurement of a range of plastic products where access to both sides is difficult or impossible, such as closed containers. The gauges are usually handheld, making them easy to carry to any location for testing.
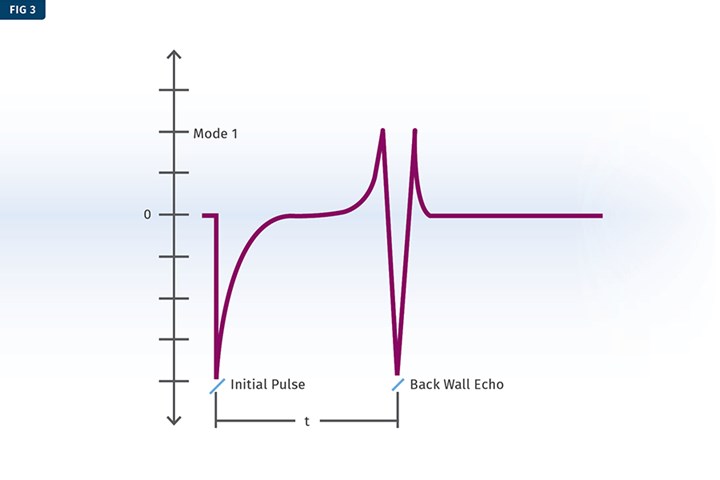
FIG 3 In this example of an ultrasonic waveform, the initial pulse represents sound entering the part. The back-wall echo represents sound returning from the opposite surface. The “t” is the time of flight of the pulse of sound. Mode 1 refers to the measurement method, which used the initial pulse and the back-wall echo to determine thickness.
How Ultrasonic Thickness Gauges Work
Ultrasonic thickness gauges work by measuring the time it takes for an ultrasonic sound wave to travel through the part. During a test, the transducer is placed on the surface of the part to be measured and acoustically coupled to the part using a fluid, typically glycerine, propylene glycol or water. Then the pulse of sound travels from the contact surface to the opposite surface and bounces back to the transducer as an echo, as shown in Figure 2. The gauge measures the transmit time of a pulse of sound through a material, as illustrated in Figure 3.
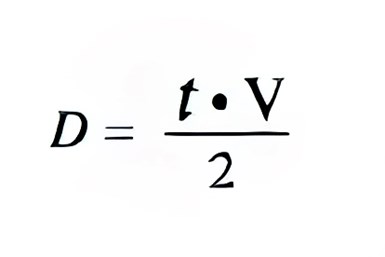
Using the velocity of sound in the material being measured, the gauge calculates the thickness of the material by the following equation, where D is the distance sound travels through the thickness of the material layer; t is the time of travel; and V is the velocity of sound through the material. Because sound travels through the material and is reflected back to the transducer at the opposite edge of the material layer, the total distance traveled is twice the layer thickness, so the travel time must be divided by 2.
Tips for Accurate Ultrasonic Thickness Measurements
Ultrasonic gauges are typically easy to use, making this measurement procedure straightforward. However, it is important to note that the measurement accuracy of ultrasonic gauges is only as good as the accuracy to which the material and sound velocities are known. Velocity varies depending on the sample composition and other properties. To achieve good accuracy when measuring the overall thickness and individual layer thickness of a multilayer plastic container, it is important to have a sample where the thickness of each layer is known so that the ultrasonic instrument can be calibrated for the sound velocity of each layer.
Just like with any ultrasonic thickness measurement, accuracy is dependent on proper sound-velocity calibration. Velocity calibration must be performed for each material being measured on samples of known thickness.
Speed of sound’s travel through plastics varies with the particular resin and its temperature and density.
Inaccuracies may occur if the material’s sound velocity changes unpredictably. Velocity can be affected by changes in the material’s properties, such as significant temperature shifts or variations in density. Most plastics exhibit noticeable velocity shifts as the temperature changes by more than 5°C or 10°F. A straightforward way to avoid temperature-induced errors is to calibrate and measure at ambient temperature. If that is impossible, operators should perform calibration and measurement at a known, constant position in the manufacturing process.
Most standard transducers will be damaged by contact with parts hotter than approximately 50°C or 125°F, so testing at elevated temperatures is not recommended unless special transducers are used. Heavy-wall products, where the inside of the part stays hot while the outer surface cools, may have wide temperature variations from the outside of the part to the inside. These temperature variations can cause considerable velocity changes through the wall of the part, which can introduce measurement uncertainties.
Ultrasonic gauges are an extremely accurate method if the operator understands the conditions that cause errors and takes a few simple precautions. If the gauge is properly calibrated, it will display an accurate wall thickness. The calibration procedure requires material samples of known thickness. Typically, the gauge is set up on samples representing the maximum and minimum material thickness to be measured.
Material sound velocity and zero offset (a transducer-related parameter) are set by performing a simple keypad operation that involves entering the known thickness of reference standards while coupled to the material. The gauge uses the known thickness to calculate a sound velocity and zero offset for that material and transducer, respectively. When the gauge makes thickness measurements, it uses the calibrated velocity to calculate the thickness of the product.
Selecting a Suitable Gauge
Multilayer plastic containers can be measured using high-precision ultrasonic thickness gauges with multilayer measurement capabilities. For example, Evident provides two instruments suited to this application: the 38DL PLUS and 72DL PLUS ultrasonic thickness gauges. The 38DL PLUS gauge with the multilayer software option can be used for plastic applications where the thickness of each layer is above 0.004 in. or 0.102 mm. If the layers are thinner, a high-frequency instrument may be necessary. Higher frequencies enable you to measure thinner test material. The 72DL PLUS ultrasonic thickness gauge can drive frequencies up to 125 Mhz, giving it the capability to measure much thinner plastic layers than traditional ultrasonic thickness gauges. It can also display the total thickness and individual thickness measurements of up to six plastic layers with one test.
The minimum measurable thickness always depends on the acoustic properties of specific materials. However, barrier layers down to 0.001 in. or 0.025 mm in thin-wall containers can often be measured with this type of high-frequency system. Recommended transducers for this type of test are typically high-frequency delay line transducers in the range of 50 Mhz to 125 Mhz.
Ultrasonic gauges are not able to distinguish virgin from regrind layers of the same plastic, and may not be able to separate adhesive layers from barrier layers.
The minimum measurable thickness in an application is determined by the highest frequency that is transmitted by the plastic in question. Some plastics are highly attenuating to high-frequency sound waves. As a result, very thin barriers embedded in thick structural plastic may not be measurable because of low-pass filtering effects. For a given product, the measurable thickness range will usually be determined by experimentation with representative samples.
The reflection ratio at the boundary between any two materials is determined by the relative acoustic impedances of those materials. As virgin and regrind plastics of a given type have essentially identical acoustic impedances, it is impossible to separately measure regrind layers that are immediately adjacent to virgin layers of the same resin. Further, adhesive layers adjacent to barrier layers are often too thin and/or too closely impedance-matched to measure with ultrasonic techniques and usually cannot be resolved separately from the barrier layer.
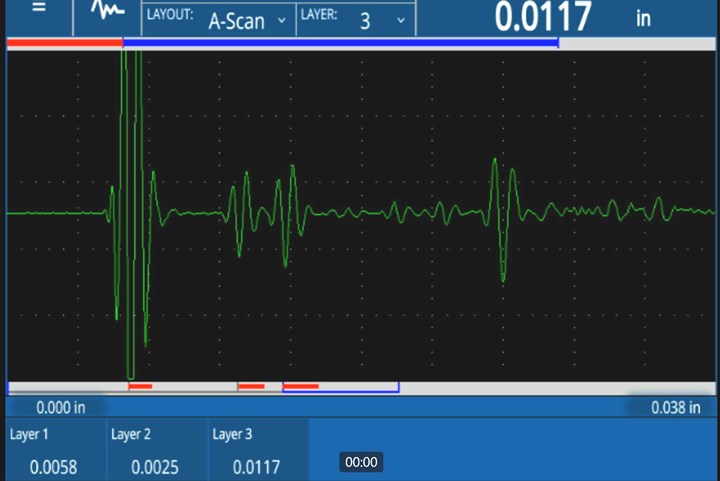
FIG 4 This is a waveform from a 50 Mhz measurement of a three-layer plastic container performed on the 72DL PLUS ultrasonic thickness gauge from Evident. High frequencies of 50 to 125 Mhz are recommended for measuring very thin plastic layers down to 0.001 in. or 0.025 mm.
The sample waveform in Figure 4 shows a 50 Mhz measurement of a three-layer plastic container comprising a 0.0058-in. (0.147-mm) outer structural layer, a 0.0025-in. (0.064-mm) barrier layer and a 0. 0117-in. (0.297-mm) inner structural layer. This test was performed using a 50 Mhz V2015-BB-RM transducer and the 72DL PLUS gauge from Evident.
About the Author: Preston Gutelius is a global product applications specialist for portable nondestructive testing (NDT) solutions at Evident Corp. (formerly known as Olympus Scientific Solutions) in Waltham, Massachusetts. In addition to managing the conventional transducer line, Gutelius now supports product applications for thickness gauges and conventional flaw detectors (ultrasonic, eddy current and bond testing), collaborating closely with sales, marketing, production and engineering teams. Contact: 781-419-3900; preston.gutelius@evidentscientific.com; evidentscientific.com.
Related Content
PHA Compound Molded into “World’s First” Biodegradable Bottle Closures
Beyond Plastic and partners have created a certified biodegradable PHA compound that can be injection molded into 38-mm closures in a sub 6-second cycle from a multicavity hot runner tool.
Read MoreWhat to Look for in High-Speed Automation for Pipette Production
Automation is a must-have for molders of pipettes. Make sure your supplier provides assurances of throughput and output, manpower utilization, floor space consumption and payback period.
Read MoreMedical Tubing: Use Simulation to Troubleshoot, Optimize Processing & Dies
Extrusion simulations can be useful in anticipating issues and running “what-if” scenarios to size extruders and design dies for extrusion projects. It should be used at early stages of any project to avoid trial and error and remaking tooling.
Read MoreMedical Molder, Moldmaker Embraces Continuous Improvement
True to the adjective in its name, Dynamic Group has been characterized by constant change, activity and progress over its nearly five decades as a medical molder and moldmaker.
Read MoreRead Next
Beyond Prototypes: 8 Ways the Plastics Industry Is Using 3D Printing
Plastics processors are finding applications for 3D printing around the plant and across the supply chain. Here are 8 examples to look for at NPE2024.
Read MoreLead the Conversation, Change the Conversation
Coverage of single-use plastics can be both misleading and demoralizing. Here are 10 tips for changing the perception of the plastics industry at your company and in your community.
Read More
