Tooling: The Science of Profile Die Balancing
In our last column, we discussed the five things profile extruders need to know about profile die design—proper land length, land-length ratio, drawdown, considerations for sensitive materials, and decompression.
In our last column, we discussed the five things profile extruders need to know about profile die design—proper land length, land-length ratio, drawdown, considerations for sensitive materials, and decompression (Plastics Technology, January 2010, p. 16 or online). Once you have taken all those five matters into account, you are ready to have your tool sent out for machining.
But your work doesn’t stop there. Sometimes modifications need to be made. Here are other issues to consider while the die is being built and once it’s ready to start running.
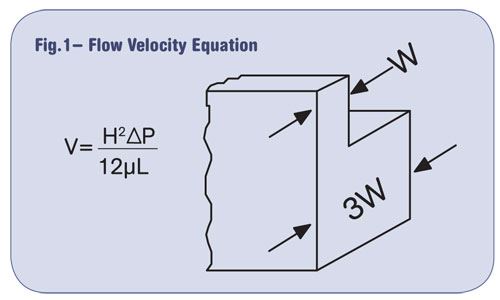
- It is imperative throughout the process that you stress to your toolmaker that the final wall thicknesses be within your specified tolerance of ±0.001 in. In reviewing the equation for flow velocity (Fig. 1), you can deduce that the flow velocity is a function of the wall thickness. An incorrect wall thickness will alter the flow, resulting in poor dimensional control as well as incorrect dimensions.
- It is important to start with the proper land-length ratio on cross sections having unequal wall thickness. Starting with only an equal land length on an unbalanced wall cross section will result in a wasted trial run that will not yield the desired dimensions. For example, if your profile has two different wall sections, one 0.060 in. thick and the other 0.090 in., and a 10:1 land-length ratio was selected, the lands should be adjusted to 0.600 in. and 0.900 in., respectively.
- Observe the flow exiting the die lip upon startup. A heavy undulating flow suggests a high-velocity area, and a strained flow though a thinner appendage will require further die tuning or balancing.
- During the first trial of the new die, it is important to shoot for the “power wall,” or the overall width dimension of the profile. After a short sample is saved and marked with an arrow depicting the direction of flow, make a simple observation before shutting the extruder down. Take a brass scraper, sever the extrudate at the die lip, and judge the flow velocity at full production running speed. The flow areas typically running faster are the heaviest areas. Save a 1-in.-long section to review with the toolmaker to discuss possible tool modifications. A severely bowed 1-in. section also indicates residual stress induced in the extrudate.
- If die modifications are necessary, you have three options to modify the tool to achieve the desired dimensions, remembering that the ultimate goal is to provide a uniform exit flow velocity across the entire die lip exit:
1. Drop the land length in the low-velocity areas.
2. EDM (via carbon or wire) flow channels to increase the flow to the feeder section.
3. Wire EDM the wall-section openings where flow is deficient or “starved.”
Any of the three methods is acceptable; however, I prefer the approach to be “steel safe.” Let me elaborate.
STEEL-SAFE TIP #1
Assume that the land-length ratio was properly executed (you should validate this) and the desired overall width dimension and wall thickness were achieved. Wire EDM the appendages to half the difference between desired and actual wall thickness. Wire cutting less than the actual difference is “steel safe.”
The output (Q) is derived from the equation:
Q= (wh³ΔP) ÷ (12µL) where w is the channel width, h is the channel height, µ is the melt viscosity, and P is the pressure.
You can see that the output flow is a function of the cube of the wall height or, in layman’s terms, the wall thickness. It is better to make two wire cuts than to overshoot the intended wall thickness, which would lead to a heavy appendage.
STEEL-SAFE TIP #2
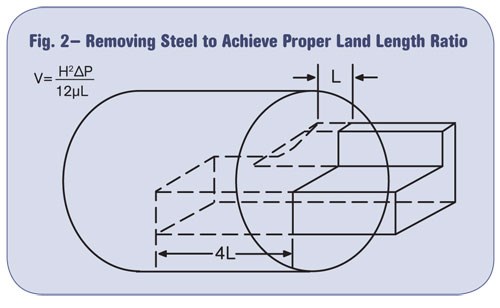
What if the land-length ratio was not properly executed? Then drop the land length by removing steel to reach the proper ratio (Fig. 2). This can be accomplished by ball end mills, tapered end mills, or carbon electrodes.
STEEL-SAFE TIP #3
Assume that you have achieved all critical dimensions. However, the extremities of your appendages taper in wall thickness and your flow velocities are slightly retarded at the edges. Wire EDM the leg extremities equally on each side of the wall.
POLISH AFTERWARD
In all cases, it is critical that after each die modification the surface be polished to remove the recast (residual rough surface) left from the wire burn, or mill marks from the mill, as the flow will be retarded from the rough surface. It also is assumed that the adapters and spreaders are designed to provide an equal cross-sectional mass-flow balance to the die lip, that the melt is kept under compression, and that a streamlined design approach was taken.
Wall-thickness differences should not be greater than 1.5:1 on standard profiles utilizing the land-length ratio approach. There are special approaches to solving die-design problems when the dimensional specifications exceed the 1.5:1 ratio.
About the Author
Daniel Cykana has dedicated his 40+-year career to profile extrusion. He worked in the Advanced Technology Group of Bemis Mfg. Co., Sheboygan Falls, Wis., for 32 years, specializing in die and product design and processing. Contact Danielcykana@aol.com or (920) 918-3250 or extrusionprocessing.com.
Related Content
Why Shoulder Bolts Are Too Important to Ignore (Part 1)
These humble but essential fasteners used in injection molds are known by various names and used for a number of purposes.
Read MoreHow to Start a Hot-Runner Mold That Has No Tip Insulators
Here's a method to assist with efficient dark-to-light color changes on hot-runner systems that are hot-tipped.
Read MoreHow to Design Three-Plate Molds, Part 1
There are many things to consider, and paying attention to the details can help avoid machine downtime and higher maintenance costs, and keep the customer happy.
Read MoreHow To Design Three-Plate Molds – Part 4
There are many things to consider, and paying attention to the details can help avoid machine downtime and higher maintenance costs — and keep the customer happy.
Read MoreRead Next
See Recyclers Close the Loop on Trade Show Production Scrap at NPE2024
A collaboration between show organizer PLASTICS, recycler CPR and size reduction experts WEIMA and Conair recovered and recycled all production scrap at NPE2024.
Read MorePeople 4.0 – How to Get Buy-In from Your Staff for Industry 4.0 Systems
Implementing a production monitoring system as the foundation of a ‘smart factory’ is about integrating people with new technology as much as it is about integrating machines and computers. Here are tips from a company that has gone through the process.
Read More


