
Use This Check List to Get Your Machine Properly Installed
Whether you bought a new machine or one that’s been refurbished, you need to prepare for installation so that it can be executed as seamlessly as feasible. Here some advice.
.jpg;width=70;height=70;mode=crop;format=webp)


Buying a new or used injection molding machine is always an experience. Often there is a time crunch to get it ordered and delivered. A non-repairable breakdown, unexpected new business, a new rush job for your best client, and other circumstances can make for near panic to get a new or used machine installed and running as soon as possible.
Finding time to make a complete list of the machine specifications needed, canvasing the suppliers for what is available by your target date, and negotiating price can make almost anybody frantic. Once the order is placed, the panic subsides a bit and, unfortunately, many molders do not start planning right then for the installation. All they can think about is the price and worry about paying it off. Do not miss the opportunity to plan and prepare for the installation as this is a significant time- and money-saving opportunity. Installation is no simple task and there are a multitude of details. What are they and how do you get a handle on them before the machine arrives?

The list below is long and likely is missing a few items. One aspect not covered in the list but highly recommended is that you should set this machine up to handle as many different molds as possible. Why? Many new, “sure-bet” projects die before or shortly after startup. You do not want your floor space taken up by expensive equipment you cannot use. Custom or captive molder, you must build in adaptability.
Set your new machine up to handle as many different molds as possible.
Start by getting as many as the details you can. Don’t wait until the machine is scheduled for delivery. In fact, check regularly on the machine-build status, as new questions are likely to arise. Many machines sit idle because some small detail was overlooked or changed. Machine downtime is expensive. While no one cannot predict every machine installation requirement, here is a checklist to get you stated.
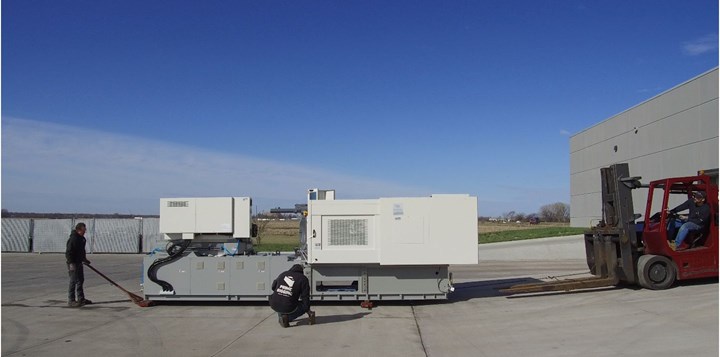
Put together an action play to make sure your machine installation is a seamless as possible. Photo: Garner Industries.
- Obtain the machine’s specification sheet, which will have all of the dimensions and weight of a “standard” machine. Will your machine have anything different?
- Make sure you have enough room for:
- The molding machine;
- Box/bags/line feeder for material, resin and color;
- Auxiliary equipment:
- Mold temperature controllers;
- Granulator;
- Hot-runner controller—and make sure each mold has a diagram of the drops and wiring;
- Anything else you want to add.
- Auxiliary equipment for the operator, degating, sonic welder, etc.
- An operator or two for assembly or perhaps something else;
- Easy access to the mold for both operator and process technician—i.e., platform or step or perhaps something else;
- A work table;
- Scrap bins;
- A ladder to access the hopper loader;
- Fork-lift truck;
- Automation equipment, robot, assembly.
- Do not use floor space near an area of the machine that will see routine maintenance or troubleshooting. If you must put something near the control cabinet, make sure everything has quick disconnects and on wheels for easy access.
- Check the floor’s weight rating.
- Check ceiling area for obstructions to the robot and crane for mold installation/removal.
- For hydraulic and hybrid machines, check type and quantity of oil required.
- For servo-hydraulic machines, order at least two extra filters, as the onet filter will often plug in a day or two.
- Check power requirements for motor and heater bands. Is a step-down transformer required? Do you need a new electrical panel? Discuss with electrician before arrival.
- Check power requirements and outlets for temperature controllers, hot-runner controller, robot, oil heater, material dryer, material loader, color feeder, conveyor, lighting, as well as extra 110V outlets on both the operator and non-operator side for various manufacturing, repair or inspection equipment.
- Check routes and connections for power, water, chiller lines and drains. Order appropriate fittings, tubing, clamps etc. Include water filters with inlet and outlet pressure gauges. Pressure differential will tell when filter clogs. This is critical to keep feed throat, mold, and other cooling channels clean and effective. It’s rarely done, but inexpensive (less than $200).
- Is an adapter plate required to connect a sprue picker or robot to the fixed platen?
- Is an adaptor plate required for a hopper magnet or color feeder/blender?
- Ensure proper venting around nozzle-tip area for purging resins that give off noxious fumes, such as PVC or acetal.
- Ensure space and power requirements for things like boxes, box labels, part labels, tape dispenser, poly bags, bag sealers, weigh scales, inspection lights, and paperwork (work orders, quality control documents, etc.).
- Order and set up mold-temperature controllers with gpm (lpm) flow monitoring and pressure sensing on inlet and outlet. Order and install appropriate cooling for machine, mold and auxiliaries. Remember all lines to the mold must carry the same temperature and volume of water for every run. That is, each machine must have a mechanism (usually a mold-temperature controller with flow meters and pressure gauges to push the same volume and temperature of cooling/heating agent every time the mold is in the press.
- Obtain necessary quality-control equipment.
- Ensure there is a mechanism to call for help.
- Review space and power requirements for boxes, box labels, part labels, tape dispenser, poly bags, bag sealers, weigh scales, inspection lights, and paperwork such as work orders, quality control documents, etc.
- Consider where to locate and mount processor supplies, such as mold preservative, ejector-pin lubricant, brass tools, purge bucket, ejector- knockout bars, propane torch, nozzle, and sprue-bushing radius gauges, etc. Location of each should be labeled so anyone can easily see what is missing. Yes, these tend disappear, but how much time and money is lost and tool damage done because the processor uses a drywall screw instead of brass for digging out a stuck sprue or section of a part. How much does it cost to repair the mold?
- Obtain proper number and size of mold clamps, bolts and spacers.
- Arrange for proper venting for noxious fumes from resin like PVC, acetal, fluoropolymers, etc.
- Consider raising the machine a few extra inches off the floor so folks can get a mop, vacuum, or broom under it for cleaning purposes. Make it easy to clean and it might get done.
- Will the operators need any special equipment to inspect, assemble, label, trim, box or other function?
- Have I missed anything you think is important?
About the Author: John Bozzelli is the founder of Injection Molding Solutions (Scientific Molding) in Midland, Mich., a provider of training and consulting services to injection molders, including LIMS, and other specialties. Contact john@scientificmolding.com.


Related Content

Fundamentals of Polyethylene – Part 6: PE Performance
Don’t assume you know everything there is to know about PE because it’s been around so long. Here is yet another example of how the performance of PE is influenced by molecular weight and density.
Read More
Is There a More Accurate Means to Calculate Tonnage?
Molders have long used the projected area of the parts and runner to guesstimate how much tonnage is required to mold a part without flash, but there’s a more precise methodology.
Read More
Optimizing Pack & Hold Times for Hot-Runner & Valve-Gated Molds
Using scientific procedures will help you put an end to all that time-consuming trial and error. Part 1 of 2.
Read More
Know Your Options in Injection Machine Nozzles
Improvements in nozzle design in recent years overcome some of the limitations of previous filter, mixing, and shut-off nozzles.
Read MoreRead Next

INJECTION MOLDING: How to Specify an Injection Molding Machine
With the market percolating, more molders are looking at new presses. This series will discuss what you should consider before writing a check, beginning with the clamping unit.
Read More
How to Mount an Injection Mold
Five industry pros with more than 200 years of combined molding experience provide step-by-step best practices on mounting a mold in a horizontal injection molding machine.
Read More
For PLASTICS' CEO Seaholm, NPE to Shine Light on Sustainability Successes
With advocacy, communication and sustainability as three main pillars, Seaholm leads a trade association to NPE that ‘is more active today than we have ever been.’
Read More