In Search of a Universal Setup Sheet
Duplicating a process from one injection machine to another is frustrating and time-consuming. Develop a mold-specific setup sheet that works in all kinds of presses by differentiating plastic parameters from machine parameters and duplicating those plastic conditions from machine to machine, electric or hydraulic.
Transferring a process from one machine to another is a daunting task. There are a multitude of parameters to set, and the setup sheet for one machine will not necessarily work on a different machine. Once you get a press to start making good parts, you make up a setup sheet specifically for that mold in this machine. But this setup gets repeated every time the mold is scheduled into a different machine. The hassle, time and costs are significant.
A “universal” setup sheet, transferrable to any machine (electric or hydraulic), must be based on plastic pressures and other values, not machine pressures and settings.
So how come a setup sheet does not apply to all machines? Before we answer this question let’s take a step back and look at the big picture. We have a large and mature processing industry. It might be the third largest manufacturing sector in the U.S. Molding shops use setup sheets for their processes. Since the industry is large and we all are trying to document the process and make it repeatable, why don’t we have a standard, universal setup sheet? We all have the same issues. Think of the scope of this subject: If we estimate that there are 16,000 molding shops, my bet is there are 16,001 different setup sheets. Does this make sense?
No, and there is even more to the story. How easy are these setup sheets to fill out, read and interpret? Are they up to date? Who is responsible for their accuracy? What happens when a machine is replaced with a new machine? Worse yet, what if an old hydraulic machine is replace with a new all-electric one? How do processors handle all of this? Bottom line: The money lost due to excessive documentation, downtime, part variations, arguments between processors, quality control, scheduling, management, etc. is huge.
If we estimate that there are 16,000 molding shops, my bet is there are 16,001 different setup sheets. Does this make sense?
Is there another approach? Is it possible to develop a setup sheet that is mold-specific and not machine-specific, so you could use the same setup sheet on any press? That would give you one setup sheet per mold, not per press. Think of the reduction of documentation, errors etc. This may sound crazy, but think of the advantages. There would be less paperwork, better process consistency on different machines, and perhaps quicker startups. Is this possible?
Yes, but it is a complex issue, and attempting to provide all the answers in one article is not realistic. So let’s start with some ground rules. With these in place perhaps you will see it is not only possible, but there are already shops that are using a “universal” setup sheet with great success.
First ground rule is: We work in parameters and units that are common to all machines. Simply stated, the strategy is to differentiate “plastic” from “machine” parameters and to duplicate “plastic” conditions from machine to machine, whether electric or hydraulic. Sounds simple enough, but it does require some changes. Focus on this concept: To produce identical parts machine-to-machine, it is critical to duplicate the plastic parameters as you move a mold from one press to another.
In documenting a process there are four plastic variables, as stated many years ago by Paulson Training Programs:
- Plastic pressure.
- Plastic flow rate.
- Plastic temperature.
- Plastic cooling.
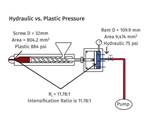
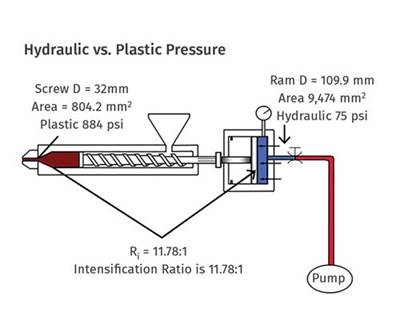
The challenge is to document the plastic parameters of each process, not machine parameters. We will start with plastic pressure. Note: plastic pressure and hydraulic pressure are not the same. Hydraulic pressure is the pressure in the hydraulic injection cylinder, and plastic pressure is the pressure in the nozzle of the machine—they are related but not the same.
To produce identical parts machine-to-machine it is critical to duplicate the plastic parameters as you move a mold from one press to another.
So how do we get plastic pressure, a plastic parameter, from hydraulic pressure, a machine parameter? Hydraulic pressure is the most common pressure value documented for hydraulic machines. My guess is that roughly 80% of the processors and setup sheets use hydraulic pressure today. Hydraulic pressure is a machine-specific parameter. To make the same part on different machines you cannot simply duplicate the hydraulic pressures unless the machine accidentally happens to have the identical intensification ratio. If you are working and documenting hydraulic pressures you are doomed to failure since most hydraulic machines have different intensification ratios. You must convert hydraulic pressure to plastic pressure via the intensification ratio, which is the ratio of the functional hydraulic ram area to the area of the screw.
Sorry, not all machines do not have 10:1 intensification ratio; that rule of thumb dates back to the 1970s. The range today for stock machines is around 8:1 to 40:1. It is this plastic pressure in the nozzle that fills the cavity and makes the part, not the hydraulic pressure. The only variation is with electric machines; they do not have hydraulic pressure and must report/use plastic pressure. They actually measure plastic pressure via a transducer. It is interesting that many electric machine manufacturers confuse the issue by displaying the plastic pressure on the machine controller via a number and a multiplier. For example, 1200 psi x 10 or 12k (“k” meaning kilo or 1000), hence the 1200 x 10 or 12 k is really 12,000 psi plastic pressure.
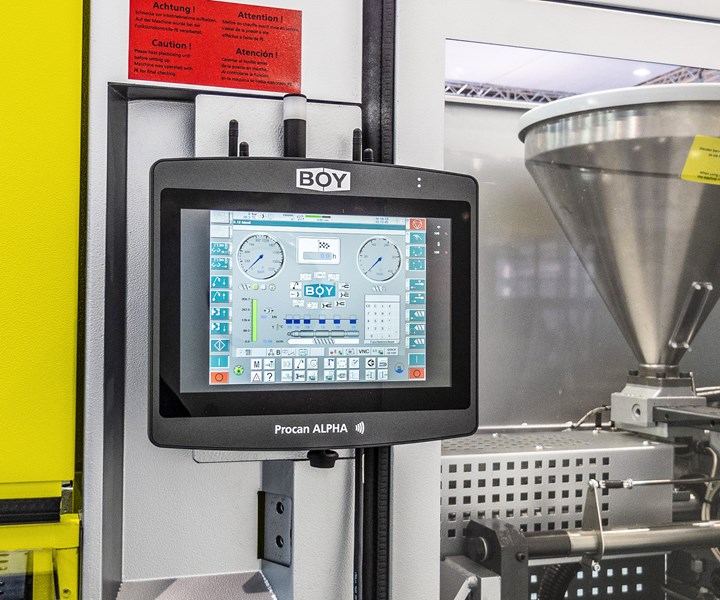
Note that most hydraulic machines can report plastic pressure on the screen of the controller. Look for a page that allows you to select the units you prefer. It may be buried in some sub-page but it will allow the operator to pick plastic pressure in the units they are familiar with; such as bar or psi. In this case the machine reads the hydraulic pressure from a hydraulic transducer then multiplies it by the machine’s intensification ratio and reports plastic pressure to the control screen. Take the time to find this page or ask the machine supplier’s technical representative to walk you through it.
If this is not available on your machine, you will need to make up a table that converts hydraulic pressure to plastic pressure via use of the machines intensification ratio. Print it, laminate it and post it on the machine near the controller. It allows all to translate hydraulic pressure to plastic pressure in less than 20 sec. This chart will save time, frustration and big money.
In short we have started on the path to a “universal” setup sheet, functional for any appropriate machine for a given mold. Using plastic pressure is a good start. Why? Filling the part should take the same plastic pressure machine-to-machine (though the nozzle tip must be identical). Plus, second-stage or pack-and-hold will use the same plastic pressure packing the part(s) to the same cavity pressure. This is a good start to making identical parts on different machines. Next is plastic flow rate—velocity vs. fill time, which is the machine variable? Which is the plastic variable? Lots of numbers to deal with, but the true-north path is plastic variables and not machine variables.
ABOUT THE AUTHOR John Bozzelli is the founder of Injection Molding Solutions (Scientific Molding) in Midland, Mich., a provider of training and consulting services to injection molders, including LIMS, and other specialties. Contact john@scientificmolding.com.
Related Content
Why Shoulder Bolts Are Too Important to Ignore (Part 1)
These humble but essential fasteners used in injection molds are known by various names and used for a number of purposes.
Read MoreThe Fundamentals of Polyethylene – Part 2: Density and Molecular Weight
PE properties can be adjusted either by changing the molecular weight or by altering the density. While this increases the possible combinations of properties, it also requires that the specification for the material be precise.
Read MoreHow to Select the Right Cooling Stack for Sheet
First, remember there is no universal cooling-roll stack. And be sure to take into account the specific heat of the polymer you are processing.
Read MoreBack to Basics on Mold Venting (Part 2: Shape, Dimensions, Details)
Here’s how to get the most out of your stationary mold vents.
Read MoreRead Next
Injection Molding: Process Documentation Is Crucial to Making ‘Identical’ Parts
Use a machine/mold setup sheet to document plastic parameters and use them on any acceptable machine into which the mold is placed.
Read MoreUnderstanding Intensification Ratio
A first step in taking the “art” out of molding.
Read MoreUnderstanding Machine vs. Plastic Variables
Why setup sheets, DOEs, validations, etc. may not yield the results they should.
Read More
.jpg;width=70;height=70;mode=crop)

