Part 1: How to Properly Size Gates, Runners and Sprues
Get the sprue, runner and gate sizes close to ideal the first time around—without spending a lot of time on extremely complicated formulas.
It doesn’t matter whether you are going to run a flow analysis or not. At some point, you will have to specify an initial sprue, runner and gate size. These sizes are typically nothing more than an educated guess based on someone’s experience, or sizes that simply “look right” to the programmer or designer.
If you run a flow analysis, the software program can tell you if any of these flow channels are too large or too small. Then you tweak their sizes and run the simulation again. If you are not running a flow analysis, the first mold sample can tell you if they are too large or too small. Then you can tweak the steel-safe sizes and sample the mold again. This month’s column will discuss how to get the sprue, runner and gate sizes closer to being ideal the first time around—without spending a lot of time on extremely complicated formulas.
Step 1: Determine the Material Viscosity
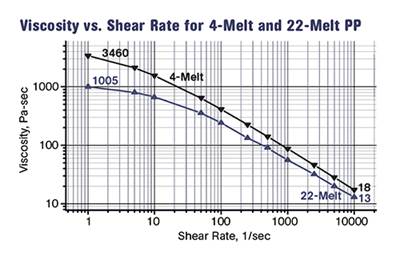
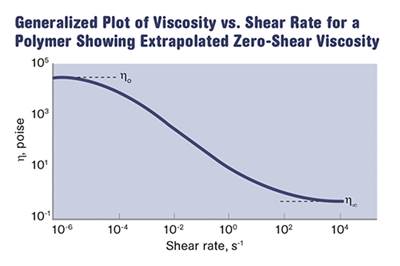
Does the material flow like water or like molasses, or somewhere in-between? That’s actually a loaded question, because it often depends on the processing parameters. The subject of melt viscosity is best left to fellow Plastics Technology columnist, materials expert Mike Sepe, and his 10-part series on Melt Flow Rate Testing. Suffice it to say, the melt-flow index stated on a material data sheet is not a very reliable indication of how viscous a material is or not, because it does not take into account shear thinning. Shear thinning is when the material becomes less viscous due to frictional heat during injection. For example, a polyethylene with a 10 MFI is probably not going to flow the same as a polycarbonate with the same 10 MFI rating.
Fortunately, having just a general idea of the viscosity of the material is sufficient for approximating the initial gate, runner and sprue sizes. If you are not sure how viscous a particular material is, ask someone in the trenches.
Step 2: Determine the Gate Dimensions
The ideal gate size is based on the wall thickness of the part, the volume of the part, the material viscosity under processing conditions, the flow rate of the material going through the gate, and the flow length from the gate to the end of fill. Let’s first discuss a typical rectangular edge gate, which in many ways also applies to lap, chisel, tapered, fan, film, curtain, ring, disk and diaphragm gates. Edge gates have three components: depth, width and land length.
The ideal gate size is based on many variables.
Gate Depth: The gate depth is an extremely critical dimension and is the first dimension that you need to determine. It defines when the material in the gate will freeze. If it is too shallow, it will freeze off too early and prevent additional material from entering the cavity as the molten material cools and shrinks. The part will then be underpacked, which can cause sink, warp, voids, poor surface finish and dimensional inconsistencies.
Determine the gate depth first.
If the gate is too deep, the packing phase will take longer than necessary because you typically wait for the gate to freeze before beginning to retract the screw. Otherwise, the material can flow backwards through the gate and into the massive runner, which can cause a void in the part.
Therefore, determining the gate depth is a balancing act. The chances of finding that sweet spot the first time around is highly unlikely; and unfortunately, the first iteration is often accepted or processed-around during production. It’s best to start off with the gate depth on the shallow side. If the injection pressure is excessively high going through the gate, or if the parts have some sink or burn marks, the depth can be increased because it is “steel safe.”
I typically start with a gate depth of 60% to 70% of the part’s wall thickness at the gate for high-viscosity or highly shear-sensitive materials, such as acrylic or rigid PVC; 50% to 60% of the part’s wall thickness for medium-flow materials; and 40% to 50% for low-viscosity, low-shear-sensitivity materials, such as polyethylene or nylon. Use the lower percentages for thinner-walled parts and the higher percentage for thicker-walled parts, because thicker parts need more time to pack out. Some people suggest making the gate depth relative to the size (actually the volume) of the part. I disagree. The volume of the part should dictate the width of the gate, or the number of gates required—not the depth of the gate.
I once had a part where the geometry was such that the gate depth was 0.200 in., but the gate width was only 0.040 in. In effect, it was a typical edge gate rotated 90°. It left a vertical, rectangular gate scar, as opposed to a horizontal one. The point I am trying to make here is that the narrower dimension will control the gate-freeze time and the wider dimension will control the flow length—regardless of the orientation.
Gate Width: There is an old rule of thumb that says the gate width should be twice the gate depth. I’d like to know who came up with this rule. The decision on how wide to make a gate should be based on the flow length into the cavity, the flow rate through the gate, the flow speed through the gate, and the volume of the part.
I like to think of a gate the same way I think of a vent in a cavity. The vent depth is a relatively fixed value based on the viscosity of the material. The gate depth is a relatively fixed value based on the wall thickness of the part. The vent width is based on how much and how fast the air inside the cavity needs to go out. Similarly, the gate width should be based on how much material needs to go in and how fast. You don’t want a vent, or a gate, to be overly restrictive, which would cause an increase in injection pressure, difficulty in filling the part, high shear, and a host of other problems.
Let’s discuss the importance of how fast material goes through a gate and into a cavity. Any good processor knows that by slowing down the injection velocity you can reduce the amount of shear burning or jetting into a cavity. Reducing the injection velocity obviously reduces the speed of the material going through the gate. It is a common misconception that you should increase the depth of a gate when you have a burning or jetting problem.
While it’s true that making the gate deeper will reduce a burning or jetting problem, so will making the gate wider. When you increase either the gate depth or the gate width, you increase the flow area. The larger the flow area, the slower the speed of the material going through the gate. As previously stated, the gate depth is based on the part’s wall thickness and is a relatively fixed value. The gate width is not a fixed value and is the more logical adjustment. The advantage of increasing the flow area is that you shouldn’t need to reduce the injection velocity to prevent shear burning or jetting, and the higher velocity is often required to fill the part.
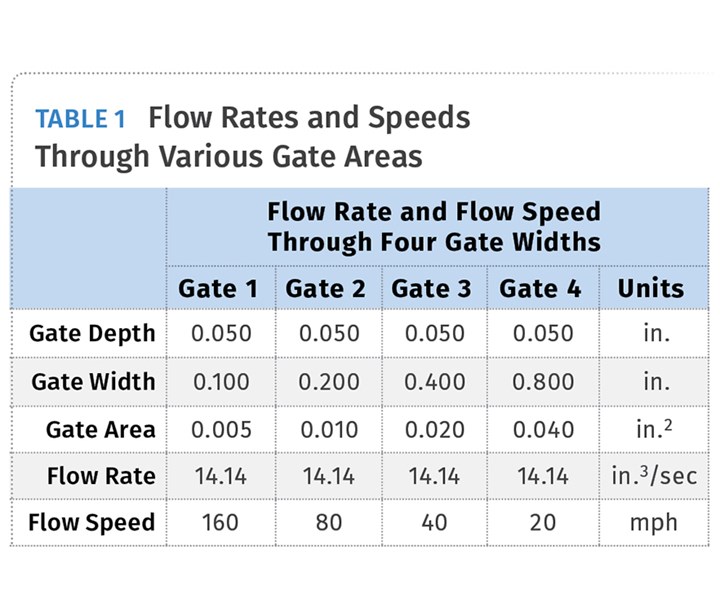
Let me put the issue of gate area vs. material speed going through a gate into more perspective. Let’s say you have a single-cavity mold, fed by an edge gate off the primary runner. Let’s assume the molding machine has a 3-in. diam. barrel and you are injecting at 2 in./sec. The material flow rate through the sprue bushing, primary runner and gate is going to be 14.1 in.3/sec.
Table 1 shows what happens to the speed of the material going through four different gate widths. All four gates have the same 0.050-in. depth, but their widths range from 0.100 to 0.800 in. Notice how gate Number 1 has a gate width twice the gate depth, which follows that old rule of thumb. That material will go through the gate at 161 mph. If the material is shear sensitive, you will probably have a burning issue. Every time you double the gate width you cut the speed of the material going through the gate in half. Also notice that the flow rate, or volume of material going into the cavity, never changes regardless of the gate area. Only the speed changes.
With the exception of the size of the gate scar and the difficulty in cutting the runner off the part, there is usually no harm in making a gate wider than necessary. One advantage of a wide gate is that the pressure required to push the material through the gate will decrease as the gate area increases. Sometimes there is more than one exception to every rule. For example, if the gate width is too wide, the speed of the material going through the gate can be so slow that it starts to freeze off before the part is packed out. This condition rarely happens with deep gates filling thick parts, but it is a common problem for very wide gates filling thin parts, such as is the case with fan, film, curtain, ring, disk or diaphragm gates.
For example, let’s say you have a 5-in. diam. cylindrical part with an internal disk gate. A 5-in. diam. part has a circumference of 15.7 in. Now that’s a “wide” gate. In the previous example, where the gate depth was 0.050 in., the flow through this ring gate would be a mere 1 mph. That’s why these types of gates often have to be deeper than anticipated in order to prevent premature freeze-off.
Now let’s take a look at what happens in multi-cavity molds. Let’s stick with the previous example where the flow rate through the sprue bushing was 14.1 in.3/sec. That flow rate of material going through the sprue bushing is cut in half when it splits in half to feed the two primary runner branches. The flow rate splits in half again at the secondary runner branches, and again at the tertiary, quaternary and quinary branches. By the time it gets to the gate, the volumetric flow rate can be extremely small. Table 2 is an example of how the flow rate and the flow speed change based on the number of cavities.
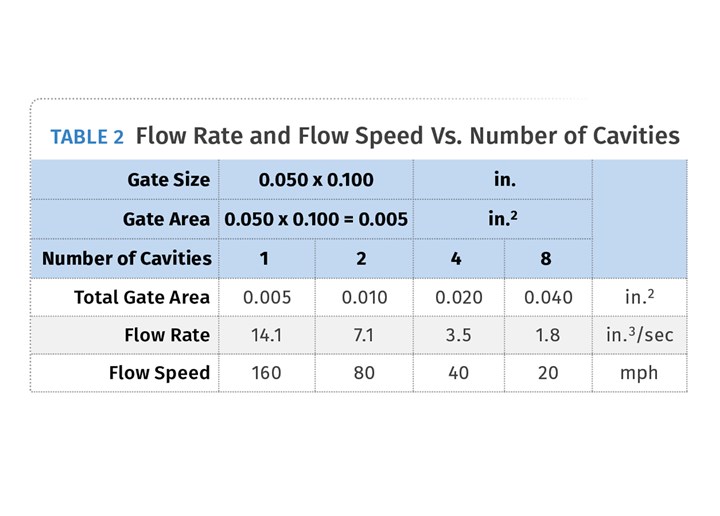
Flow rate and flow speed are cut in half at every runner branch.
The point I am making here is, if you’re injecting 14.1 in.3/sec of material into a mold, don’t think the material is going into each cavity of a multi-cavity mold at the same 14.1 in.3/sec. In fact, for a 32-cavity mold, the flow rate in this example drops down to 0.45 in.3/sec. There is a direct correlation between the number of cavities and the desired material flow rate from the screw. Another reason I am mentioning this is to show you what happens if there is a problem with the mold and you have to shut off a cavity or two. Changing your shot size is not the only process change you should make. You may need to reduce the injection velocity, because the speed and flow rate of material going into the open cavities just increased. That will cause the material viscosity to decrease.
So, how wide should an edge gate be? Since there are so many variables, it is impossible to make a recommendation on how wide to make a gate. A flow analysis is a very useful tool for that determination. You can also determine whether the gate is wide enough during the initial mold trial, by performing a pressure-loss study.
If you had a small, thin part, such as a polypropylene wall anchor, the gate width could be the same size as the gate depth. There wouldn’t be a need to make it any wider, despite what any rule of thumb says. Conversely, when I was a teenager, my father molded a 16 × 24 in. acrylic panel with an edge gate that was 24 in. wide. That is called a “curtain” gate, which is technically just an extremely wide edge gate.
One industry expert recommends using the following formula to approximate the initial gate width:
W = n × (√A )÷ 30,
where W is the gate width in inches, n is a material constant, and A is the surface area of the cavity in square inches (not the projected area). The material constant n is 0.6 for free-flowing materials, such as PE or PS; 0.7 for slightly more viscous materials, such as acetal or PP; 0.8 for even more viscous materials, such as cellulose acetate; and 0.9 for highly viscous materials, such as rigid PVC.
As an example, let’s say you have a lid for a box that measures 10 × 5 × 2 in. The wall thickness is 0.100 in. and the material is PVC. The surface area of this lid is= (2 × 10 × 2) + (2 × 5 × 2) + (10 × 5) = 110 in2. The gate width should therefore be: W = 0.9 × ( √110) ÷ 30 = 0.314 in. I believe this formula is a little on the conservative side. By that I mean that the gate-width calculations are a little wider than what I would use. Still, it is an excellent “reality check” on what you think the width should be, and 100 times more accurate than the old rule of thumb.
About the Author: Jim Fattori is a third-generation molder with more than 40 years of experience in engineering and project management for custom and captive molders. He is the founder of Injection Mold Consulting LLC in Pennsylvania. Contact: jim@injectionmoldconsulting.com;
injectionmoldconsulting.com
Related Content
How to Design Three-Plate Molds, Part 1
There are many things to consider, and paying attention to the details can help avoid machine downtime and higher maintenance costs, and keep the customer happy.
Read MoreHow to Select the Right Tool Steel for Mold Cavities
With cavity steel or alloy selection there are many variables that can dictate the best option.
Read MoreIs There a More Accurate Means to Calculate Tonnage?
Molders have long used the projected area of the parts and runner to guesstimate how much tonnage is required to mold a part without flash, but there’s a more precise methodology.
Read MoreGot Streaks or Black Specs? Here’s How to Find and Fix Them
Determining the source of streaking or contamination in your molded parts is a critical step in perfecting your purging procedures ultimately saving you time and money.
Read MoreRead Next
Melt Flow Rate Testing–Part 1
Though often criticized, MFR is a very good gauge of the relative average molecular weight of the polymer. Since molecular weight (MW) is the driving force behind performance in polymers, it turns out to be a very useful number.
Read MoreMelt Flow Rate Testing – Part 2
To fully appreciate the strengths and weaknesses of the melt-flow-rate (MFR) test it is important to know something about the way the test is performed.
Read MoreMelt Flow Rate Testing—Part 3
There is a well-established relationship between something called the weight-average molecular weight of a polymer and a parameter known as the zero-shear viscosity.
Read More

